background image

English   

- 55 -

  Inserting Batteries in the 
Remote Control Handset

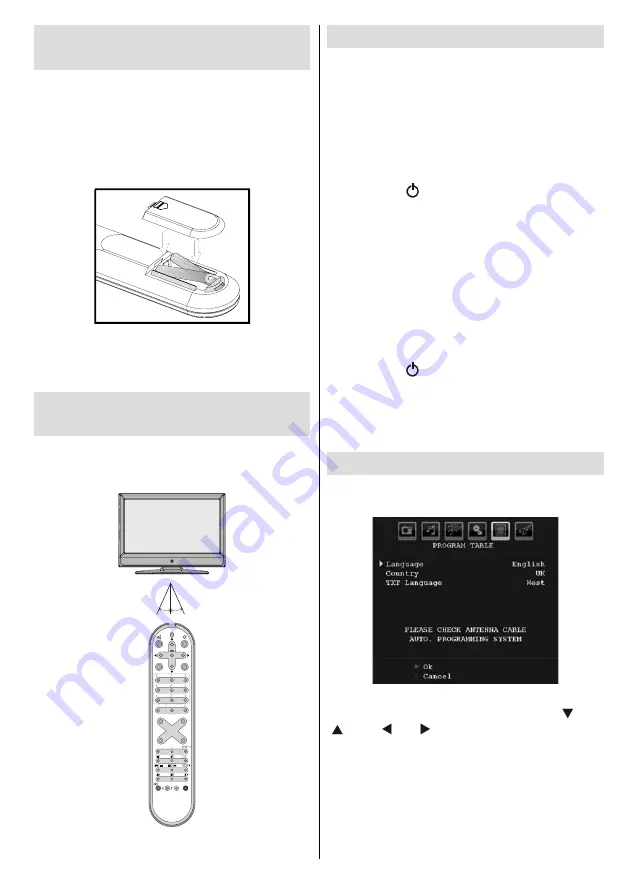
  • Remove the battery cover located on the back 

of the handset by gently pulling backwards 
from the indicated part.

  • Insert two  

AAA/R3

  or equivalent type batteries 

inside. Place the batteries in the right directions 
and replace the battery cover. 


  Note : Remove the battery from remote control 
handset when it is not to be used for a long period. 
Otherwise it can be damaged due to any leakage of 
batteries. 

   Operating Range for the 
Remote Control

  • Point the top of the remote control toward the 

LCD TV’s remote sensor LED while pressing 
a button. 

V

-

+

-

+

P

2

3

4

5

6

8

9

7

0

OK/

SELECT

P<P/SWAP

-/--

PP

I    I   I   

-

TV

AV

GUIDE

WIDE

EXIT

ABC

DEF

GHI

JKL

MNO

PQR

STU

VWX

YZ

M

DTV

1

SOURCE

30

30


 Remote range is approximately 7m/23ft. 

   Switching the TV On/Off

  To Switch the TV On

  • Connect the power cord to the 220-240V AC 

50 Hz.  

 • Press STANDBY switch. Then the standby 

LED lights up. 

 • To switch on the TV from standby mode 

either:

  • Press the “

” button,  

P+

  /  

P-

  or a numeric 

button on the remote control. 

 • Press the  

-P/CH 

 or  

P/CH+ 

 button on the TV. 

The TV will then switch on. 

  Note : If you switch on your TV via PROGRAMME 
UP/DOWN buttons on the remote control or on the 
TV set, the programme that you were watching last 
will be reselected. 

 By either method the TV will switch on. 

 To Switch the TV Off

  • Press the “

” button on the remote control 

or press the STANDBY switch, so the TV will 
switch to standby mode. 

  •  

To power down the TV completely, unplug 
the power cord from the mains socket.


First Time Installation

When the TV is switched on for the fi rst time, the 
following menu screen will be displayed.

S e l e c t   y o u r   C o u n t r y ,   L a n g u a g e 
a n d   T X T   l a n g u a g e   b y   u s i n g   “

”   o r 

“ ” and “ ” or “ ” buttons. 

Press OK or RED button to continue.

To cancel, press the BLUE button.

For more information on this process, see 
“Install Menu” section.

Note: Do not turn off the TV while initializing fi rst time 
installation.

A02_[GB]_SSM_MB35_26855W_1063K_ANALOG_BRONZE2_10062371_50152966.indd   55

08.12.2009   10:24:22

Summary of Contents for TL-26LC855

Page 1: ...TFT FARBFERNSEHGERÄT MIT FERNBEDIENUNG TFT COLOR TELEVISION WITH REMOTE CONTROL TFT TELEVISEUR COULEUR A TELECOMMANDE BEDIENUNGSANLEITUNG OPERATING INSTRUCTIONS MODE D EMPLOI TL 26LC855 ...

Page 2: ...nstellung der Lautstärke 19 Programmauswahl Vorheriges oder nächstes Programm 19 Programmwahl Direktzugriff 19 Navigieren im TV Menüsystem 20 Menüsystem 20 Menü Bild 20 Modus 20 Helligkeit Kontrast Farbe Schärfe Farbton 20 Farbtemperatur 20 Rauschreduktion 20 Filmmodus 21 Spielemodus optional 21 Bildzoom 21 Zurücksetzen 21 Speichern 21 Menü Ton 21 Lautstärke 21 Equalizer 21 Balance 22 Kopfhörer 22...

Page 3: ...anorama 29 14 9 29 Kino 30 Untertitel 30 Zoom 30 Teletext 30 Pflege des Bildschirms 31 Bleibendes Bild 31 Kein Strom 31 Schlechte Bildqualität 31 Kein Bild 31 Ton 31 Fernbedienung 31 Eingabequellen 31 Anhang A Typische Anzeigemodi PC Eingang 32 Anhang B AV und HDMI Signalkompatibilität Ein gangssignaltypen 33 Anhang C Unterstützte DVI Auflösungen 34 Anhang D Pinbelegung 35 Pinbelegung SCART Anschl...

Page 4: ...le Sendersuche vorwärts und rückwärts Einschlaf Funktion Kindersicherung Automatische Stummschaltung wenn keine Übertragung stattfindet NTSC Wiedergabe PIP PAP PAT Funktionen AVL Automatische Lautstärkebegrenzung Wird kein gültiges Signal entdeckt schaltet sich das Gerät nach 5 Minuten automatisch in den Standby Modus PLL Frequenzsuche PC Eingang Plug Play für Windows 98 ME 2000 XP Vista Audio Aus...

Page 5: ...el muss so verlegt werden dass niemand auf das Kabel treten kann Beschädigungen am Netzkabel können zu Bränden oder Stromschlägen führen Wenn das Netzkabel beschädigt ist und ausgetauscht werden muss darf dies nur durch qualifizierte Personen erfolgen Feuchtigkeit und Wasser Verwenden Sie dieses Gerät nicht in feuchter oder dunstiger Umgebung vermeiden Sie das Badezimmer die Spüle in der Küche ode...

Page 6: ...l enthält eine geringe Menge Quecksilber Bitte beachten Sie die örtlichen Vorschriften bei der Entsorgung Informationen für Benutzer in Ländern der Europäischen Union D i e s e s S y m b o l a u f d e r Verpackung zeigt an dass das elektrische oder elektronische G e r ä t a m E n d e s e i n e r Lebensdauer getrennt vom normalen Haushaltsmüll entsorgt werden muss Innerhalb der EU gibt es getrennte...

Page 7: ...mate wiedergegeben wird Hinweis Dieses Gerät ist nicht für eine längerfristige Wiedergabe von Standbildern einschließlich Logos Videospielen Computerbildern Teletext und nicht bildschirmfüllende Formate geeignet Durch die Wiedergabe von Standbildern Logos Videospiele Computerbilder Teletext und nicht bildschirmfüllende Formate erzeugte permanente Nachbilder können nicht mehr rückgängig gemacht wer...

Page 8: ...en im TXT Modus PAP 15 Modus Index Seite Keine Funktion 16 Anzeigen im TXT Modus Von TV auf 17 PC Modus umschalten Blau Installationsmenü 18 Gelb Menü Funktion 19 Grün Menü Bild 20 Rot Menü Ton 21 Vergrößern im TXT Modus Bildgröße 22 Halten im TXT Modus PIP Position 23 Teletext 24 Persönliche Einstellungen 25 Lautstärke 26 Lautstärke 27 Letztes Programm Swap 28 Menü 29 Cursor nach links 30 Stummsc...

Page 9: ... TV und Bedientasten FRONTANSICHT RÜCKSEITE SEITENANSICHT Standby Taste 1 TV AV Taste 2 Tasten Programm aufwärts 3 abwärts Tasten Lautstärke 4 Hinweis Drücken Sie gleichzeitig die Tasten um das Hauptmenü aufzurufen ...

Page 10: ...enden Sie ein Audiokabel und die AUDIO AUSGÄNGE des TV Geräts Der 4 SCART 2 Anschluss dient zur Eingabe von und Ausgabe an Zusatzgeräte n Der 5 SCART 1 Anschluss dient zur Eingabe von und Ausgabe an Zusatzgeräte n Schließen Sie das SCART Kabel zwischen einer der SCART Buchsen des TV Geräts und der SCART Buchse des Zusatzgeräts z B Decoder Videorecorder DVD Player an Hinweis Wenn ein externes Gerät...

Page 11: ...ade aktiven Quelle ausgegeben Verwenden Sie ein koaxiales SPDIF Kabel um Audiosignale an ein Gerät mit einem S PDIF Eingang zu übertragen An den 9 RF Eingang wird eine Antenne oder ein Kabel angeschlossen Beachten Sie Wenn Sie einen Decoder oder einen Medienrecorder verwenden sollten Sie das Antennenkabel über diesen mit einem geeigneten Antennenkabel an das TV Gerät anschließen wie in der Abbildu...

Page 12: ...hließen Sie das Audiokabel zwischen den VIDEOEINGÄNGEN des TV Geräts und dem VIDEOAUSGANG des Zusatzgeräts an Die Audioeingänge werden zum Anschließen der 3 Audiosignale von Zusatzgeräten verwendet Schließen Sie das Audiokabel zwischen den AUDIOEINGÄNGEN des TV Geräts und dem AUDIOAUSGANG des Zusatzgeräts an Hinweis Wenn Sie ein Gerät über den VIDEOEINGANG an das TV Gerät anschließen sollten Sie d...

Page 13: ...Hz ausgelegt Geben Sie Ihrem Gerät nach dem Auspacken genug Zeit sich der Umgebungstemperatur im Raum anzupassen bevor Sie es einstecken Stecken Sie das Netzkabel in eine Netzsteckdose Antennenanschluss Schließen Sie den Antennen oder Kabel TV Stecker an die Buchse ANTENNENEINGANG an der Rückseite des TV Geräts an RÜCKSEITE ...

Page 14: ...ie ein 15 poliges D Sub Monitorkabel um einen PC an das LCD TV anzuschließen Wenn der Anschluss hergestellt ist schalten Sie auf die Quelle PC Siehe dazu den Abschnitt Eingangsauswahl Stellen Sie die von Ihnen bevorzugte Auflösung ein Informationen zur Auflösung finden Sie im Anhang RÜCKSEITE PC Audiokabel nicht mitgeliefert an AUDIOEINGÄNGE des TV Geräts PC RGB Kabel nicht mitgeliefert an PC Eing...

Page 15: ...bgebildet anschließen Siehe dazu den Abschnitt Eingangsauswahl Die meisten DVD Player werden über die COMPONENT ANSCHLÜSSE angeschlossen Verwenden Sie ein Component Videokabel um es an den Videoeingang anzuschließen Um das Audiosignal wiederzugeben verwenden Sie ein Component Audiokabel wie unten in der Abbildung gezeigt Wenn der Anschluss hergestellt ist schalten Sie auf die Quelle YPbPr Siehe da...

Page 16: ...Lieferumfang enthalten sind ZumAnschlusseinesCamcordersverwendenSiebittedieVIDEOIN unddieAUDIOANSCHLÜSSE Schließen Sie den Camcorder nicht gleichzeitig an die Anschlüsse VIDEO IN an da dies zu Bildstörungen führen kann Für die Auswahl der entsprechenden Quelle siehe den Abschnitt Eingangsauswahl im Folgenden Um dasAudiosignal über Kopfhörer zu hören schließen Sie diesen an die Buchse KOPFHÖRER des...

Page 17: ...um Anschluss externer Lautsprecher Achten Sie darauf die LINKEN und RECHTEN AUDIO Buchsen nicht zu vertauschen Schalten Sie das LCD TV und die externen Lautsprecher erst ein wenn Sie alle Anschlüsse vorgenommen haben Lesen Sie für weitere Informationen das Handbuch Ihres Lautsprechersets ZumAnschluss eines Geräts mit SPDIF Unterstützung müssen Sie ein geeignetes SPDIF Kabel verwenden um eine Audio...

Page 18: ...er einen VCR oder einen Decoder an Ihr LCD TV anschließen Beachten Sie dass die in der Abbildung gezeigten Kabel nicht im Lieferumfang enthalten sind Schalten Sie das Zusatzgerät und TV Gerät aus bevor Sie die Anschlüsse vornehmen Lesen Sie für weitere Informationen das Handbuch des Zusatzgeräts RÜCKSEITE Scartbuchsen Decoder DVD Recorder Videorecorder ...

Page 19: ...e beträgt ca 7 m 23 ft Ein Ausschalten des TV Geräts Einschalten des TV Geräts Schließen Sie das Netzkabel an ein 220 240V AC Netz mit 50 Hz an Drücken Sie die Taste STANDBY Die Standby LED leuchtet auf Um das TV Gerät aus dem Standby einzuschalten Drücken Sie die Taste P P oder eine Zifferntaste auf der Fernbedienung Drücken Sie die Taste P CH oder P CH am TV Gerät Das TV Gerät schaltet sich ein ...

Page 20: ...utstärkebalken Schieberegler eingeblendet Programmauswahl Drücken Sie die Taste P CH um das nächste Programm aufzurufen bzw die Taste P CH um das vorherige Programm auszuwählen Ansicht des Hauptmenüs Drücken Sie die Taste M um das Hauptmenü aufzurufen Wählen Sie im Hauptmenü über die Tasten P CH oder P CH ein Untermenü aus und öffnen Sie dieses Untermenü über die Tasten oder Informationen über die...

Page 21: ...sind für die Navigation im gesamten Menüsystem gültig Um die Optionen auszuwählen die in den folgenden Abschnitten erklärt werden lesen Sie bitte den Abschnitt Navigation im Menüsystem Menüsystem Menü Bild Modus Je nach Ihren Wünschen können Sie die entsprechende Option Modus einstellen Wählen Sie die Option Modus mit den Tasten oder Drücken Sie die Taste oder um eine der folgenden Optionen auszuw...

Page 22: ... zur Auswahl des Bildmodus auf der Fernbedienung reagiert nicht während der Spielmodus aktiv ist Wenn das TV Gerät in den PIP PAP Modus geschaltet wird wird die Option Spielmodus aus dem Menü Bild ausgeblendet und deaktiviert Bildzoom Wählen Sie die Option Bildzoom durch Drücken der Taste oder aus Verwenden Sie die Tasten oder um zwischen Auto 16 9 4 3 Panorama 14 9 Kino Untertitel oder Zoom auszu...

Page 23: ...en den Modi Mono Stereo Dual I oder Dual II wählen jedoch nur wenn der gewählte Kanal den entsprechenden Modus unterstützt AVL D i e F u n k t i o n A u t o m a t i s c h e Lautstärkebegrenzung AVL stellt den Klang so ein dass beim Umschalten zwischen Kanälen mit unterschiedlicher Lautstärke die Lautstärke gleich bleibt zum Beispiel ist die Lautstärke von Werbesendungen oft höher als die von ander...

Page 24: ...um das Untermenü PIP aufzurufen Mit den Tasten oder können Sie auf PIP oder PAP Modus schalten oder die Funktion deaktivieren Ist das TV Gerät auf den PIP oder PAP Modus geschaltet ändert sich das Untermenü PIP PAP entsprechend und die folgenden Einstellungen sind auf dem Menübildschirm zu sehen Beachten Sie dass nur die Optionen Quelle und Swap in den Menüeinstellungen aktiv sind wenn Sie mit der...

Page 25: ...sch in Abhängigkeit vom übertragenen Signal ein Wenn keine WSS oder Bildgrößeninformation vorhanden ist verwendet das TV Gerät die hier festgelegte Einstellung Wählen Sie die Option Standard Format mit den Tasten oder aus Über die Taste oder können Sie die Option Standard Format auf Panorama 16 9 4 3 oder 14 9 einstellen Blauer Hintergrund Wenn das Signal schwach oder ausgefallen ist ändert sich d...

Page 26: ...e Zifferntasten auf der Fernbedienung verwenden Sie können 200 Programme zwischen 0 und 199 speichern Band Für Band können Sie entweder C oder S auswählen Drücken Sie die Taste oder um Band auszuwählen Kanal Der Kanal kann über die Taste oder oder die Zifferntasten verändert werden Farbnorm Wählen Sie die Option Farbnorm mit den Tasten oder aus Drücken Sie die Taste oder um die Farbnorm auf PAL PA...

Page 27: ...den Namen eines ausgewählten Programmes durch Drücken der Taste ROT ändern Der erste Buchstabe des ausgewählten Namens wird markiert Drücken Sie die Taste oder um diesen Buchstaben zu ändern und die Taste oder um die anderen Buchstaben auszuwählen Speichern Sie den Namen indem Sie die Taste ROT drücken Verschieben Sortieren Wählen Sie das einzufügende Programm über die Navigationstasten aus Drücke...

Page 28: ...eser Quelle zu wählen Menüsystem im PC Modus Lesen Sie den Abschnitt Anschließen des LCD TVs an einen PC für denAnschluss eines PCs an das TV Gerät Um auf die Quelle PC zu schalten drücken Sie die Taste auf der Fernbedienung und wählen Sie PC als Eingang Sie können auch das Menü Quelle verwenden um zum PC Modus zu schalten Beachten Sie dass die Menüeinstellungen für den PC Modus nur verfügbar sind...

Page 29: ...t definieren Menü Ton Die Optionen dieses Menüs werden imAbschnitt Menü Ton im Abschnitt Menüsystem erklärt Menü Funktion Die Einstellungen sind identisch mit jenen die im Abschnitt Menü Funktion im Abschnitt Menüsystem erklärt werden Menü Quelle Die Einstellungen sind identisch mit jenen die im Abschnitt Menü Funktion im Abschnitt Menüsystem erklärt werden Anzeige der TV Information Programmnumme...

Page 30: ...0i ist nur der Modus 16 9 verfügbar Im PC Modus ist nur der Modus 16 9 verfügbar Auto Wenn ein WSS Signal Wide Screen Signaling Breitbildsignal mit dem Bildseitenformat im Sendesignal oder im Signal von einem externen Gerät enthalten ist ändert das TV Gerät automatisch den ZOOM Modus in Übereinstimmung mit dem WSS Signal Wenn der AUTO Modus wegen schlechter Qualität des WSS Signals nicht richtig f...

Page 31: ... aktuellen Programm ein Vergrößern Drücken Sie einmal diese Taste um die obere Hälfte der Seite zu vergrößern und nochmals um die untere Hälfte vergrößern zu lassen Wenn Sie sie nochmals drücken kehren Sie zur normalen Größe zurück Anzeigen Zeigt verborgene Informationen an z B Lösungen von Rätseln oder Spielen Halten Hält falls gewünscht eine Seite an Um die Haltefunktion aufzuheben nochmals dies...

Page 32: ...e Antenne anders ausrichten Kann das Bild bzw der Text kaum erkannt werden Überprüfen Sie ob Sie die richtige Frequenz eingegeben haben Bitte stellen Sie die Kanäle neu ein Die Bildqualität kann sich verschlechtern wenn zwei Zusatzgeräte gleichzeitig an das TV Gerät angeschlossen werden Trennen Sie in diesem Fall eines der Zusatzgeräte wieder ab Kein Bild Ist die Antenne richtig angeschlossen Sind...

Page 33: ... 35 2 VESA 16 9 4 3 10 800 600 60 37 9 VESA 16 9 4 3 11 800 600 70 43 8 16 9 4 3 12 800 600 72 48 1 VESA 16 9 4 3 13 800 600 75 46 9 VESA 16 9 4 3 14 800 600 85 53 7 VESA 16 9 4 3 15 832 624 75 49 7 MAC 16 9 4 3 16 1024 768 43 35 5 VESA interlace 16 9 4 3 17 1024 768 60 48 4 VESA 16 9 4 3 18 1024 768 70 56 5 VESA 16 9 4 3 19 1024 768 72 57 7 16 9 4 3 20 1024 768 75 60 0 16 9 4 3 21 1024 768 85 68 ...

Page 34: ... 60Hz O 1080P 50Hz O 1080P 60Hz O HDMI1 HDMI2 480I 60Hz O 480P 60Hz O 576I 50Hz O 576P 50Hz O 720P 50Hz O 720P 60Hz O 1080I 50Hz O 1080I 60Hz O 1080P 50Hz O 1080P 60Hz O 1080P 24 HZ O X Nicht möglich O Möglich Beachten Sie In einigen Fällen kann unter Umständen ein Signal nicht richtig auf dem LCD Schirm angezeigt werden Das Problem kann durch eine Inkompatibilität in den Standards des Quellgeräts...

Page 35: ...rstützte DVI Auflösungen BeimAnschluss von Geräten mit DVI Adapterkabeln nicht mitgeliefert an das TV Gerät beachten Sie bitte die folgenden Auflösungsinformationen 24Hz 25Hz 30Hz 50Hz 60Hz 480i 480p 576i 576p 720p 1080i 1080p ...

Page 36: ...t 21 GND SHIELD GEHÄUSE 11 RGB G IN Pinbelegung HDMI Anschluss Pin Eingangssignal Pin Eingangssignal 1 TMDS Data2 11 TMDS Clock Shield 2 TMDS Data2 Shield 12 TMDS Clock 3 TMDS Data 2 13 CEC 4 TMDS Data 1 14 Reserviert im Gerät nicht beschaltet 5 TMDS Data1 Shield 15 SCL 6 TMDS Data1 16 SDA 7 TMDS Data0 17 DDC CED Ground 8 TMDS Data0 Shield 18 5V Stromversorgung 9 TMDS Data0 19 Hot Plug Erfassung 1...

Page 37: ...an dass die Auswahl nur möglich ist wenn an Scart 1 ein RGB Signal anliegt Einschränkungen Scart 1 muss ein RGB Signal haben um mit den Quellen TV Scart 2 und FAV PIP PAP zu ermöglichen Wenn diese Quellen im Hauptfenster angezeigt werden und Scart 1 kein RGB Signal hat kann die PIP PAP Quelle nicht auf die Quelle Scart 1 geschaltet werden Wenn die Quelle Scart 1 im Hauptfenster angezeigt werden un...

Page 38: ...LANZEIGE Bildschirmanzeige RF ANTENNENEINGANG 75 Ohm nicht geregelt BETRIEBSSPANNUNG 220 240V AC 50 Hz AUDIO German Nicam Stereo AUDIO AUSGANGSLEISTUNG WRMS 10 THD 2 x 6 LEISTUNGSAUFNAHME W 100 W max 1 W Standby PANEL 16 9 Display 26 Bildschirmgröße ABMESSUNGEN mm TxLxB Mit Standfuß 180 x 645 x 488 Gewicht kg 8 80 TxLxB Ohne Standfuß 100 x 645 x 444 Gewicht kg 8 50 ...

Page 39: ...ode 56 Operation with the Remote Control 56 Volume Setting 56 Programme Selection Previous or Next Prog ramme 56 Programme Selection Direct Access 56 Menu System 57 Picture Menu 57 Mode 57 Brightness Contrast Colour Sharpness Hue 57 Colour Temp 57 Noise Reduction 57 Film Mode 57 Game Mode optional 57 Picture Zoom 58 Reset 58 Store 58 Sound Menu 58 Volume 58 Equalizer 58 Balance 58 Headphone 58 Vol...

Page 40: ...65 Cinema 65 Subtitle 65 Zoom 65 Screen Care 67 Image Persistence 67 No Power 67 Poor Picture 67 No Picture 67 Sound 67 Remote Control 67 Input Sources 67 Appendix A PC Input Typical Display Modes 68 Appendix B AV and HDMI Signal Compatibility Input Signal Types 69 Appendix C Supported DVI Resolutions 70 Appendix D Pin Specifications 71 SCART connector pin specifications 71 HDMI connector pin spec...

Page 41: ...ng system Forward or backward manual tuning Sleep timer Child lock A u t o m a t i c s o u n d m u t e w h e n n o transmission NTSC playback PIP PAP PAT functions AVL Automatic Volume Limiting When no valid signal is detected after 5 minutes the TV switches itself automatically to standby mode PLL Frequency Search PC input Plug Play for Windows 98 ME 2000 XP Vista Audio line out Game Mode optiona...

Page 42: ...d or tie it with other cords The power cords should be placed in such a way that they are not likely to be stepped on A damaged power cord can cause fire or give you an electric shock When it is damaged and needs to be replaced it should be done by qualified personnel Moisture and Water Do not use this device in a humid and damp place avoid the bathroom the sink in the kitchen and near the washing...

Page 43: ... LCD PANEL contains a small amount of mercury please follow the local laws or regulations for disposal Information for Users in European Union Countries This symbol on the product or on its packaging means that your electrical and electronic device should be disposed at the end of its service life separately from your household wastes There are separate collection systems for recycling in EU For m...

Page 44: ...n screen filling format e g a 4 3 format is displayed Note This appliance is not built for the long term rendering or replay offixed images including Logos video games computer pictures Teletext and non screen filling formats Through rendering or replay of fixed images Logos video games computer pictures Teletext and non screen filling formats the created permanent afterimages cannot be undone The...

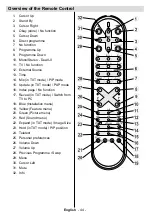
Page 45: ...XT mode PAP mode 15 Index page No function 16 Reveal in TXT mode Switch from 17 TV to PC Blue Installation menu 18 Yellow Feature menu 19 Green Picture menu 20 Red Sound menu 21 Expand in TXT mode Image Size 22 Hold in TXT mode PIP position 23 Teletext 24 Personal preferences 25 Volume Down 26 Volume Up 27 Previous Programme Swap 28 Menu 29 Cursor Left 30 Mute 31 Info 32 V P 2 3 4 5 6 8 9 7 0 OK S...

Page 46: ...sh 45 LCD TV and Operating Buttons FRONT VIEW REAR VIEW SIDE VIEW Standby button 1 TV AV button 2 Programme Up Down 3 buttons Volume Up Down buttons 4 Note Press or buttons at the same time to view main menu ...

Page 47: ...CART cable between SCART sockets on TV and SCART socket on your external device such as a decoder a VCR or a DVD player Note If an external device is connected via the SCART sockets the TV will automatically switch to AV mode If both sockets are employed at the same time SCART 1 will override SCART 2 unless manually selected Note You should connect the decoder to EXT 1 if you are planning to watch...

Page 48: ...should connect the aerial cable through the device to the television with an appropriate antenna cable as shown in the illustrationin the following pages 10 PC Input is for connecting a personal computer to the TV set Connect the PC cable between the PC INPUT on the TV and the PC output on your PC 11 HDMI 2 HDMI Input HDMI Inputs are for connecting a device that has an HDMI socket Your LCD Televis...

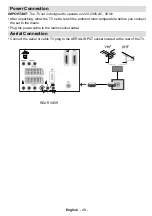
Page 49: ... 2 external devices Connect the video cable between the VIDEO IN socket on the TV and the VIDEO OUT jack on your device Audio Inputs are used for connecting audio signals of 3 external devices Connect the audio cable between the AUDIO INPUTS on the TV and the AUDIO OUTPUT jacks on your device Note If you connect a device to the TV via the VIDEO INPUT you should also connect your device with an aud...

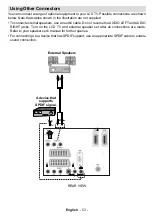
Page 50: ...C 50 Hz After unpacking allow the TV set to reach the ambient room temperature before you connect the set to the mains Plug the power cable to the mains socket outlet Aerial Connection Connect the aerial or cable TV plug to the AERIAL INPUT socket located at the rear of the TV REAR VIEW ...

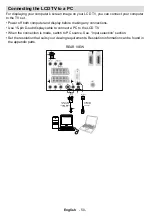
Page 51: ...ng any connections Use 15 pin D sub display cable to connect a PC to the LCD TV When the connection is made switch to PC source See Input selection section Set the resolution that suits your viewing requirements Resolution information can be found in the appendix parts REAR VIEW PC audio cable not supplied to AUDIO INPUTS on the TV PC RGB cable not supplied to PC input Audio Inputs PC Input ...

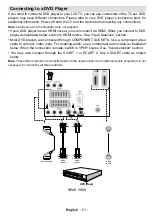
Page 52: ...yer as illustrated below switch to HDMI source See Input Selection section Most DVD players are connected through COMPONENT SOCKETS Use a component video cable to connect video input For enabling audio use a component audio cable as illustrated below When the connection is made switch to YPbPr source See Input selection section You may also connect through the SCART 1 or SCART 2 Use a SCART cable ...

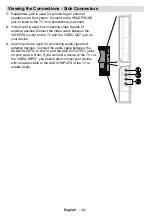
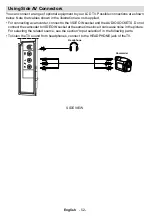
Page 53: ...upplied For connecting a camcorder connect to the VIDEO IN socket and the AUDIO SOCKETS Do not connect the camcoder to VIDEO IN socket at the same time since it can cause noise in the picture For selecting the related source see the section Input selection in the following parts To listen the TV sound from headphones connect to the HEADPHONE jack of theTV Camcorder Headphone SIDE VIEW ...

Page 54: ...nnect external speakers use an audio cable Do not reverse the AUDIO LEFT and AUDIO RIGHT jacks Turn on the LCD TV and external speaker set after all connections are made Refer to your speaker set s manual for further queries For connecting a to a device that has SPDIF support use an appropriate SPDIF cable to enable sound connection External Speakers A device that supports SPDIF signal REAR VIEW ...

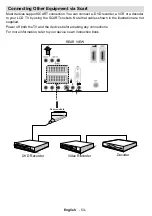
Page 55: ...er a VCR or a decoder to your LCD TV by using the SCART sockets Note that cables shown in the illustration are not supplied Power off both the TV and the devices before making any connections For more information refer to your device s own instruction book REAR VIEW Scart sockets Decoder DVD Recorder Video Recorder ...

Page 56: ...AC 50 Hz Press STANDBY switch Then the standby LED lights up To switch on the TV from standby mode either Press the button P P or a numeric button on the remote control Press the P CH or P CH button on the TV The TV will then switch on Note If you switch on your TV via PROGRAMME UP DOWN buttons on the remote control or on the TV set the programme that you were watching last will be reselected By e...

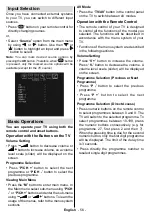
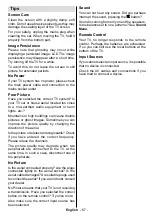
Page 57: ... To learn the usage of the menus refer to the menu system sections AV Mode Press the TV AV button in the control panel on the TV to switch between AV modes Operation with the Remote Control The remote control of your TV is designed to control all the functions of the model you selected The functions will be described in accordance with the menu system of your TV Functions of the menu system are de...

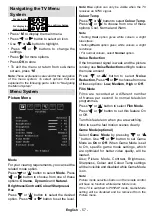
Page 58: ...g Cool option gives white colours a slight blue stress Setting Warm option gives white colours a slight red stress For normal colours select Normal option Noise Reduction If the broadcast signal is weak and the picture is noisy use Noise Reduction setting to reduce the noise amount Press or button to select Noise Reduction Press or to choose from one of these options Low Medium High or Off Film Mo...

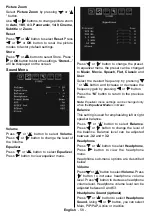
Page 59: ...t the desired frequency by pressing or button and increase or decrease the frequency gain by pressing or button Press the M button to return to the previous menu Note Equalizer menu settings can be changed only when the Equalizer Mode is in User Balance This setting is used for emphasizing left or right speaker balance Press or button to select Balance Press or button to change the level of the ba...

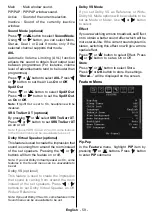
Page 60: ... the impression that sound is coming from around the room instead of the set speakers Pressing the or buttons will turn the feature on or off Note If you set Dolby Virtual Speaker as On some features in the Sound menu can be unavailable to be set Dolby VS optional This feature is used to create the impression that sound is coming from around the room instead of the set speakers Press buttons to se...

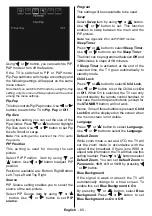
Page 61: ...swap between the main and the PIP picture Note See Appendix E for all PIP PAP modes Sleep Timer Press or button to select Sleep Timer Use or button to set the Sleep Timer The timer can be programmed between Off and 120 minutes in steps of 10 minutes If Sleep Timer is activated at the end of the selected time the TV goes automatically to standby mode Child Lock Press or button to select Child Lock ...

Page 62: ...ll Mode as 1 1 or Normal by using or If you select 1 1 screen ratio will be adjusted correctly If you set Normal screen ratio may expand Ext Out Press or button to select Ext Out Use or button to set the Ext Out as On or Off Note For copying from a DVD or VCR device you should choose desired source from source menu and turn On to EXT Out from feature menu Install Menu Program Press or button to se...

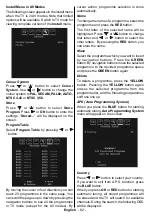
Page 63: ...he programme and press the RED button The first letter of the selected name will be highlighted Press or button to change that letter and or button to select the other letters By pressing the RED button you can store the name Move Select the programme which you want to insert by navigation buttons Press the GREEN button By navigation buttons move the selected programme to the decided programme spa...

Page 64: ...press button on your remote control and select PC input You can also use Source menu to switch to PC mode Note that PC mode menu settings are available only while the TV is in PC source PC Position Menu Select the first icon by pressing or button PC Position menu appears on the screen Autoposition If you shift the picture horizontally or vertically to an unwanted position use this item to put the ...

Page 65: ... displayed on the screen when a new programme is entered or INFO button is pressed Mute Function Press button to disable sound Mute indicator will be displayed in the upper side of the screen To cancel mute there are two alternatives the first one is pressing the button and the second one is increasing the volume level PIP Picture in Picture and PAP Picture and Picture Modes Press the button to sw...

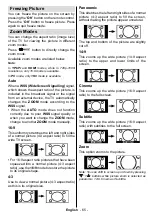
Page 66: ...hange the ZOOM mode change to another ZOOM mode manually 16 9 This uniformly stretches the left and right sides of a normal picture 4 3 aspect ratio to fill the wide TV screen For 16 9 aspect ratio pictures that have been squeezed into a normal picture 4 3 aspect ratio use the 16 9 mode to restore the picture to its original shape 4 3 Use to view a normal picture 4 3 aspect ratio as this is its or...

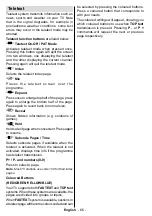
Page 67: ...l size Reveal Shows hidden information e g solutions of games Hold Holds a text page when convenient Press again to resume Subcode Pages Time Selects subcode pages if available when the teletext is activated When the teletext is not activated displays time info if the programme has teletext transmission P P and numbers 0 9 Press to select a page Note Most TV stations use code 100 for their index p...

Page 68: ...icture or teletext unrecognisable Check if you have entered the correct frequency Please retune the channels The picture quality may degrade when two peripherals are connected to the TV at the same time In such a case disconnect one of the peripherals No Picture Is the aerial connected properly Are the plugs connected tightly to the aerial socket Is the aerial cable damaged Are suitable plugs used...

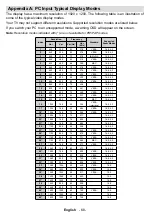
Page 69: ...0 37 9 VESA 16 9 4 3 11 800 600 70 43 8 16 9 4 3 12 800 600 72 48 1 VESA 16 9 4 3 13 800 600 75 46 9 VESA 16 9 4 3 14 800 600 85 53 7 VESA 16 9 4 3 15 832 624 75 49 7 MAC 16 9 4 3 16 1024 768 43 35 5 VESA interlace 16 9 4 3 17 1024 768 60 48 4 VESA 16 9 4 3 18 1024 768 70 56 5 VESA 16 9 4 3 19 1024 768 72 57 7 16 9 4 3 20 1024 768 75 60 0 16 9 4 3 21 1024 768 85 68 3 16 9 4 3 22 1152 864 60 53 8 1...

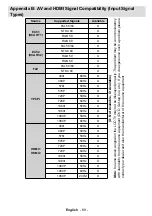
Page 70: ...0Hz O 1080I 50Hz O 1080I 60Hz O 1080P 50Hz O 1080P 60Hz O HDMI1 HDMI2 480I 60Hz O 480P 60Hz O 576I 50Hz O 576P 50Hz O 720P 50Hz O 720P 60Hz O 1080I 50Hz O 1080I 60Hz O 1080P 50Hz O 1080P 60Hz O 1080P 24 HZ O X Not Available O Available Note In some cases a signal on the LCD TV may not be displayed properly The problem may be an inconsistency with standards from the source equipment DVD Set top box...

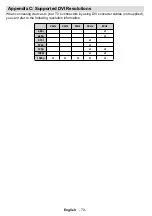
Page 71: ...orted DVI Resolutions When connecting devices to your TV s connectors by using DVI converter cables not supplied you can refer to the following resolution information 24Hz 25Hz 30Hz 50Hz 60Hz 480i 480p 576i 576p 720p 1080i 1080p ...

Page 72: ...Not used 21 GND SHIELD CHASSIS 11 RGB G IN HDMI connector pin specifications Pin Input signal Pin Input signal 1 TMDS Data2 11 TMDS Clock Shield 2 TMDS Data2 Shield 12 TMDS Clock 3 TMDS Data 2 13 CEC 4 TMDS Data 1 14 Reserved N C on device 5 TMDS Data1 Shield 15 SCL 6 TMDS Data1 16 SDA 7 TMDS Data0 17 DDC CED Ground 8 TMDS Data0 Shield 18 5V Power 9 TMDS Data0 19 Hot Plug Detect 10 TMDS Clock Sign...

Page 73: ...C VGA 9 9 9 9 9 9 9 8 RGB This indicates that selection is possible only if Scart 1 has a RGB signal Restrictions Scart 1 source must have RGB signal to perform PIP PAP with sources TV Scart 2 FAV If these sources are set to main window and Scart 1 does not have a RGB signal Pip Pap source can not be switched to the Scart 1 source If scart 1 source is set to main window and scart 1 does not have a...

Page 74: ... CHANNEL INDICATOR On Screen Display RF AERIAL INPUT 75 Ohm unbalanced OPERATING VOLTAGE 220 240V AC 50 Hz AUDIO German Nicam Stereo AUDIO OUTPUT POWER WRMS 10 THD 2 x 6 POWER CONSUMPTION W 100 W max 1 W Standby PANEL 16 9 display 26 Screen Size DIMENSIONS mm DxLxH With foot 180 x 645 x 488 Weight Kg 8 80 DxLxH Without foot 100 x 645 x 444 Weight Kg 8 50 ...

Page 75: ...éléviseur à l aide de la télécommande 92 Réglage du volume 93 Sélection de programme Programme précédent ou suivant 93 Sélection de programme Accès direct 93 Menu Image 94 Mode 94 Luminosité Contraste Couleur Définition Teinte 94 Température de Couleur 94 Réduction de bruit 94 Mode Film 94 Mode Jeux en option 94 Zoom image 94 Réinitialisation 94 Mémoriser 95 Menu Son 95 Volume 95 Égaliseur 95 Bala...

Page 76: ...om 103 Télétexte 103 Entretien de l écran 104 Persistance de l image 104 Pas d alimentation 104 Image faible 104 Aucune image 104 Son 104 Télécommande 104 Sources d entrée 104 Annexe A Modes d affichage typique de l entrée PC 105 Annexe B Compatibilité du signal AV et HDMI types de signal d entrée 106 Appendice C Résolutions prises en charge 107 Appendice D Spécifications des broches 108 Spécifica...

Page 77: ...tomatique Réglage manuel vers l avant ou vers l arrière Minuterie Sommeil Verrouillage enfants Le son est automatiquement coupé lorsque il n y a aucune transmission Lecture NTSC Fonctions PIP PAP PAT AVL Limitation automatique de volume Lorsqu aucun signal valide n est détecté le téléviseur passe automatiquement au mode veille après 5 minutes PLL Recherche de fréquence Entrée PC Plug Play pour Win...

Page 78: ...attachez pas à d autres cordons Les cordons d alimentation doivent être placés de façon à ce qu on ne risque pas de marcher dessus Un cordon de raccordement endommagé peut être la cause d un incendie ou d une commotion électrique Quand il est endommagé et doit être remplacé ceci doit être effectué par un technicien qualifié Moisissure et eau N utilisez pas ce matériel dans un endroit humide et mou...

Page 79: ...mpe fluorescente cathodique froide dans l ÉCRAN LCD contient une petite quantité de mercure Veuillez respecter les lois ou réglementations locales pour la mise au rebut Informations applicables aux utilisateurs des pays de l Union Européenne Le symbole sur le produit ou sur son emballage signifie que votre équipement électrique ou électronique ne doit pas être jeté à la fin de sa durée de vie avec...

Page 80: ...s affiche Remarque Cet appareil n est pas conçu pour le rendu à long terme ou la relecture d images figées y compris les logos les jeux vidéo les images informatiques le télétexte et les formats qui ne remplissent pas l écran Avec le rendu ou la relecture d images figées les logos les jeux vidéo les images informatiques le télétexte et les formats qui ne remplissent pas l écran les images rémanent...

Page 81: ... en mode TXT Mode PAP 15 Page Index Aucune Fonction 16 Révéler en mode TXT Basculer de TV 17 à PC Bleu Menu Installation 18 Jaune Menu Options 19 Vert Menu Image 20 Rouge Menu Son 21 Etendre en mode TXT Taille de l image 22 Retenir en mode TXT Position PIP 23 Télétexte 24 Préférences personnelles 25 Baisse du volume 26 Volume Haut 27 Programme précédent Echange 28 Menu 29 Touche directionnelle gau...

Page 82: ...mmande AFFICHAGE AVANT AFFICHAGE ARRIÈRE AFFICHAGE LATÉRAL Bouton de mise en veille 1 Bouton TV AV 2 Touches Programme Suivant 3 Précédent Touches Volume Haut Bas 4 Remarque Appuyez sur les boutons au même moment pour afficher le menu principal ...

Page 83: ... Pour brancher les haut parleurs externes à votre téléviseur utilisez l option SORTIES DE LIGNE AUDIO du téléviseur avec un câble audio Entrées ou sorties 4 PÉRITEL 2 pour périphériques externes Entrées ou sorties 5 PÉRITEL 1 pour périphériques externes Branchez le câble PERITEL entre la prise PERITEL du téléviseur et la prise PERITEL de votre périphérique externe tel que le décodeur un VCR ou un ...

Page 84: ...ourante Utilisez un câble coaxial SPDIF pour transférer des signaux audio en direction d un périphérique disposant d une entrée S PDIF 9 L entrée RF se branche à une antenne ou à un câble Remarquez que si vous utilisez un décodeur ou un enregistreur média vous devez brancher un câble aérien qui va de l appareil au téléviseur avec un câble d antenne approprié tel qu illustré ci dessous 10 L entrée ...

Page 85: ...es Branchez le câble vidéo entre l ENTREE VIDÉO du téléviseur et la SORTIE VIDÉO de votre appareil Ensuite utilisez les entrées audio pour brancher les 3 signaux audio des périphériques externes Branchez le câble audio entre les ENTRÉES AUDIO du téléviseur et les ports de SORTIE AUDIO de votre appareil Remarque Si vous branchez un périphérique au téléviseur à travers l ENTRÉE VIDÉO vous devez égal...

Page 86: ...allé attendez un moment pour que le téléviseur atteigne la température ambiante avant de le brancher à la prise de courant Branchez le câble d alimentation à la prise secteur Branchement de l antenne Branchez l antenne ou le câble du téléviseur à la prise d ENTRÉE DE L ANTENNE située à l arrière du téléviseur AFFICHAGE ARRIÈRE ...

Page 87: ...chements Utilisez le câble de 15 broches pour brancher le PC au téléviseur LCD Une fois le branchement effectué passez à la source du PC Voir la section Sélection d entrée Réglez la résolution d affichage qui vous convient Pour les informations relatives à la résolution se reporter à l annexe AFFICHAGE ARRIÈRE Câble audio de PC non fourni sur les ENTREES AUDIO du téléviseur Câble RGB du PC non fou...

Page 88: ... dessous passez à la source HDMI Voir la section Sélection d entrée La plupart des lecteurs de DVD sont branchés à travers les PRISES DU COMPOSANT Utilisez un câble vidéo du composant pour brancher l entrée vidéo Pour activer l option audio utilisez un câble audio du composant tel qu illustré ci dessous Une fois le branchement effectué passez en source YPbPr Voir la section Sélection d entrée Vous...

Page 89: ...es câbles présentés dans l illustration ne sont pas fournis Pour raccorder un caméscope branchez une prise VIDEO IN ainsi que les PRISES AUDIO Pour sélectionner la source correspondante se reporter à la section Sélection d entrée dans les paragraphes suivants Pour écouter le son du téléviseur en provenance des casques branchez le port dudit CASQUE au téléviseur Caméscope Casque AFFICHAGE LATÉRAL ...

Page 90: ...ut parleurs externes utilisez le câble audio N inversez pas les prisesAUDIO GAUCHE et AUDIO DROIT Allumez le téléviseur LCD et le haut parleur externe une fois tous les branchements effectués En cas de problèmes reportez vous au manuel d utilisation Pour un branchement à un périphérique doté d un support SPDIF utilisez un câble SPDIF approprié pour activer la connexion sonore Haut parleurs externe...

Page 91: ...magnétoscope ou un décodeur à votre téléviseur LCD en utilisant les prises PERITEL Remarquez que les câbles présentés dans l illustration ne sont pas fournis Débranchez le téléviseur et les appareils avant d effectuer les branchements Pour de plus amples informations reportez vous à votre manuel d utilisation AFFICHAGE ARRIÈRE Prise Péritel Décodeur Graveur de DVD Enregistreur vidéo ...

Page 92: ... STU VWX YZ M DTV 1 SOURCE 30 30 Prévoir un espace d environ 7m 23ft Mise en marche et arrêt du téléviseur LCD Pour allumer le téléviseur Branchez le cordon d alimentation à une prise de 220 240V AC 50 Hz Appuyez sur la touche VEILLE Le TÉMOIN de mise en veille s allume Pour allumer le téléviseur à partir du mode de veille vous pouvez soit Appuyez sur la touche P P ou une touche numérique de la té...

Page 93: ...pressé seules les options de la source sélectionnées seront disponibles en dehors de la source TV Opérations de Base Vouspouvezfairefonctionnervotretéléviseur en utilisant non seulement ses boutons mais aussi ceux de la télécommande Fonctionnement du téléviseur à l aide de ses boutons Réglage du volume Appuyez sur le bouton pour diminuer le volume ou sur le bouton pour l augmenter Lorsque vous pro...

Page 94: ...iques Pour le programme 27 par exemple appuyez d abord sur la touche 2 puis sur la touche 7 Lorsque la durée d appui est expirée pour le deuxième numéro seul le premier programme numérique s affichera La limite de la durée d attente est de 3 secondes Appuyez directement sur le numéro de programme pour sélectionner à nouveau les programmes à un chiffre Navigation dans le système de menu Pour visual...

Page 95: ...rrêt Mode Film Les films sont enregistrés à un nombre de cadres différent par seconde comparé aux programmes de télévision normaux Appuyez sur le bouton ou pour sélectionner Mode Film Appuyez sur la touche ou pour activer ou désactiver cette fonction Activez cette fonction lorsque vous voyez un film pour voir clairement les scènes qui se déroulent rapidement Mode Jeux en option Sélectionnez le mod...

Page 96: ...nt au niveau de l équilibre du haut parleur gauche ou droit Appuyez sur le bouton ou pour sélectionner Balance Appuyez sur la touche ou pour changer le niveau de la balance Le niveau de balance peut être réglé entre 32 et 32 Casque Appuyez sur le bouton ou pour sélection Casque Appuyez sur le bouton pour afficher le menu Casque Les options du sous menu Casque sont décrites ci dessous Volume Appuye...

Page 97: ...ivez Dolby Virtual Speaker certaines options du menu Son peuvent ne pas être disponibles pour réglage Effet Si vous regardez une diffusion mono activez l option Effet pour obtenir un meilleur effet sonore qui sera plus stéréo Si le système sonore actuel est en Stéréo et si l effet de son est activé l effet rendu sera plus spatial En appuyant sur ou sur sélectionnez Effet Appuyez sur le bouton ou p...

Page 98: ...rouillage enfants Utilisez le bouton ou pour sélectionner l activation ou la désactivation du Verrouillage Enfant Lorsque Activé est sélectionné le téléviseur peut uniquement être contrôlé à l aide de la télécommande Dans ce cas les boutons du panneau de contrôle sauf le bouton VEILLE ne fonctionneront pas Sil undecesboutonsestenclenchéVerrouillage enfant activé s affiche à l écran lorsque la fenê...

Page 99: ...C ou S Appuyez sur le bouton ou pour sélectionner Bande Chaîne La chaîne peut être modifiée avec la touche ou ou les touches numériques Système de Couleur Appuyez sur la touche ou pour sélectionner Système de couleur Utilisez le bouton ou pour faire passer le système de couleur à PAL PAL 60 SECAM ou AUTO Système sonore Appuyez sur le bouton ou pour sélectionner le Système sonore Appuyez sur le bou...

Page 100: ... première lettre du nom sélectionné sera mise en surbrillance Appuyez sur le bouton ou pour changer cette lettre et sur le bouton ou pour sélectionner les autres lettres En appuyant sur le bouton ROUGE vous pouvez mémoriser le nom Déplacer Sélectionnez le programme que vous voulez insérer avec les touches directionnelles Appuyez sur le bouton VERT À l aide des touches de navigation déplacez le pro...

Page 101: ...appuyez sur la touche de votre télécommande et sélectionnez l entrée PC Vous pouvez également utiliser le menu Source pour basculer en mode PC Remarquez que les réglages du menu mode PC sont disponibles uniquement lorsque le téléviseur se trouve dans la source PC Menu de position PC Sélectionnez la première icône en appuyant sur la touche ou Le menu Position PC apparaît à l écran Position automati...

Page 102: ...ontidentiques aux réglages expliqués dans la section Menu Spécification du Système de menu Menu Source Les réglages du menu Source sont identiques aux réglages expliqués dans la section Menu Source du Système de menu Menu Navigateur média Les réglages du menu Navigateur média sont identiques aux réglages expliqués dans la section Menu Navigateur média du Système de menu Affichage des informations ...

Page 103: ... mode YPbPr et HDMI résolutions 720p 1080i seul le mode 16 9 est disponible En mode PC seul le format 16 9 est disponible Auto Lorsque un signal WSS Signal d écran large qui montre le rapport d aspect de l image est inclus dans le signal de transmission ou dans le signal d un dispositif externe le téléviseur change automatiquement le mode ZOOM vers 4 3 ou 16 9 selon le signal WSS Lorsque le mode A...

Page 104: ... écran du télétexte au dessus du programme Révéler Révèle l information cachée réponses de jeux par exemple Retenir Retient un texte lorsqu il s avère nécessaire Appuyez de nouveau pour reprendre Pages sous codées Heure Sélectionne les pages de sous code si disponibles lorsque le télétexte est activé Lorsque le télétexte n est pas activé affiche l information relative à l heure si le programme dis...

Page 105: ...ge en changeant la direction de l antenne Est ce que l image ou le télétexte sont méconnaissables Vérifiez si vous avez saisi la bonne fréquence Veuillez régler à nouveau les chaînes La qualité de l image peut se dégrader lorsque deux périphériques sont branchés au téléviseur au même moment Dans une telle situation débranchez l un des périphériques Aucune image Est ce que l antenne est correctemen...

Page 106: ...ESA 16 9 4 3 11 800 600 56 35 2 VESA 16 9 4 3 12 800 600 60 37 9 VESA 16 9 4 3 13 800 600 70 43 8 16 9 4 3 14 800 600 72 48 1 VESA 16 9 4 3 15 800 600 75 46 9 VESA 16 9 4 3 16 800 600 85 53 7 VESA 16 9 4 3 17 832 624 75 49 7 MAC 16 9 4 3 18 1024 768 43 35 5 VESA interlace 16 9 4 3 19 1024 768 60 48 4 VESA 16 9 4 3 20 1024 768 70 56 5 VESA 16 9 4 3 21 1024 768 72 57 7 16 9 4 3 22 1024 768 75 60 0 1...

Page 107: ...I 60Hz O 1080P 24Hz O 1080P 50Hz O 1080P 60Hz O HDMI1 HDMI2 480I 60Hz O 480P 60Hz O 576I 50Hz O 576P 50Hz O 720P 50Hz O 720P 60Hz O 1080I 50Hz O 1080I 60Hz O 1080P 50Hz O 1080P 60Hz O 1080P 24 HZ O X Non disponible O Disponible Remarque Dans certains cas un signal à l écran du téléviseur LCD peut ne pas s affi cher correctement Le problème peut être celui d une inconsistance rencontrée avec les st...

Page 108: ... Résolutions prises en charge Reportez vous aux résolutions suivantes au moment de raccorder les connecteurs à votre téléviseur à l aide des câbles DVI non fournis 24Hz 25Hz 30Hz 50Hz 60Hz 480i 480p 576i 576p 720p 1080i 1080p ...

Page 109: ...Non utilisé 21 GND SHIELD CHASSIS 11 ENTRÉE RGB G Spécifications des broches de la prise HDMI Broche Signal d entrée Broche Signal d entrée 1 TMDS Data2 11 TMDS Clock Shield 2 TMDS Data2 Shield 12 TMDS Clock 3 TMDS Data 2 13 CEC 4 TMDS Data 1 14 Réservé N C sur périphérique 5 TMDS Data1 Shield 15 SCL 6 TMDS Data1 16 SDA 7 TMDS Data0 17 DDC CED Ground 8 TMDS Data0 Shield 18 5V Power 9 TMDS Data0 19...

Page 110: ... est possible que si Péritel 1 est doté d un signal RGB Restrictions La source Péritel 1 doit disposer d un signal RGB pour effectuer les combinaisons du mode PIP PAP avec les sources TV Péritel 2 FAV Si ces sources sont définies sur la fenêtre principale et Péritel 1 ne dispose pas d un signal RGB la source PIP PAP ne peut pas basculer vers la source Péritel 1 Si la source Péritel 1 est définie s...

Page 111: ...HAÎNE Affichage à l écran ENTRÉE D ANTENNE RF 75 Ohm Non équilibré VOLTAGE DE FONCTIONNEMENT 220 240V CA 50 Hz AUDIO German Nicam Stereo PUISSANCE DE SORTIE AUDIO WRMS 10 THD 2 x 6 CONSOMMATION ÉLECTRIQUE W 100 W max 1 W Veille PANNEAU Écran 16 9 Taille de l écran 26 DIMENSIONS mm DxLxH Avec pied 180 x 645x 488 Poids en Kg 8 80 DxLxH Sans pied 100 x 645 x 444 Poids en Kg 8 50 ...

Page 112: ...50152966 ...
Reviews: