background image

4- 1

EM1-33043D

4. INSTALLING THE PRINTER

4.1 LOADING THE BATTERY

4. INSTALLING THE

PRINTER

4.1 LOADING THE BATTERY

CAUTION:

1. Be sure to turn off the printer before

loading the battery.

2. Use the specified battery only.  Failure

to do this may cause fire or electric
shock.

3. In the United States, used lithium ion

batteries should be returned to the
store where you bought the machine.
(USA only)

4. LITHIUM ION BATTERY

DISPOSE OF PROPERLY
Caution:  Do not handle damaged or
leaking lithium ion battery.

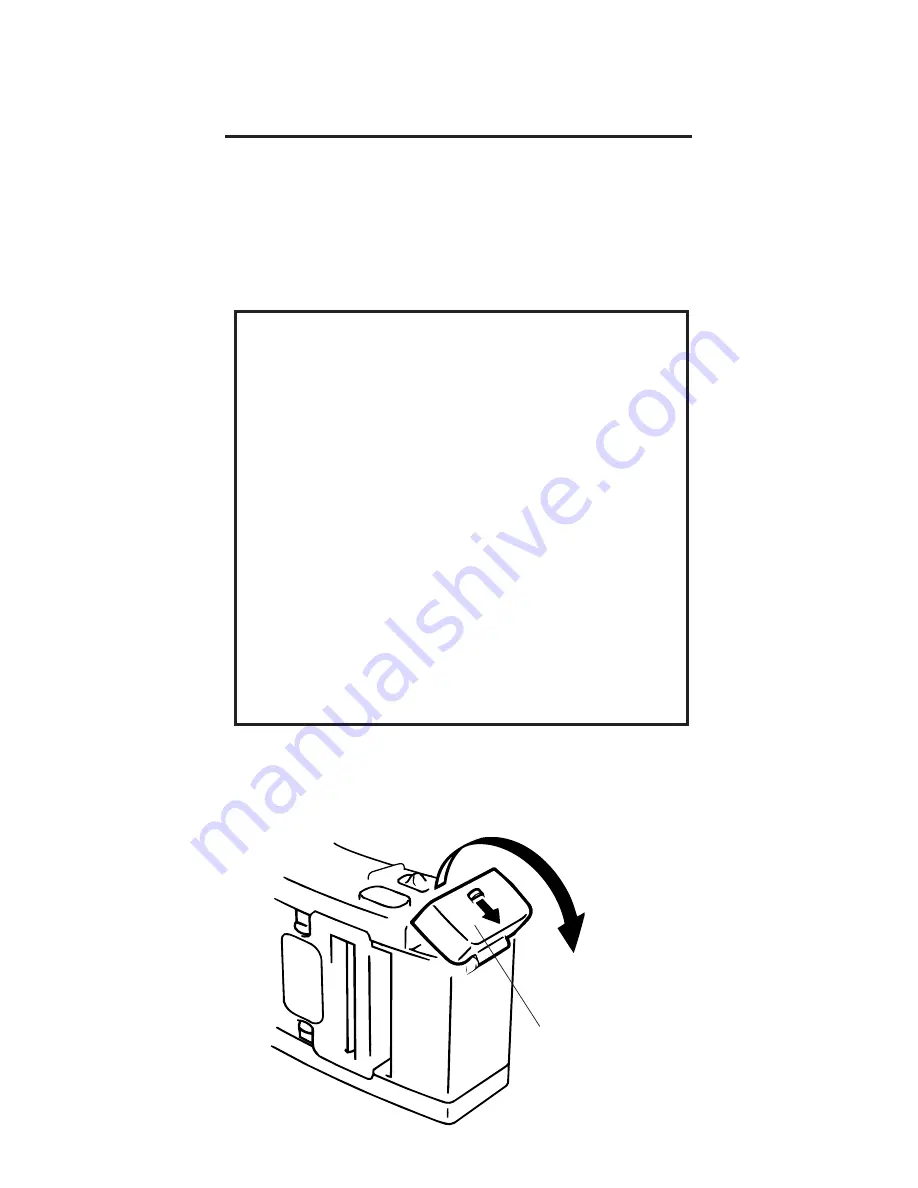
Battery Cover

Fig. 4-1

1) Slide the battery cover release catch

toward the direction indicated by the
arrow and open the battery cover.

Summary of Contents for TEC B-210 SERIES

Page 1: ...TEC Portable Printer B 210 SERIES Owner s Manual Document No EM1 33043D TOSHIBA TEC CORPORA TION ...

Page 2: ...g Product Specifications EN 60 950 EN 56 022 IEC 801 2 IEC 801 3 Supplementary Information The product herewith complies with the requirements of the Low Voltage Directive 73 23 EEC and the EMC directive 89 336 EEC 1 The product was tested in a typical set up TEC personnel advocated 2 The following technical documentation has been filed for review Factory Inspection Certificate by TUV Rheinland Ow...

Page 3: ...ACE RS 232C 2 2 2 3 RADIO INTERFACE 2 2 2 4 IrDA INTERFACE 2 3 2 5 MEDIA 2 4 3 APPEARANCE 3 1 3 1 FRONT REAR VIEW 3 1 3 2 OPERATION PANEL 3 2 4 INSTALLING THE PRINTER 4 1 4 1 LOADING THE BATTERY 4 1 4 2 INSTALLING THE MEDIA GUIDE 4 3 5 LOADING THE MEDIA 5 1 6 SECURING THE PRINTER TO YOUR WAIST 6 1 7 ISSUING THE MEDIA 7 1 8 CARE HANDLING OF THE MEDIA 8 1 ...

Page 4: ... may not be copied in whole or in part without the prior written permission of TEC 2 The contents of this manual may be changed without notification 3 Please refer to your local Authorized Service representative with regard to any queries you may have in this manual Copyright 1997 by TEC CORPORATION All Rights Reserved 570 Ohito Ohito cho Tagata gun Shizuoka ken JAPAN ...

Page 5: ...between a handy terminal and the printer is adopted Owing to a low power consumption design and use of a chargeable lithium battery as a power source this printer can issue 300 pieces of 40 mm pitch labels with a fully charged battery Loading a label roll is very simple just put a label roll into the printer and close the media cover A belt holder provided on the rear of the printer enables the pr...

Page 6: ...erference to radio communications However there is no guarantee that interference will not occur in a particular installation Ifthisequipmentdoescause harmfulinterferencetoradioortelevision reception which can be determined by turning the equipment off and on the user is encouraged to try to correct the interference by one or more of the following measures Reorient or relocate the receiving antenn...

Page 7: ... switch in the O position to stop movement Safety Summary Personalsafetyinhandlingormaintaining the equipment is extremely important Warnings and Cautions necessary for safe handling are included in this manual All warnings and cautions contained in this manual and written inside or outside of the printer should be read and understoodbeforehandlingormaintaining the equipment Do not attempt to effe...

Page 8: ...s indicates that there is the risk of death or serious injury if the machines are improperly handled contrary to this indication WARNING If water or any other liquid enters the machine turn off the power Continuous use of the machine under such conditions may cause fire or electric shock If the enclosure is damaged when dropped or subject to shock turn off the power Continuous use of the machine u...

Page 9: ...incorrectly replaced Replace the battery only with TOSHIBA TEC Corporation BatteryPackTypeB 213 BT 7 2 V 1350 mAh Li ion Discard used batteries according to the manufacturer s instruction ATTENTION II ya denger d explosion s il ya remplacementincorrectdelabatterrie Remplacer uniquement avec une batterie du même type ou d un type équivalent recommandé par le constructeur Mettre au rebut les batteri...

Page 10: ...tery into fire or heat it with a microwave or oven etc Do not load the battery with the electrodes reversed Do not connect the electrodes with metal objects like wire Do not carry or store the battery along with metal objects such as necklaces hairpins etc Do not stick a needle into hammer step on or drop the battery Do not solder the battery Do not leave the battery where the temperature is more ...

Page 11: ...ssubjecttorapidchange in temperature as this causes condensation causing electric shock or machine failure Do not damage the print head platen or strip roller with a sharp object Doing so may cause machine failure Do not touch or contact the print head element with a metal object Doing so may cause machine failure Use the specified media only Failure to do this may cause machine failure Be sure to...

Page 12: ...only Failure to do this may cause the battery to overheat burst or burn Do not force the battery into the machine or battery charger Doing so may cause the battery to overheat burst or burn Check for the correct electrode Do not connect the battery to a power outletoracarcigarettelighterjackasthis may cause the battery to overheat burst or burn Because the B 213 BT battery is exclusively for the B...

Page 13: ...a dry cloth or a cloth slightly dampened with a mild detergent solution NEVER USE THINNER OR ANY OTHER VOLATILE SOLVENT on the plastic covers 3 USE ONLY TOSHIBA TEC SPECIFIED media 4 DO NOT STORE the media where they might be exposed to direct sunlight high temperatures high humidity dust or gas 5 Any data stored in the memory of the printer could be lost during a printer fault 6 DO NOT open the m...

Page 14: ... B 1 1 APPLICABLE MODEL Interface 11 Radio 418 MHz RS 232C 12 Radio 433 MHz RS 232C 23 RS 232C 24 RS 232C IrDA Issue mode H Batch Strip mode Dot density of the print head G 8 dots mm Destination GB Great Britain QP Europe QM Other countries NOTE The B 211 GH11 GB model is for exclusive use in Great Britain ...

Page 15: ...1 11 EM1 33043D 1 INTRODUCTION 1 2 ACCESSORIES 1 2 ACCESSORIES Owner s Manual Print Head Cleaner Battery Media Guide ...

Page 16: ...s 24x24 dots Times Roman 21 point Helvetica 18 point Letter Gothic 14 3 point Courier 15 point Presentation 27 point NW7 EAN 8 EAN 13 CODE 39 Interleave 2 of 5 PDF417 EAN128 CODE128 GH11 model RS 232C or radio 418 MHz GH12 model RS 232C or radio 433 MHz GH23 model RS 232C GH24 model RS 232C IrDA Lithium ion battery 7 2V 1350mA official Item Dimensions Weight Operating temperature Operating humidit...

Page 17: ...tion method Transmission speed Protocol Communicating distance Description FM superhet UHF radio telemetry receiver Complies with MPT1340 ETS300 220 418 MHz 433 92 MHz Unidirectional Receive only 4800 bps 8 bit data non parity stop bit 1 bit 3 m 2 3 RADIO INTERFACE The following specification is applicable only to the GH11 and GH12 models NOTE The RS 232C interface cable mustbedisconnectedwhenusin...

Page 18: ...icable angle 15 degrees max Ambient light immunity 1 000 lx max under a fluorescent lamp or incandescent lamp Intensity of emission Min 36mW SR θh θv 15 Receivable infrared ray Min 7µW cm2 θh θv 15 Protocol Start stop synchroniza tion Half duplex transmission Start bit 1 bit Stop bit 1 bit 8 bit data Non parity 2 4 IrDA INTERFACE The following specification is applicable only to the GH24 model 2 4...

Page 19: ...2 4 EM1 33043D 2 SPECIFICATIONS 2 5 MEDIA 2 5 MEDIA Label Receipt Black Mark on reverse side Receipt paper Fig 2 1 G D H B A F G D C H I E B A Feed direction ...

Page 20: ...1 0 52 0 Receipt 34 37 40 43 46 49 52 55 0 5 Gap length 3 0 7 0 Black mark length 3 0 7 0 Effective print width 48 0 Effective print length 7 0 160 0 Margin 1 0 gap 7 mm 5 0 gap 3 mm Outer roll diameter ø34 Max Roll way The print side facing inside Thickness Label 111µm Receipt 65µm Strip mode Batch mode C B A D E F G H I Unit mm NOTE Do not use media other than the above to ensure print quality a...

Page 21: ...EAR VIEW Fig 3 1 Rear View Belt Holder Serial Interface Connector Front View Battery Cover Battery Cover Release Catch Power Switch Status Indicator REPRINT Button Media Cover Backing Paper Outlet Media Outlet Media Cover Release Catch IrDA Interface Window GH24 model only ...

Page 22: ...l as the previous one When the button is held the printer issues labels continuously Receipts are fed for 20 mm by pressing this button once STATUS Indicator Red The status indicator lights and then goes off at power on Theindicatorwhichdoesnotlightor stayslitindicatestheloadedbattery is uncharged Power Switch A slide power switch REPRINT STATUS I ...

Page 23: ...only Failure to do this may cause fire or electric shock 3 In the United States used lithium ion batteries should be returned to the store where you bought the machine USA only 4 LITHIUM ION BATTERY DISPOSE OF PROPERLY Caution Do not handle damaged or leaking lithium ion battery Battery Cover Fig 4 1 1 Slide the battery cover release catch toward the direction indicated by the arrow and open the b...

Page 24: ...er from the battery and then load the battery in the correct orientation as indicated in the following figure Battery Pack Cover Battery Fig 4 2 3 Close the battery cover completely 4 Turn on the printer and the status indicator will blink then go off The status indicator which does not light or stays lit indicates that the battery is uncharged ...

Page 25: ...in position 4 2 INSTALLING THE MEDIA GUIDE 4 2 INSTALLING THE MEDIA GUIDE NOTE The media guide is not required for a 55 mm wide label roll 1 Slide the media cover release catches and open the media cover Fig 4 3 WARNING A cutter is attached to the inside of the media cover Care should be take not to injure your hand with the cutter when opening the cover Media Guide 2 1 ...

Page 26: ...atethemediaguide push up the pin on the media guide with a screw driver or equivalent and remove the media guide from the printer 4 2 INSTALLING THE MEDIA GUIDE Fig 4 4 Media Guide Pin Slot 1st 2nd 3rd 4th 5th 6th 7th Media 52 49 46 43 40 37 34 Width Unit mm ...

Page 27: ...lsandreceipts 1 Turn off the printer 2 Slide the media cover release catches in the direction indicated by arrows A and open the media cover Media Cover Fig 5 1 WARNING A cutter is attached to the inside of the media cover Care should be taken not to injure your hand with the cutter when opening the cover ...

Page 28: ...LOADING THE MEDIA Fig 5 3 3 Put a label roll or a receipt roll into the media holder unit in the orientation as shown below Media Holder Unit Media Roll Fig 5 2 Batch issue 1 Insert the leading edge of the label roll into the media outlet ...

Page 29: ...he printer and press the REPRINT button The printer will align the print start position for the label When using receipts the printer will feed for 20 mm 2 Close the media cover completely Make sure that the media cover release catches snap back into position Fig 5 4 ...

Page 30: ... LOADING THE MEDIA Strip issue 1 Unrollthelabelrollalittleandremove a label Fig 5 6 Fig 5 5 2 Close the media cover completely Make sure that the media cover release catches snap back into position 5 LOADING THE MEDIA ...

Page 31: ...e sure to take up any slack in the media roll before closing the media cover An incompletely closed cover will cause a media skew print position misalignment poor print quality paper jam etc 2 If the media cover is closed while the printer is turned on the printer will automatically feed a label to align the print position 5 LOADING THE MEDIA ...

Page 32: ... WAIST 6 SECURING THE PRINTER TO YOUR WAIST CAUTION Care should be taken not to drop the printer when securing it to your waist 1 Lift the belt holder Fig 6 1 2 Insert the belt holder into your belt and lower the printer to secure it to your waist Belt Belt Holder Fig 6 2 Belt Holder ...

Page 33: ... areas subject to noise and radio interference 2 Be sure to disconnect the RS 232C interfacecablefromtheprinterbefore performing radio communication or IrDA 3 To perform the radio communication or IrDA the printer must be synchronizedwiththehandyterminal 4 IrDA is available on the condition indicated below The following performance is obtained under the fluorescentlamp max 1000lx Care must be take...

Page 34: ...tingmanual Radio Communication Sample Fig 7 1 3 Issuing labels 1 The number of labels are specified when issuing labels in batch mode To re issue the label press the REPRINT button 2 The printer prints labels one by one in strip mode by pressing the REPRINT button To issue more than one label remove the printed label before issuing the next one NOTE Trim off the backing paper coming from the backi...

Page 35: ...ton to feed it to the position where it is easily cut Each timetheREPRINTbuttonispressed the receipt is fed for 20 mm 4 Trim off the printed media upward or downward with the cutter NOTE Do not pull the media toward the feed direction as this will misalign the print position of the next media Media Fig 7 2 ...

Page 36: ...orprinter Readthe following guideline carefully Do not store the media for longer than the manufactures recommended shelf life Store media rolls on the flat end do not store them on the curved sides as this might flatten that side causing erratic media advance and poor print quality Store the media in plastic bags and always reseal after opening Unprotectedmediacangetdirtyandthe extra abrasion fro...

Page 37: ...pm and CL 600 ppm Some ink used on pre printed labels maycontaincomponentswhichshorten the print head s product life Do not use labelspre printedwithinkwhichcontains hard substances such as carbonic calcium CaCO3 and kaolin Al2 O3 2SiO2 2H2 O For further information please contact your local distributor or your media manufacturer 8 CARE HANDLING OF THE MEDIA ...

Page 38: ...the cleaning i e low usage weekly high usage daily 1 Turn off the printer 2 Open the media cover 3 Remove the media roll from the printer 4 Clean the print head element with the print head cleaner 5 Wipe the cutter platen and strip roller with a soft cloth moistened with alcohol Removedustorforeignsubstancesfrom the internal parts of the printer if any WARNING Care should be taken not to injure yo...

Page 39: ... paper particles or stains from thefeedgapsensor blackmarksensor and the batch strip sensor with a soft cloth Print Head Print Head Cleaner Fig 9 1 Cutter Strip Roller Feed Gap Sensor Black Mark Sensor Platen Strip Mode Sensor Fig 9 2 9 1 CLEANING ...

Page 40: ... CAUTION 1 DONOTPOURWATERdirectlyonto the printer 2 DONOTAPPLYcleanerordetergent directly onto any cover or panel 3 NEVER USE THINNER OR OTHER VOLATILE SOLVENT on the plastic covers 4 DO NOT clean the covers or the operation panel with alcohol as it may cause them to discolor loose their shape or develop structural weakness WARNING 1 Be sure to turn off the printer prior to performing any maintena...

Page 41: ...MED MEDIA 1 Turn off the printer 2 Open the media cover 3 Remove the media roll from the printer 4 Remove the jammed media DO NOT USE any sharp implement or tool as these could damage the printer 5 Clean the print head and platen then remove any further dust or foreign substances ...

Page 42: ...oubleshooting guide and take corrective action Action Load a new media roll Close the media cover completely Turn off the printer remove the jammed media and re load the media roll correctly Contact a TOSHIBA TEC service representative for repair Check that the interface cable is connected firmly Check the communication parameters Turn off the printer and replace the battery with a fully WARNING I...

Page 43: ...pletely Other problems The printer does not issue media Print failure Corrective action Charge the battery fully Turn on the printer Re load the media roll correctly Check the handy terminal for an error status and take appropriate action described in the handy terminal s operating manual Close the media cover completely Clean the print head with the attached print head cleaner Replace the media r...

Page 44: ......

Page 45: ......

Page 46: ...PRINTED IN JAPAN EM1 33043D 99010500 GS E ...

Reviews: