EN
sPEEd contRoL PRogRaMMing
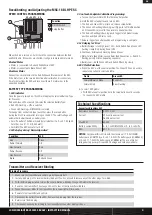
When the ESc is turned on, it will check the connection between the Red
and White wire. If the wires are shorted, it will go into brushed motor mode.
Brushed Motor
• Motor (+) connected to Red and White Wire of ESc
• Motor (-) connected to Black Wire of ESc
Brushless Motor
connect the 3 motor wires to the Red, White and Black wires of the ESc.
If the motor runs in the reverse direction after calibration, disconnect any
2 motor wires from the ESc and reconnect those 2 motor wires in the
opposite orientation.
BATTERy TyPE PRoGRAmmING
1. LED indicator
Once the power is turned on, the LED will display the selected Battery Type
for 2 seconds.
Red and Green LEDs are used to display the selected Battery Type:
• Red LED Flashing = LiPo is selected
• Green LED Flashing = NiMH/Nicd is selected
To change from one battery type to another, press the setup button
during the first 2 seconds after turning on the ESc. The cutoff voltage will
automatically adjust based on battery type.
• For LiPo battery: The ESc will auto detect whether it is 2-cell, 7.4V (6.0V
cutoff) or 3-cell, 11.1V (9.0V cutoff)
• For NiMH: The ESc will cut off at 4.3V
2. LED display during “Normal Operation”
3. One-Touch Endpoints Calibration Programming:
a. Turn on the Transmitter with throttle in neutral position.
b. Hold the ESc setup button and turn on ESc.
c. The Red and Green LED will turn on; release setup button.
d. The Green LED will begin flashing; pull trigger to full throttle position
until Green LED turns solid, then return to neutral position.
e. The Red LED will begin flashing; push trigger to full brake/reverse
position until Red LED turns solid.
f. Release trigger to neutral position and programming is complete.
4. LED display for “Error”
a. Battery Voltage is too high (over 13V)—Solid Red LED and Green LED
flashing slowly (Only during Power ON)
b. Overheat—Alternatively Flashing Red and Green
c. Motor Failure (Bad Motor, Locked Rotor, Bad connection)—Red LED
flashing quickly 3 times (repeating sequence)
d. Battery Low—Solid Green LED and Red LED flashing slowly
5. ESC Profile Selection:
a. When the ESc is at the neutral position, the Green LED can be used to
indicate the currently selected profile:
b. To select ESc profile:
• With ESc at neutral position, hold the setup button over 5 seconds
to change the ESc profile
Recalibrating and adjusting the Msc-18BL hP Esc
Transmitter and Receiver Binding
Binding Procedure
1. Make sure the transmitter and vehicle are both powered off.
2. Install a bind plug in the receiver battery/bind port. You do not need to remove any of the other plugs to re-bind.
3. With the Bind plug installed, turn on the vehicle. Notice a blinking Orange LED within the receiver.
4. Power on the transmitter. The orange LED on the rear of the transmitter will blink.
5. When the receiver binds to the transmitter, the receiver light will turn solid.
6. Power off the transmitter and vehicle.
7. Disconnect the battery from the ESc. Remove the bind plug from the receiver.
8. Safely store the bind plug.
9. The receiver will keep the binding to the transmitter until another binding is done.
condition
LEd
Stop
Green
Partial Forward
Off
Max Forward
Red
Partial Reverse
Off
Max Reverse
Red
Brake
Red and Green
Profile
green LEd
Forward/Reverse Mode
Solid ON
Forward Only
Slow Flashing
technical specifications
noticE:
Only power this vehicle with the stock 6-cell, 7.2-Volt NiMH
battery pack (LOSB1209), a 2-cell, 7.4-Volt LiPo battery pack (LOSB9835)
or 3-cell, 11.1-Volt LiPo battery pack (LOSB9836). The use of higher
voltage battery packs will cause ESc damage and void any warranty.
sensorless Brushless Esc
Resistance per phrase
0.0017 Ohm
current
32A continuous current,
260A burst current
Max RPM
80,000
Battery compatibility
4- to 7-cell NiMH/Nicd, or 2- to 3-cell LiPo
BEc
5V, 1A
Function
A
On/Off Switch
B
Setup Button
B
A
5
Losi Mini 8ight BRUshLEss BUggy• instRUction ManUaL


