


6292,
6934*
6292,
6934*
6915
6915
9270,
9279,
9280*
7413
7260
7413
7260
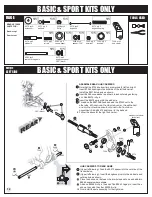
ball cups thread on in opposite directions,
and face in opposite directions
2 1/2" (2.50" or 63.5mm)
1:1
7230
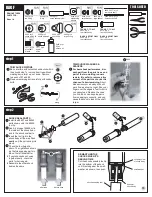
T O O L S U S E D
B A G E
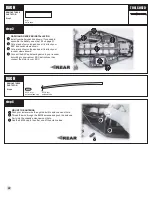
REMOVE THESE
PARTS FOR:
Steps 2-3
6292, 6934*, qty 2
4-40 x 3/8
6915, qty 2
4-40 x 5/8
1:1
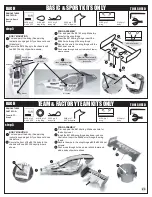
BASIC & SPORT ONLY
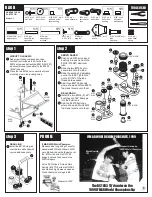
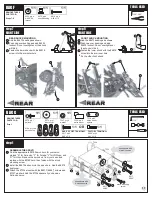
9270, qty 1
rear shock tower
MOUNT THE REAR SHOCK
TOWER
Orient the tower outward as
shown and mount to bulkhead
with #6292 (6934*) screws.
Fasten the tower to the
transmission brace with the #6915
screws.
Add two #7413 screws in the
middle holes at top, then thread
on #7260 nuts.
1:1
7413, qty 2
4-40 x 3/4
1:1
7260, qty 2
4-40 nut
14
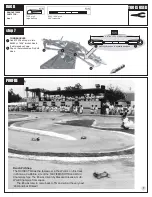
s t e p 2
L E F T S I D E
R E A R V I E W
1/16", 3/32"
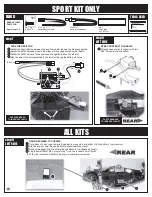
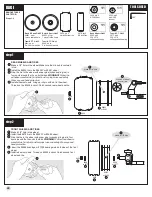
A L L K I T S
COMPLETED REAR ASSEMBLY
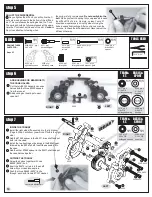
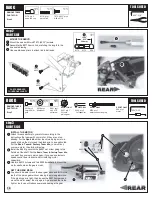
s t e p 3
ADD TURNBUCKLES
Twist #7230 ball cups onto the
#6262 (1403*) turnbuckle until
you get the dimension shown.
Ball cups will face in opposite
directions.
Connect ball ends with the
turnbuckle ball cups as shown,
using your needlenose pliers.
Assemble both right and left
sides.
7230, qty 4
large ball cup
6262, 1403*, qty 2
1.65" turnbuckle
1:1
1:1
7230
6262, 1403*
TEAM & F.T. ONLY
9279, 9280*, qty 1
rear shock tower
1:1


