background image

TASCAM  DA-3000

 37

6 − Playback

Locating to specific positions

If you use a USB keyboard with a number pad or a USB number 

pad, you can locate to specific positions when the unit is 

stopped, playing back or in playback standby.
Press the * (asterisk) key to clear the track number and time 

display and prepare the unit to receive numeric input.
Use the numeric keypad to enter numbers in the following order. 

 p

  Track number: 3 digits

 p

  Elapsed time from track beginning: 2 digits each for hours, 

minutes, seconds

For example, if you want to specify a location that is 1 minute 30 

seconds from the beginning of track 2, you would press keys in 

the following order.

w

 0 

w

 2 

w

 0 

w

 0 

w

 0 

w

 1 

w

 3 

w

 0

When you finish entering the nine digits, the unit will automati-

cally locate to the specified position.
After locating to the new position, the unit will resume the same 

status as before (stopped, in playback standby or playing back).
This means playback will start automatically from the located 

position only during playback 

Locating to a position after partial entry

If you press the press the MULTI JOG dial, PLAY button or 

PAUSE button on the front panel (or remote control PLAY 

button or F1 button) before you finish entering the time, you 

will locate to the position that is specified at that point.
For example, suppose you input only:

w

 0 

w

 2 

w

 0 

w

 0 

w

 1 

w

 2

Then, if you press the MULTI JOG dial, PLAY button or PAUSE 

button, the unit will locate to 12 minutes after the beginning of 

track 2. 
The button pressed when locating determines what happens 

after locating.

MULTI JOG dial pressed: 

The unit resumes playback or playback standby according to 

the status before locating. 

PLAY button pressed: 

Playback starts. 

PAUSE button pressed: 

The unit enters playback standby. 

Remote control PLAY button pressed: 

If playing back before locating, playback pauses after 

locating. 
If stopped or in playback standby before locating, playback 

starts after locating.

Adding marks manually during 

playback

When stopped, when in playback standby or during playback, 

you can add marks manually to the track in any positions you 

like. During track playback, you can move quickly to marks.

Adding marks during playback

When a track is stopped, playing back or in playback standby, 

press the MULTI JOG dial (or remote control MARK button) at 

any point where you want to add a mark.

NOTE

•  Each track can store information for a maximum of 99 

added marks.

•  You can also add marks during recording. (See “Adding 

marks manually during recording” on page 27.)

•  When adding a mark manually, the Mark Name “MARKxxx” * 

is used.  

* “xxx” is a number that increments through all MARKs in 

this track.

Locating to marks

When a track is stopped, playing back or in playback standby, 

you can turn the MULTI JOG dial (or use the remote control F3 

[+]/F4 [−] buttons) to locate to marks. 
Turn the MULTI JOG dial right to locate to the nearest later mark 

or left to locate to the nearest previous mark from the current 

position. 
When locating to a MARK point, that MARK point's name is 

displayed in the button section of the HOME screen. Also, if a 

MARK point is passed during playback, that MARK point's name 

is also displayed.
By pressing the HOME/DISPLAY button, the MARK Point name 

for the current position is also displayed.

Deleting marks

You can delete an added mark when stopped or when in 

playback standby. 

1.  Move to the mark that you want to delete. (See “Locating to 

marks” on page 37.)

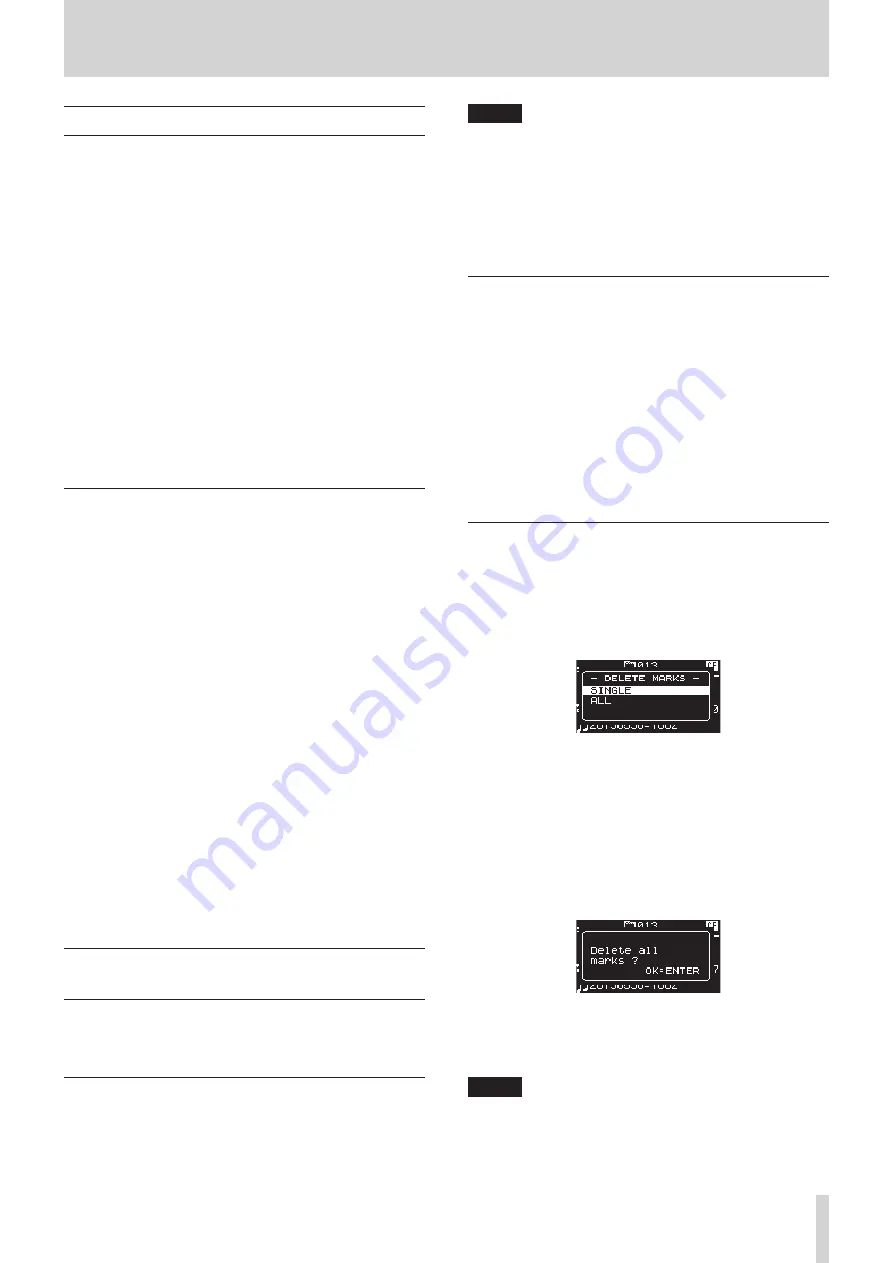
2.  Press the MULTI JOG dial to open the DELETE MARKS 

pop-up. 

3.  Turn the MULTI JOG dial to select whether to delete one 

mark or all marks in a file. 

Options: 
 

SINGLE:  Delete only the selected mark. 


ALL: 

Delete all the marks added to the current file. 

4.  Press the MULTI JOG dial to delete the mark or marks.

If you selected SINGLE, the Home Screen will reappear after 

the selected mark is deleted.
If you selected ALL, a confirmation pop-up message will 

appear. 

Press the MULTI JOG dial again to delete all the marks added 

to the current file. 
The Home Screen will reappear after all the marks are 

deleted.

NOTE

To cancel marked deletion, press the 

EXIT/CANCEL [PEAK 

CLEAR]

 button.

Summary of Contents for SD-500HR

Page 1: ...D01323621A Z SD 500HR Hi Res Digital Recorder OWNER S MANUAL MODE D EMPLOI MANUAL DEL USUARIO ...

Page 2: ...fied Do not mix and use new and old batteries or different types of batteries together The batteries could rupture or leak causing fire injury or stains around them Do not carry or store batteries together with small metal objects The batteries could short causing leak rupture or other trouble Do not heat or disassemble batteries Do not put them in fire or water Batteries could rupture or leak cau...

Page 3: ... bottom of the unit as shown below 1 Read these instructions 2 Keep these instructions 3 Heed all warnings 4 Follow all instructions 5 Do not use this apparatus near water 6 Clean only with dry cloth 7 Do not block any ventilation openings Install in accordance with the manufacturer s instructions 8 Do not install near any heat sources such as radiators heat registers stoves or other apparatus inc...

Page 4: ...g the recording file format 21 Using the sampling rate converter 21 Monitoring the input signal 22 Adjusting the input signal level 22 Setting the peak hold indicators 22 Setting the master clock 23 Using this unit as an AD DA converter 23 Basic recording operations 24 Sync recording 24 Activating and setting sync recording 24 Sync recording operation 25 Creating new higher numbered tracks automat...

Page 5: ...rder 41 Removing tracks from playlists 41 8 Miscellaneous functions 42 INFO button and indicator 42 Copying files between media backing up 42 Viewing information about the media 43 Restoring the factory settings 43 Using a USB keyboard 43 Setting the keyboard type 43 Using a keyboard to input text 44 Keyboard operation list 44 9 Message Lists 45 10 Troubleshooting 47 11 Specifications 48 Media and...

Page 6: ...dicated switch ADDA DIRECT mode that enables use as a standalone AD DA converter Temperature compensated crystal oscillator TCXO enables high frequency precision 1 ppm or less Included items This product includes the following items Take care when opening the package to avoid damaging the items Keep the packing materials for transportation in the future Please contact the store where you purchased...

Page 7: ...s with bad ventilation or high humidity Very dusty locations In order to assure good heat dissipation do not place any object on top of the unit Do not place the unit on top of a pre main amplifier power amplifier or other device that generates heat Power supply Connect the unit to the standard power outlet Hold the plug when connecting and disconnecting the power cord Beware of condensation If th...

Page 8: ...back and SD CF cards for recording Microdrives cannot be used with this unit Moreover some SD cards CF cards and USB flash drives especially older ones use slower flash memory components or smaller internal buffers When using an SD card CF card or USB flash drive like this the unit might not operate properly A list of SD cards CF cards and USB flash drives that have been confirmed to operate with ...

Page 9: ...ers While pressing and holding the HOME DISPLAY button turn to adjust the display and indicator brightness Turn when the BROWSEscreen is open to select subfolders and files in the same folder See BROWSE screen navigation on page 29 Button functions Use to confirm selections and settings ENTER function When the BROWSEscreen is open press to open a pop up menu for the selected folder or file See Fol...

Page 10: ...pop up message is open press this to answer NO When the Home Screen is open press this to clear the level meter peak hold indicators t STOP button Stops playback and recording y PLAY button indicator Press when stopped or in playback standby to start playback Press in recording standby to start recording During playback or recording this button lights u PAUSE button indicator Press when stopped or...

Page 11: ...ITAL IN OUT SDIF 3 connectors are connected the DIGITAL IN OUT S PDIF CASCADE and DIGITAL IN OUT AES EBU connectors cannot be used to input and output digital audio signals j DIGITAL IN OUT SDIF 3 connectors These are digital audio input and output connectors for DSD signals These are digital audio input and output connectors for the SDIF 3 DSD raw format Each connector carries either the left or ...

Page 12: ... cursor up See BROWSE screen navigation on page 29 0 F4 button Skip to the previous mark Press when the BROWSEscreen is open to move the cursor down See BROWSE screen navigation on page 29 Home Screen The main unit display shows the following information 1 Total number of tracks This shows the total number of tracks in the playback area 2 SRC operation indicator When the sampling rate converter is...

Page 13: ...page 42 INFO View media information page 43 RENAME Edit folder and file names page 31 DELETE Delete folders and files page 31 DIVIDE Divide files page 34 UNDO REDO Undo redo DIVIDE operations page 35 F PRESET Restore the factory settings page 43 KEYBOARD Keyboard type setting page 43 PEAK HOLD Level meter peak hold time setting page 22 CLOCK ADJST Time setting page 17 UNDO only appears after a DIV...

Page 14: ...RKscreen open 5 Turn the MULTI JOG dial to change the setting 6 To change the setting of a different item on the same screen press the MULTI JOG dial to move the cursor to the next setting 7 Turn the MULTI JOG dial to change the setting 8 Repeat steps 5 7 as necessary to set other items 9 Press the MULTI JOG dial to return to the menu Press the HOME DISPLAY button to return to the Home Screen NOTE...

Page 15: ...vices to the same power supply line When using a power strip for example use a thick cable with a high current capacity to minimize variation in the power voltage Digital recorder or other device Clock generator or other device ANALOG IN BALANCED L R ANALOG OUT BALANCED L R ANALOG IN UNBALANCED L R ANALOG OUT UNBALANCED L R DIGITAL OUT S PDIF DIGITAL IN S PDIF AES EBU IN OUT SDIF 3 OUT R L SDIF 3 ...

Page 16: ...tery Do not heat or disassemble the coin shaped lithium ion battery or put it into fire or water Do not carry or store the coin shaped lithium ion battery with small metal objects Doing so could short the battery and cause leakage or rupture for example When storing or disposing of batteries cover the contacts with tape to prevent them from touching other batteries or metal objects Follow the disp...

Page 17: ...s discharged the CLOCK ADJUST screen will appear immediately so that the Time can be corrected Setting the date and time The date and time are added to recorded files based on the unit s built in clock 1 Press the MENU button repeatedly to open the UTILITY page and turn the MULTI JOG dial to select CLOCK ADJST 2 Press the MULTI JOG dial to open the CLOCK ADJUST screen 3 Press the MULTI JOG dial ag...

Page 18: ... or CF card when the unit is in use recording playing back writing data to a card etc Doing so could cause recording to fail recorded data to be damaged sudden loud noise to be output from monitoring equipment damage to equipment and harm to hearing 1 Pull the card slot door forward to open it 2 To eject an SD card press the SD card in slightly To eject a CF card press the square button located to...

Page 19: ...on NOTE During selection press the EXIT CANCEL PEAK CLEAR button to cancel the selection and return to the menu screen 4 The name of the currently selected media appears at the top right of the Home Screen SD card selected CF card selected USB flash drive selected Preparing SD CF cards and USB flash drives You must use this unit to format SD cards CF cards and USB flash drives in order to make the...

Page 20: ...ew file On playback in order to hear the audio seamlessly please set the TRACK GAP mode setting to GAPLESS See Setting gapless playback mode on page 38 Unexpected power interruptions If an unexpected power interruption occurs when recording to an SD or CF card the unit has a protection function that might prevent the complete loss of all track recording data Data recorded up to about 25 seconds be...

Page 21: ...the CHANNELscreen 11 Turn the MULTI JOG dial to set the Recorded file s channel type Stereo File or Dual Mono File Options STEREO default MONOx2 12 Press the MULTI JOG dial to confirm the selection and return to the menu screen Using the sampling rate converter Since this unit has a built in sampling rate converter you can record at a sampling frequency that is different from the sampling frequenc...

Page 22: ...UT VOL 2 Press the MULTI JOG dial to open the INPUT VOLUME screen NOTE The LEVELitem shows the input levels 3 Turn the MULTI JOG dial to adjust the VOLUMEitem which is the input signal level Options MUTE 60dB 12dB default 0 0dB CAUTION The level meter OVER indicators will light at the following levels If the DSD mode is set to 3 though they will light at 3dB and higher PCM recording and playback 1...

Page 23: ... another recorder or DAW for example To use this unit as an AD DA converter set ADDA D IRECT mode to ON When ON the INPUT SELECTscreen setting does not function and setting the input selection for the analog and digital inputs separately is necessary In addition when ADDA D IRECTmode is ON playback is not possible but recording the analog input signal is possible To play back a recording set ADDA ...

Page 24: ...the recording is being written to the current media WRITING FILE will appear the display While this message is shown do not move the unit turn off the power or remove the current media The recorded content cannot be saved correctly if writing is interrupted Sync recording If the sync recording function is on recording will begin automatically when the input signal exceeds the level set in advance ...

Page 25: ...function during recording the unit automatically creates a new track with a higher number when a set condition is met Use the menu to enable the Auto Track function and set its mode 1 Press the MENU button repeatedly to open the REC FUNC menu and turn the MULTI JOG dial to select AUTO TRACK 2 Press the MULTI JOG dial to open the AUTO TRACKscreen 3 Turn the MULTI JOG dial to set the auto track func...

Page 26: ...omatic mark function By turning the AUTO MARKoptions ON marks can be added automatically whenever the OVER indicator lights or an external clock synchronization error occurs Use of this function allows you to quickly find and check problems that occurred in the system during recording 1 Press the MENU button repeatedly to open the REC FUNC menu and turn the MULTI JOG dial to select AUTO MARK 2 Pre...

Page 27: ...Escreen 3 Turn the MULTI JOG dial to set the pause mode Options NEW TRK default New track with higher number created when switching from recording to recording standby SAME TRK No new track created when switching from recording to recording standby 4 Press the MULTI JOG dial to confirm the selection and return to the menu screen Setting the file name format You can specify the type of file name th...

Page 28: ...hift and press the MULTI JOG dial This also switches between numbers and symbols at the same time To cancel editing Press the EXIT CANCEL PEAK CLEAR button CAUTION You can also directly access SD and CF cards from a computer to change the names of files but doing so could change the playback order of the files Names that contain characters other than letters of the alphabet numbers and symbols can...

Page 29: ...ork with Press the MULTI JOG dial to open the folder or file menu pop up See Folder operations on page 30 See File operations on page 30 Press the EXIT CANCEL PEAK CLEAR button to move up one level in the file structure When using the folder or file menu press this to go back one step Turn the MULTI JOG dial or use the remote control F3 F4 buttons to select a subfolder or file inside the same fold...

Page 30: ...G dial to open the file menu pop up Turn the MULTI JOG dial to select the item that you want and press the MULTI JOG dial to execute the operation NOTE When a protected SD card is loaded the RENAME DELETE ADD P L and MOVE COPYitems cannot be used See SD card write protection on page 18 SELECT Open the selected file and return to the Home Screen RENAME Open the RENAMEscreen where you can edit the n...

Page 31: ...not appear when the RENAME function is being used The following symbols and punctuation marks cannot be used in names NOTE In addition to using the BROWSEscreen to select a folder or file to change its name you can also use the RENAMEitem on the TRACK ED ITpage of the menu screen to edit the name of the selected folder or file Deleting folders and files You can delete folders and files from SD car...

Page 32: ...operation Depending on the selected item MOVING or COPYING appears in a pop up and the folder or file is moved or copied After selecting MOVE After selecting COPY After moving or copying completes the BROWSEscreen reopens NOTE After using MOVE the moved folder or file will not remain in its original folder location After using COPY the copied folder or file will also remain in its original folder ...

Page 33: ...he folder menu pop up 2 Turn the MULTI JOG dial to select CREATE 3 Press the MULTI JOG dial to open the CREATEscreen 4 Input the folder name For details about how to input a folder name see Inputting and editing characters on page 28 5 After inputting the folder name turn the MULTI JOG dial to select Enter and press the MULTI JOG dial to confirm the name A confirmation pop up message appears NOTE ...

Page 34: ...ded After dividing completes the BROWSEscreen reopens NOTE When stopped you can press the EXIT CANCEL PEAK CLEAR button to return to the BROWSEscreen without dividing You cannot move to the beginning or end of a track by using the m buttons You can only make fine adjustments with the MULTI JOG dial when in scrub playback mode By pressing and holding the m buttons you can move the division point co...

Page 35: ...ress the EXIT CANCEL PEAK CLEAR button 4 Press the MULTI JOG dial to undo the file division UNDO WORKING appears in a pop up and the file division is undone After completing the undo the BROWSEscreen reopens The file that the undo operation was conducted on will be selected 5 After undoing a file division if you want to redo the division you can execute the REDOmenu item Press the MULTI JOG dial t...

Page 36: ...e played back by this unit is on the current media the Home Screen will appear as follows To stop playback Press the STOP button To pause playback and enter playback standby Press the PAUSE button Selecting tracks If the play area has more than one track you can either skip backward or forward to the track or enter the track number directly to select a track for playback Skipping to the previous o...

Page 37: ...ating Adding marks manually during playback When stopped when in playback standby or during playback you can add marks manually to the track in any positions you like During track playback you can move quickly to marks Adding marks during playback When a track is stopped playing back or in playback standby press the MULTI JOG dial or remote control MARK button at any point where you want to add a ...

Page 38: ... press the HOME DISPLAY button or remote control F2 button to return to the Home Screen 6 Select the track that you want to play back repeatedly and start playback Setting gapless playback mode You can set the unit so that gaps silent intervals between tracks during playback are eliminated If you want audio data including tracks recorded using the auto track and track increment functions to play b...

Page 39: ...acks in a playlist In addition you can register a folder to add all the tracks in that folder at one time For details see Registering folders and files in a playlist on page 32 Using the playlist menu With the Playlist folder or a playlist selected press the MULTI JOG dial to open the playlist pop up menu This is the menu to use when you want to work with the Playlist folder or a playlist NOTE If ...

Page 40: ... JOG dial A confirmation pop up message appears NOTE To cancel the deletion of a playlist press the EXIT CANCEL PEAK CLEAR button 4 Press the MULTI JOG dial to delete the selected playlist During playlist deletion DELETING P LIST appears in a pop up After deletion completes the BROWSEscreen reopens NOTE When you delete a playlist the audio files themselves are not deleted Only the playlist informa...

Page 41: ...rder of tracks that have been added to a playlist one at a time 1 Select the track that you want to rearrange on the BROWSE screen and press the MULTI JOG dial to open the playlist track pop up menu 2 Turn the MULTI JOG dial to select ORDER 3 Press the MULTI JOG dial The track to be reordered blinks 4 Turn the MULTI JOG dial to move that track to the position in the order where you want it and pre...

Page 42: ...ill not re appear until after recording is stopped and Alert 2 will not re appear until a different media is inserted Error message indicator red Information shown Master clock digital input error Pressing the INFO button toggles the display in the order ALERT information w Error Information w Operational Status w Home Screen The ALERT information and Error displays are only viewable when such an ...

Page 43: ...pen a confirmation pop up message NOTE To cancel press the EXIT CANCEL PEAK CLEAR button 3 Press the MULTI JOG dial again to restore the unit settings to their factory defaults READING MEDIA appears in a pop up When restoration completes the menu screen reappears Using a USB keyboard By connecting a Windows compatible USB keyboard or numeric keypad to the KEYBOARD connector on the front panel of t...

Page 44: ...er input mode is activated automatically according to the current operation of the unit Full keyboard Keyboard key s Operation Esc key Same as the EXIT CANCEL PEAK CLEAR button F1 key Same as the HOME DISPLAY button F2 key Same as the INFO button F3 key Same as the MENU button F12 key Same as the RECORD button R key Search backward P key Skip to the previous track S key Stop F key Search forward N...

Page 45: ...ady existed Un Redo failed The REDO operation failed CLOCK LOST Switched to internal Master clock synchronization became unlocked The unit switched to its internal clock CANNOT COPY Not Enough space on Media Not enough open space is available on the media so copying is not possible CANNOT INC Media full or too short interval Incrementing the track was not possible because either the interval was t...

Page 46: ...T RECORD Media Full Recording is not possible because there is no open space on the media CANNOT RECORD Take limit reached Recording is not possible because the maximum number of files has been reached PLAYLIST ERROR There are some unusable entries There is a problem with the playlist entry information CAUTION Cannot play while input monitoring When the Input signal monitoring function is ON and A...

Page 47: ...f open space or replace the media e If the folder already contains a large number of entries the total number of files folders and other items change the recording folder 8 8 Changed settings are not saved e This unit backs up settings whenever you change them This backup could fail if you turn the power off while this data is being written so do not turn the power off immediately after changing a...

Page 48: ...Format IEC60958 3 S PDIF Input frequency 44 1 48 88 2 96 176 4 or 192 kHz when SRC OFF 32 kHz 216 kHz when SRC ON Allowable frequency deviation 100 ppm when SRC OFF AES EBU balanced Connector XLR 3 31 1 GND 2 HOT 3 COLD Format AES3 2003 IEC60958 4 AES EBU Input frequency 44 1 48 88 2 96 176 4 and 192 kHz when SRC OFF 32 216 kHz when SRC ON Allowable frequency deviation 100 ppm when SRC OFF SDIF 3 ...

Page 49: ...gher Ref 20dB BALANCED JEITA 116 dB or higher UNBALANCED JEITA DSD mode 116 dB or higher Ref 20dB BALANCED AES 17 20k LPF 114 dB of higher UNBALANCED AES 17 20k LPF Frequency response PCM mode Fs 44 1 or 48 kHz 20 Hz 20 kHz 0 1 dB JEITA Fs 88 2 or 96 kHz 20 Hz 40 kHz 0 1 dB 0 3 dB JEITA Fs 176 4 or 192 kHz 20 Hz 80 kHz 0 1 dB 3 dB JEITA DSD mode 20 Hz 50 kHz 0 1 dB 3 dB JEITA 20 Hz 100 kHz 0 1 dB ...

Page 50: ...R Balanced Phones level Digital Outputs Analog Inputs L R XLR Balanced Input Source Input Volume Linked Digital Inputs SRC SRC ON OFF I F Rec Monitor Record Tracks Track L CF Card SD Card Track R D A XLR AES EBU XLR AES EBU Play RCA Unbalanced COAXIAL S PDIF BNC SDIF 3 DSD RAW DIR A D A D Balanced Circuit Input Source RCA Unbalanced COAXIAL S PDIF BNC SDIF 3 DSD RAW I F withDIT Balanced Circuit D ...

Page 51: ...d you may also have other rights that vary by country state or province If you have a warranty claim or request please contact the dealer where you bought the product 该保证书赋予了顾客特定的合法权利 并且因国家 州或省等地域的不同 顾客可能拥有其他权利 如需申请或要求保修 请与购 买本产品的销售店进行联系 WARRANTY 51 ...

Page 52: ...4 Gage Road Montebello California 90640 U S A Phone 1 323 726 0303 TEAC AUDIO EUROPE Gutenbergstr 3 82178 Puchheim Germany Phone 49 8142 4208 141 This device has a serial number located on its rear panel Please record the serial number and retain it for your records Model name SD 500HR Serial number Printed in China ...

Reviews: