background image

29

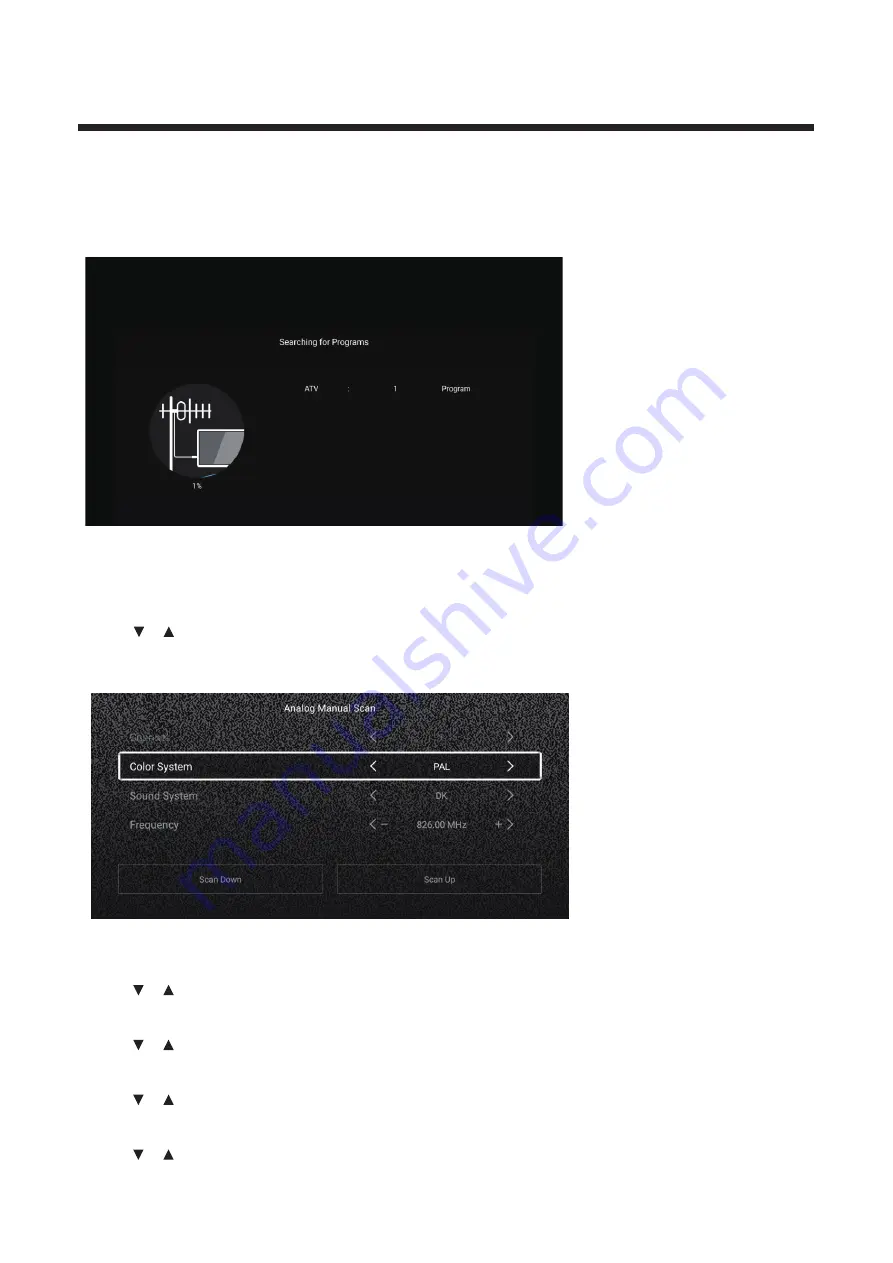
Analog Manual Scan

A

nalog manual search can search for effecti

v

e simulation program channel manually.

I

t can be selected only in the 

A

T

V I

nput.  

Press


enter the sub-

/  

button


to


select


A

nalo

g M

anua

l S

can , and press


OK


button


to


m

enu.

Press  

EXIT 

or

 MENU 

button to quit.

Channel   


 ◄  ►

 the channel number. 

Press

 /  

button


to


select


C

hannel

.

 Press

 /  

button


to


select

Color System   


 ◄  ►

 P

A

L/

S

E

CAM

/NT

SC

/

A

uto.

Press

 /  

button


to


select


C

olo

r S

ystem

.

 Press

 /  

button


to


select

Sound System


 ◄  ►

 D

K/

BG

/

I

/L/

M

/N.

Press

 /  

button


to


select


S

ound


S

ystem

.

 Press

 /  

button


to


select

Frequency   


 ◄  ►

Press

 /  

button


to


select


Frequency

.

 Press

 /  

button


to


adjust.

Auto Scan

A

utomatic search can search for effecti

v

e program channel automatically.

Press

 ▼


start auto search

/  

button


to


select


A

uto


S

can, then press


OK


button


to


.

I

f you want to stop searching, press  

EXIT 

or

 MENU 

button to stop searching.

Summary of Contents for LE32A321

Page 1: ...USER MANUAL WARRANTY INFORMATION INSIDE PLEASE READ www teac com au IMPORTANT LE32A321 LED TV Trademark of TEAC Corporation JAPAN...

Page 2: ......

Page 3: ...ep this information for your own records Owner s Name Owner s Address Postcode Model Name No S erial No Dealer s Name Dealer s Address Postcode Thank you for selecting a TEAC product If your TEAC prod...

Page 4: ...und or replacement via your TEAC Authorised Retailer is available for a period of 14 days after purchase for goods that have been inspected and determined to have a major failure Refund and exchange i...

Page 5: ...atteries 9 Connecting to External Devices 7 Connecting external devices to your LED TV 7 What is Included TV Placement Setup 4 TV Stand Installation Removal 4 Unit and Accessories 4 Wall Mounting 4 TR...

Page 6: ...rack is used use caution when moving the cart apparatus combination to avoid injury from tip over Unplug the apparatus during lightning storms or when unused for long periods of time Refer all servici...

Page 7: ...qualified personnel should service this apparatus To avoid battery leakage remove exhausted batteries from the remote control or when not using for a long period Do not break open or throw exhausted b...

Page 8: ...mponents Caution Your new TV is heavy please consult with a professional wall mount installer WARNING Large TVs can fall over and cause major damage injury If you are standing a large TV on its feet w...

Page 9: ...ck View Button Functions 7 1 STANDBY Turn on TV CH Next channel CH Previous channel VOL Increase volume VOL Decrease volume 2 5 3 4 IR RECEIVER Receives infrared signals from the remote control INDICA...

Page 10: ...Satellite connection 9 11 VGA PC video input 12 RJ45 Network connection port DVB T Antenna connection 8 NOTE Before making or changing cable connections please make sure that power to the unit is comp...

Page 11: ...r satellite box HDMI cable Headphones Common Interface USB1 USB2 DC Max 500mA 5VDC MINI YPbPr MINI AV HDMI1 HDMI2 Coaxial cable VGA cable cable TV company Satellite signal VHF UHF antenna RF Coaxial c...

Page 12: ...Guide 15 INFO Show informations 16 NAVIGATION KEYS Up Down Left Right and OK ENTER To move in the menus and confirm settings 17 BACK Press to return to the previous menu 18 EXIT Exit the Menu 19 Press...

Page 13: ...ecomes weak or stops working replace the batteries in the remote control 1 Open the battery cover 2 Insert two size AAA batteries Place the batteries with their terminals corresponding to the and indi...

Page 14: ...system setting will appear when you open the TV on the first time Please set according to the on screen guide Press OK button to start the setup Press button to select the language Press button to se...

Page 15: ...11 Press button to select Connect the TV assistant Press button to select select the StoreMode Press button to select Set your TV network...

Page 16: ...Press button to select TV viewing guide Press button to choose the way you watch TV programs or source Home page ATV DTV AV YPBPR HDMI1 HDMI2 HDMI3 SCART VGA 12...

Page 17: ...ress button to select Home page in Setup Wizard or press button to select Home in the menu of ATV DTV input Press button to select Movie TV HOT APP FAV APP MUSIC You can choose the program you want on...

Page 18: ...S Press button to select OTHERS Press button to select the SETTINGS and press OK button to enter the System Setting Press button to select Network Time Commen System Info Network Press button to selec...

Page 19: ...Timer Auto Attach Get the current time and date automatically Time Zone Set the current time zone Time Edit Set the current time Date Format Set the current date 24 Hours Select the 12 hours or 24 hou...

Page 20: ...ery Blue Screen The device name Language Set the current display language The default language is English Input Method Set the remote controller input method WallPaper Set the Wallpaper System Recover...

Page 21: ...17 System Info Press button to to select System Info...

Page 22: ...in OTHERS on the Home page or press MEDIA button on the remote and press OK button to enter enter the Media Center Press button to select All Video Audio Image Play List Press button to select Play L...

Page 23: ...select Subtitle Track and press OK button to select close Encoding Standard Press button to select Encoding Standard and press OK button to select ISO WINDOWS Region Language Press button to select R...

Page 24: ...show interval Optional 3 5 8 12Sec Aspect ratio Set the aspect ratio Optional Auto Full screen Zoom Out Rotate Set the rotate Optional Default Rotate Right Rotate left Set as wallpaper Set the current...

Page 25: ...Home page button to select Press button to select ATV DTV AV YPBPR HDMI1 HDMI2 HDMI3 SCART VGA Or press Menu button and press button to select Source Press button to select the input source you want P...

Page 26: ...ome Source Picture Sound Channel Lock Common Advance Picture ress P MENU button to enter the main menu Press button to select the Picture Press OK button to enter the sub menu Press button to select P...

Page 27: ...brightness im proved contrast for energy saving Contrast Brightness Color Sharpness These terms Picture Mode are available only when User is selected in Press button to select Contrast Brightness Col...

Page 28: ...whole color is in favor of light The picture is more fresh and elegant Normal The picture does not in favor of any color The color is moderate Warm The picture is in favor of red green and less blue t...

Page 29: ...ing Impaired Multi Taack Sound More Settings Press MENU or EXIT button to quit Sound Mode Press button to select Sound Mode Press button to select Standard Music Movie News User Standard Emit balanced...

Page 30: ...it can keep the volume of the speaker steady no matter what kind of difference among the TV sound of each channel AUDIO DESCRIPTION Press button to select Audio description Press button to select On O...

Page 31: ...Output Press button to select Digital Audio Output Press button to select Off PCM RAW SPDIF Delay Press button to select SPDIF Delay Press button to select Surround Press button to select Sorround Pre...

Page 32: ...er the sub menu ATV Press button to select Country Scan Channel List Press MENU or EXIT button to quit Scan Press button to select Scan Press OK button to enter the sub menu button to select AutoScan...

Page 33: ...ect Channel Press button to select Color System PAL SECAM NTSC Auto Press button to select Color System Press button to select Sound System DK BG I L M N Press button to select Sound System Press butt...

Page 34: ...on to select All Favorite All Press MENU button to edit the program button to select All Press Optional Move Top Favorite Rename Delete Skip If the program is selected as an analog signal the program...

Page 35: ...tton to quit Country Press button to select Country Press OK button to enter to select country Antenna Type button to select Antenna Type Press button to select Air Cable Satellite Press Scan Press bu...

Page 36: ...If you want to stop searching press EXIT or MENU button to stop searching Scan mode Scan mode Network Quick Full Blind Press button to select Press button to select Modulation Auto 16QAM 32QAM Press...

Page 37: ...ss button to select Start Scan Press button to start auto scan Digital Manual Scan Digital manual search can search for effective simulation program channel manually It can be selected only in the DTV...

Page 38: ...Press button to select Network ID Press button to select Network ID Press button to ad ust Audio Lanugage Press button to select Audio Language Press OK button to enter the sub menu Subtitle Press bu...

Page 39: ...to select All Press Optional Move Top Favorite Delete Skip If the program is selected as an analog signal the program can be renamed Favorite Press MENU button to edit the Favorite Channel button to...

Page 40: ...select Country Antenna Type Scan CI Card Signal Information Audio Language Subtitle Channel List EPG Press MENU or EXIT button to quit Country Press button to select Country Press OK button to enter...

Page 41: ...K button to start scan to search programs CI Card Press button to select CI Card to view and set the the information of CI card Signal Information Press button to select Signal Information and press O...

Page 42: ...hannel List Press OK button to enter the sub menu Press button to select All Favorite DTV Radio Data Encrypt HD Free Astra1 All Press MENU button to edit the program button to select All Press Optiona...

Page 43: ...sub menu Default password is 0000 Press button to select Change Password System Lock Change Password Change Password set Password Press button to select Press ENTER button to System Lock n Off Press b...

Page 44: ...40 Common P MENU button to enter the main menu ress Press button to select Common Press OK button to enter the sub menu...

Page 45: ...cord List Format Schedule List Press ENTER button to enter sub mune Timer Settings Press button to select Timer Settings Press button to select Autostandby Timer Sleep Timer On Timer OSD Timer On Time...

Page 46: ...t signal Press button to select Blue Screen Press button to select On Off Teletext Press button to select Teletext Press button to select Arabic West East West Farsi Russian Audio Language 1st Audio L...

Page 47: ...to select CEC and press button to select On Off Press The following terms are available only when On is selected in CEC Tv Auto Power On button to select TV Auto Power On and press buttonto select On...

Page 48: ...mode Press to select On Off Menu Reset Recall the default setting Press button to select Menu Reset Press ENTER button to enter the sub menu Advance Press MENU button to enter the main m enu Press but...

Page 49: ...Sound PC Adjust Common Advance PC Adjust P ress button to PC Adjust Press ENTER button to enter the sub menu Press button to select Auto adjust Horizontal Position Vertical Position Clock Phase Sampli...

Page 50: ...f the picture Press button to adjust Clock Phase Adjust the phase PC input source to ensure the best display effect Press button to adjust Sampling Clock Adjust the clock PC input source Press button...

Page 51: ...ector plug for secure connection and any damage Antenna cable type is not correct Check antenna cable type VHF UHF Direction or position of antenna is incorrect Adjust the direction or position of ant...

Page 52: ...al Output Data Interface USB Supported System Files Dimensions Weight With stand Without stand 734 192 475mm 734 91 436mm 5 6kg FAT32 and FAT16 Remote Control Signal Type Infrared Control Distance 5 m...

Page 53: ......

Page 54: ......

Page 55: ......

Page 56: ......

Page 57: ......

Page 58: ...ranty period please call the TEAC Warranty Service Hotline 1300 553 315 Between Monday to Friday 8 30AM to 5PM AEST Please have your purchase receipt and the product s serial number ready For other en...

Reviews: