background image

8

PREPARATION

1) Before the unit is turned on, please check if all the connections are right and safe.

Then connect the main power.

2) Press the

button on the back panel to turn on the main power.

3) Press the

button on the remote control (or front panel) to switch to

operation mode.

POWER ON/OFF
STANDBY

STATE INDICATION OF DISPLAY SCREEN

1. In radio mode, the display screen will show the currently tuned frequency and the

mono/stereo status.

2. In Audio-input, iPod status, show the signal input and main volume status.

FAST FORWARD AND FAST REWIND

In play status, press the

or

button to fast rewind or fast forward. Press the

button again or

button to resume playing mode.

Note: These buttons are unavailable in Audio Input mode.

PLAY

PREVIOUS AND NEXT

In play status, press the

button to go to the previous audio file; press the

button to go to the next audio file.
Note: These buttons are unavailable in Audio Input mode.

BASIC OPERATION

MUTE BUTTON

If you press the

button while playing, sound output will be switched off. Press

the

button again or the

buttons to resume the previous volume level.

Note: When in the Mute mode, the characters on display screen will flash.

MUTE

MUTE

VOL+/-

STANDBY MODE

Press the

button on the remote control (or on front panel) to switch to

operation or standby mode.
Note: Make sure that the unit is connected to the power source.

STANDBY

SLEEP BUTTON

In play status, press the

button on the remote control continuously, you can set

the different sleep time for this unit: 10 min, 20 min, 30 min, 60 min, 90 min, 120 min.
For example, if you press the

button to select ``10 min``, the unit will enter

sleep mode in 10 minutes.

SLEEP

SLEEP

VOLUME SETTING

Press the

buttons to turn the volume up or down.

VOL.+/-

5

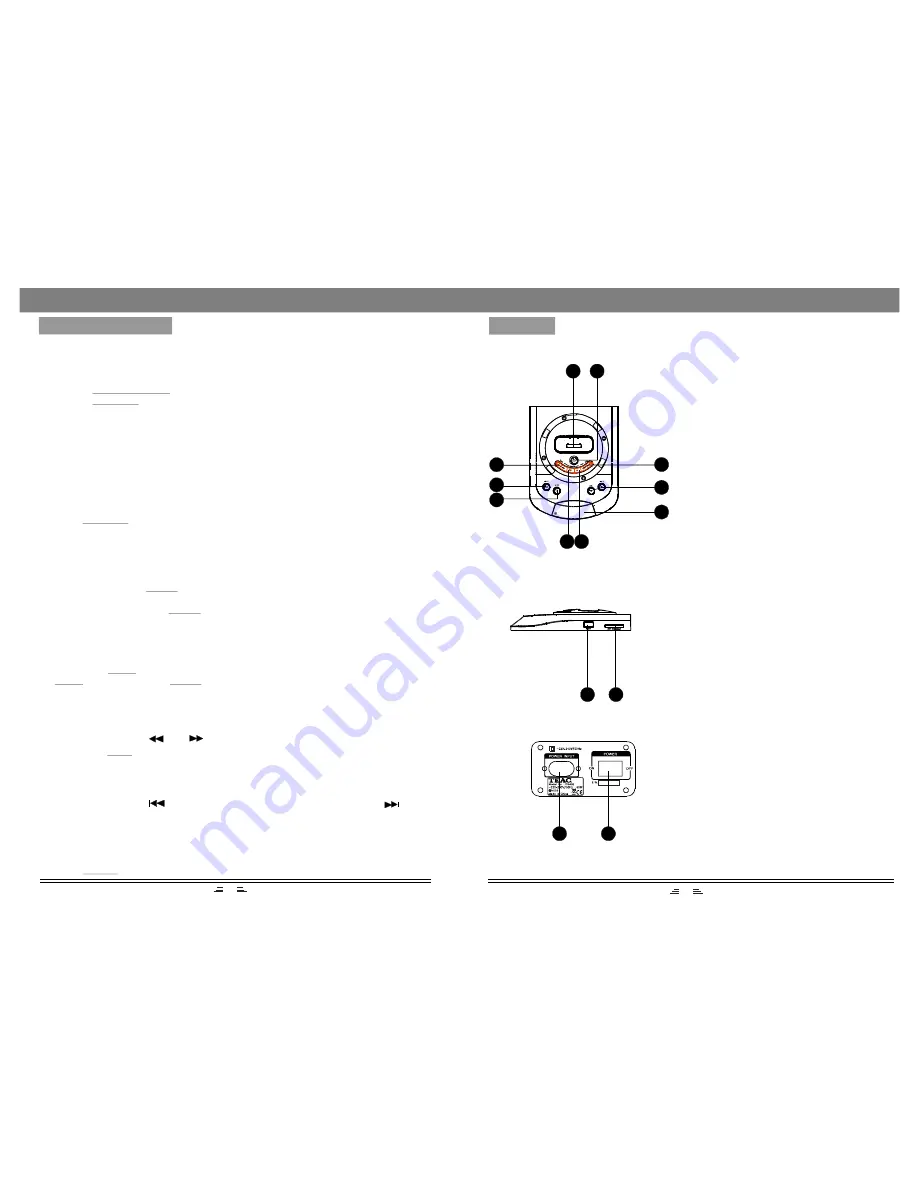
PANELS

3

1

2

4

5

6

7

8

9

10

11

12

13

14

1. FAST REWIND/FAST FORWARD

BUTTONS

2. AUDIO INPUT BUTTON

3. SLEEP BUTTON

4. IPOD INTERFACE

5. STANDBY BUTTON

6. PLAY/PAUSE BUTTON

7. STOP BUTTON

8. PREVIOUS/NEXT BUTTONS

9. VOLUME -/+ BUTTONS

10. DISPLAY SCREEN

11. USB SLOT

12. MEMORY CARD SLOT

13. POWER SUPPLY INPUT

14. POWER ON/OFF

Summary of Contents for iTB400 i-TALLBOY

Page 1: ...iTB400 i TALLBOY ...

Page 2: ......

Page 3: ...ort Multi media card port Unit dimension Total weight 220 240V 50Hz 60W 2 15 W 4 Ohm 30 W 6 Ohm 20Hz 20KHz 3dB FM 88 00 108 00MHz 80dB Weight A iPod audio output 1 Tow type audio input Port type 2 0 Maximum capacity 16GB Port type SD MMC Maximum capacity 16GB 870 240 205mm 8 8 Kg Note Specifications subject to change without prior notice Weight and dimensions are approximate ...

Page 4: ...pecifically to iPod and has been certified by the developer to meet Apple performance standards Apple is not responsible for the operation of this device or its compliance with safety and regulatory standards iPod is a trademark of Apple Inc registered in the U S and other countries Compatibility information ...

Page 5: ...error may occur when there is a thunder storm static interruption or other interference In this case please turn off the power for 10 seconds and the unit will reset to normal once it is switched on 12 Power supply can not be turned on Make sure that the power cord is fully inserted in the power outlet TROUBLESHOOTING The remote control does not work Battery is used up The front end of the remote ...

Page 6: ...twice button once you may select the 25th saved station Press the or button to switch to the previous or next band 4 Automatically search bands press the button this system starts to search bands from low to high frequency automatically The searched band are saved automatically Press this button again to stop searching 3 Save Bands Press the button to save the current frequency For example if you ...

Page 7: ...fast rewind or fast forward Press the or button to go to the previous or next audio files 4 To exit the USB CARD mode Press the or button and switch to other modes USB SD USB SD IPOD AUDIO FM ACCESSORIES Part 1 Plastic Adaptors for iPod Docking Part 2 Audio Cable Part 5 User Manual USE R MANUAL Part 3 Remote Control 60GB 30GB MINI NANO Part 4 Base Copper Feet INSTALL THE REMOTE CONTROL BATTERY 2 1...

Page 8: ...tly connect audio facility eg PC with this unit then press button on the remote control to enjoy the external audio input sources function 3 Press button on the remote control to enter radio mode IPOD AUDIO FM TONE FUNCTION In play status press button on the remote control to select the Bass or Treble adjusting mode press the button to adjust the effect of Bass or Treble TONE VOL SEARCH BUTTON In ...

Page 9: ...de BASIC OPERATION MUTE BUTTON If you press the button while playing sound output will be switched off Press the button again or the buttons to resume the previous volume level Note When in the Mute mode the characters on display screen will flash MUTE MUTE VOL STANDBY MODE Press the button on the remote control or on front panel to switch to operation or standby mode Note Make sure that the unit ...

Page 10: ...t the remote control sensor of the device 2 The range of the remote control depends on the health of the battery 3 Bright light sun or artificial light should not fall directly at the remote control sensor Bright light will decrease the effectiveness of the remote control 4 Make sure that there are no obstacles between the remote control and the remote control sensor MENU STANDBY USB SD IPOD AUDIO...

Reviews: