background image


  WARRANTY INFORMATION 


Our goods come w it h guar ant ees t hat cannot be excluded under t he Australian Consumer Law . You ar e 
ent it led to a replacement or ref und f or a  major failur e and for compensat ion f or any ot her reasonably  
foreseeable loss or damage. You are also ent itled to have t he goods repaired or replaced if t he goods f ail 
to be of accept able quality and t he f ailur e does not amount to a major failur e. 

 
Warranty Terms & Conditions 
 

1. 

TEAC warrants that this product is free from defects in material and workmanship under normal domestic use with 
reasonable care and skill. Maintenance and cleaning (i.e. laser head) is not covered by this warranty. The TEAC 
warranty only applies to TEAC products purchased, used and serviced in Australia.  

 
2. 

The benefits to the consumer given by this Warranty are in addition to other rights and remedies of the consumer 
under a law in relation to goods or services to which the warranty relates, being the Australian Consumer Law. 


3. 

Refund or replacement via your retailer is available for a period of 14 days after purchase for goods that have been 
inspected and determined to have a major failure. Refund and exchange is not applicable for change of mind. 

 
4. 

Subject to the terms herein, this warranty effectively covers the equipment as specified in the Warranty Periods 
Table below from the date of purchase. 


TEAC PRODUCT 


WARRANTY PERIOD 

LED/LCD TV 42” (106 cm) and above 

1 Year (In-Home Service/ Pick up Available)* 

LED/LCD TV 32” (80 cm) and above 

1 Year (Carry-in Service) 

All other TEAC products 

1 Year (Carry-in Service) 


5. 
         This service will only be provided as part of this warranty if all the following conditions are met; 

In Home Service/Pick up* Service 

a)  The product is indicated in the Warranty Period Table. 
b)  The product is within the warranty period. 
c)  The product is located within the normal service area of the local TEAC Authorised Service Centre. 


If TEAC determines that the product is not repairable on site, TEAC can complete the repair by taking the product to 
a TEAC Authorised Service Centre. 
 

Where In-Home service/Pick up* is not available, the purchaser is required to send the product to the nearest TEAC 
Authorised Service Centre for repair. In this event, proof of purchase is required to support a warranty claim. After 
the repair, the product will be available for collection by or return to the purchaser at a fee upon request. TEAC in-
home service can be made available at a fee upon request. 

Carry-in Service 

 
6. 

A 12-month replacement warranty is applicable to all Accessories such as Remote, Power Adaptors and Cables. 

 
7. 

TEAC will ensure to the best of its abilities that all required parts are made available for any required service/repair. 


8. 

TEAC Australia Pty Ltd and its Authorised Service Centres will use their best endeavours to complete product 
repairs within a reasonable period based on available resources and workload during the time when service is 
requested and performed.  


9. 

Refurbished parts may be used to repair the product. In the case of a replacement, the product may be replaced, 
with a refurbished unit of the same type or, if one is unavailable, a similar refurbished model with equal or better 
features & specifications. 


10. 

Please be advised that if the product presented for repair is capable of retaining user-generated data, the data may 
be lost during servicing. Customers are strongly encouraged to back up all important information/data before 
sending the product in for service/repair. 

 
11. 

Service will be provided only during normal business hours and under safety conditions and circumstances. TEAC 
and its authorised service agents can refuse any repair if safety, in relation to OH&S, becomes a concern to its staff 
or authorised service agents’ personnel.  

 
12. 

The warranty is void and warranty claims may be refused, subject to the Australian Consumer Law, if:  
a)  The product was not transported, installed, operated or maintained according to manufacturer instruction, or  
b)  The product was abused, damaged, tampered, altered or repaired by any unauthorised persons, or 
c)  Product failure is due to accidents during use, installation or transit, power surges, use of defective or 

incompatible external devices, exposure to abnormal conditions such as excessive temperatures or humidity, or 
entry of liquids, objects or creatures into the product. 

 
13. 

No one is authorised to assume any liability on behalf of TEAC or impose any obligation on it, in connection with the 
sale of any equipment other than as stated in this warranty and outlined above. 


14. 

TEAC reserves the right to inspect and verify whether the product is exhibiting a major failure as claimed by 
customers/retailers.  

 
15. 

LCD dead pixel policy, please contact TEAC Customer Support Hotline on 1300 553 315 for assistance.  

Summary of Contents for HDR3500T

Page 1: ......

Page 2: ......

Page 3: ...e Model Name No Serial No Dealer s Name Dealer s Address Postcode Authorised Service Centres in Major Australian Cities NSW 151 Arthur Street Homebush West NSW 2140 Queensland Unit 1 320 Curtin Ave We...

Page 4: ...epair the product will be available for collection by or return to the purchaser at a fee upon request TEAC in home service can be made available at a fee upon request Carry in Service 6 A 12 month re...

Page 5: ...cate hazardous situations Warning Alert user to the operation which could result in device damage or data loss and the presence of a hazardous situation which could result in serious injury Note Remin...

Page 6: ...risk of fire or electric shock do not expose this unit to rain splashing and do not place objects filled with liquid on this unit Do not cover vents of this unit with newspaper table cloth curtain etc...

Page 7: ...qualified service technician Warning Mark This mark appears on rear panel of this receiver painted prominently in contrasting color to background It consists of two graphical symbols and warning mess...

Page 8: ...Subtitle 13 3 8 Picture in Picture PIP 13 4 Electronic Program Guide EPG 14 4 1 View EPG Information 14 4 2 Schedule Program using EPG 15 4 3 View Detailed Program Information 15 5 Personal Video Rec...

Page 9: ...2 Change Password 30 9 3 PG parental guide Lock 30 9 4 Network 31 9 5 Factory Reset 31 10 Software Upgrade 31 11 Information 32 11 1 Channel Information 32 11 2 System Information 32 12 Appendix 33 1...

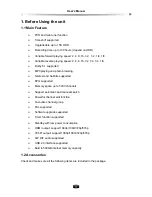
Page 10: ...Teletext and Subtitle supported EPG supported Memory space up to 5000 channels Support automatic and manual search Powerful channel edit function Favourite channel group PAL supported Software upgrad...

Page 11: ...ues for menu options or move cursor left right 3 7 CH Switch to previous next channel or move cursor down up 4 USB Connect to USB devices like a memory stick or an external hard disk drive 5 OK Displa...

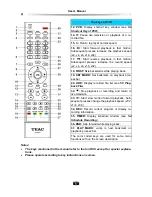
Page 12: ...PG Display Electronic Program Guide EPG 8 OK Display channel list See 3 4 Channel List or confirm operation 9 28 VOL Decrease or increase the volume change values for menu options or move cursor left...

Page 13: ...ess bar 26 HDD Display recorded file list see 5 5 Play back File 32 Stop playback or recording and return to live television 33 Start slow motion forward playback Sub sequent presses change the playba...

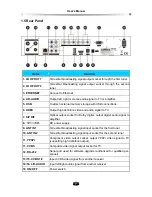
Page 14: ...Optical output socket for Dolby digital output digital audio signal to amplifier 8 DC power supply 9 ANT IN1 Terrestrial broadcasting signal input socket for the first tuner 10 ANT IN2 Terrestrial bro...

Page 15: ...connector The second set top box would act independently allowing the user to browse through different channels Analogue channels may still be received on your television set by connecting the antenna...

Page 16: ...n the unit and plug the other end into the matching sockets on your television or audio system 3 Using CVBS composite video and audio connectors Note You cannot view high definition video with the com...

Page 17: ...attery compartment Please take note of the battery s polarity which is indicated inside the battery compartment Note Batteries including those which contain no heavy metals should not be disposed off...

Page 18: ...will be a pop up window with 2 selections Options will be available to select Active Standby or Passive Standby then press OK key to confirm a selection If no selection has been made then the highlig...

Page 19: ...nt program 2 Channel number and name 3 Current and next program information 4 Current audio mode 5 Audio decoding standard 6 Current time 7 Standard high definition mode icon 3 4 Channel List Channel...

Page 20: ...ability from the broadcaster Please operate according to on screen in structions 3 7 Subtitle If Closed Caption is set to On in 10 1 General Settings press SUBT key to switch on off Closed Caption inf...

Page 21: ...dow 3 Swap PIP Window You can swap main screen for PIP window by pressing SWAP key 4 Change Position of PIP Window Press MOVE key on the remote to move the PIP window to different positions as illustr...

Page 22: ...y If you want to cancel this setting press OK key again Notes System will record scheduled program in both operational and standby modes Refer to 5 4 Schedule Recording for more detailed operations 4...

Page 23: ...y or display de pending on the content If the unit does not detect storage device please wait two to three minutes 5 1 Set Storage Device You can select the designated memory location of the program b...

Page 24: ...ey or Never Always System always records programs in the background temporarily When changing channels or switching the unit to operation mode system will delete recorded information and start recordi...

Page 25: ...the specified time Select Pause and press OK key to pause valid recording Select Resume and press OK key to resume valid recording Select OK and press OK key to save the setting Select Cancel and pres...

Page 26: ...ed press OK key to display weekly win dow You can select desired days from Monday to Sunday with keys and press OK key to confirm then select OK and press OK key to save Channel Name Press OK key to d...

Page 27: ...ns on how to play a recorded file are as follows If there are several storage devices connected to your receiver at the same time or if a favourite group has been created you can select a storage devi...

Page 28: ...rform the following steps during playback Add Bookmark 1 Press INFO key to display the process bar 2 Press Green key to add a bookmark at a desired scene then you will see a small triangle appear on t...

Page 29: ...file is marked with If you want to cancel the setting press OK key again to pop up the drop down list Select Cancel Delete and press OK key to confirm 4 After pressing EXIT key a confirmation mes sage...

Page 30: ...move the cursor horizontally with keys and vertically with keys Press OK key on a button to enter its character on the input line To delete all characters on the input line select Clear and press OK k...

Page 31: ...if playing back a recording To enable this feature refer to 5 2 Set Recording Parameter 1 Using Time Shift After starting time shift the unit records current program on embedded HDD in the background...

Page 32: ...can neither record nor use time shift with an unformatted HDD This unit only supports Consumer Electronics CE HDD specially made for PVR video recording 2 Unmount USB Device Warning Unmount USB device...

Page 33: ...from the unit Refer to 5 8 2 Unmount USB Device for detailed operations 6 1 MP3 Select Main Menu Multimedia MP3 and press OK key to display MP3 list 1 Press keys to select an MP3 file 2 Press OK key t...

Page 34: ...cy by performing the following steps 1 Press numeric keys to input new frequency values 2 Press keys to select proper bandwidth 3 Press EXIT key to save and go back to the previous menu 4 The new freq...

Page 35: ...finishing the found TV and radio channels will be listed 8 Channel Edit You can delete lock and move channels In addition you can make your own favourite channel list Select Main Menu Channel Channel...

Page 36: ...o configure the video and audio settings appropriately to your TV set and other ap pliances Select Main Menu Settings General Settings and press OK key to enter Menu Language The default is English As...

Page 37: ...not provide Dolby digital you cannot watch the program with Dolby sound even though you set the option to AC3 PIP Refer to 3 8 Picture in Picture PIP 9 2 Change Password The local password is required...

Page 38: ...w software may be released to improve the unit s performance You can upgrade software via the USB port You have to check the software information of your unit before downloading new software and downl...

Page 39: ...ion about current channel such as PID values frequency bandwidth signal level and signal quality etc Select Main Menu Channel Channel Info and press OK key to enter 11 2 System Information This window...

Page 40: ...y Set a proper audio parameter No picture 1 Video cable is disconnected or incorrectly connected Connect video cable correctly 2 The unit is in radio mode Switch it to TV mode if you need Video and au...

Page 41: ...PEG 2 MP ML MPEG 4 AVC H 264 HP L4 Aspect Ratio 4 3 16 9 Video Resolution 1920 1080 max Audio Decoding Standard ISO IEC 13818 3 and TR101154 Decoding MPEG 1 layer I and II AC3 Audio Mode Left Right St...

Page 42: ...ernal USB storage device TRP Music File Type MP3 Picture File Type JPEG 12 3 Acronym DVB Digital Video Broadcasting EPG Electronic Program Guide FTA Free to Air HDD Hard Disk Drive HDMI High Definitio...

Page 43: ......

Reviews: