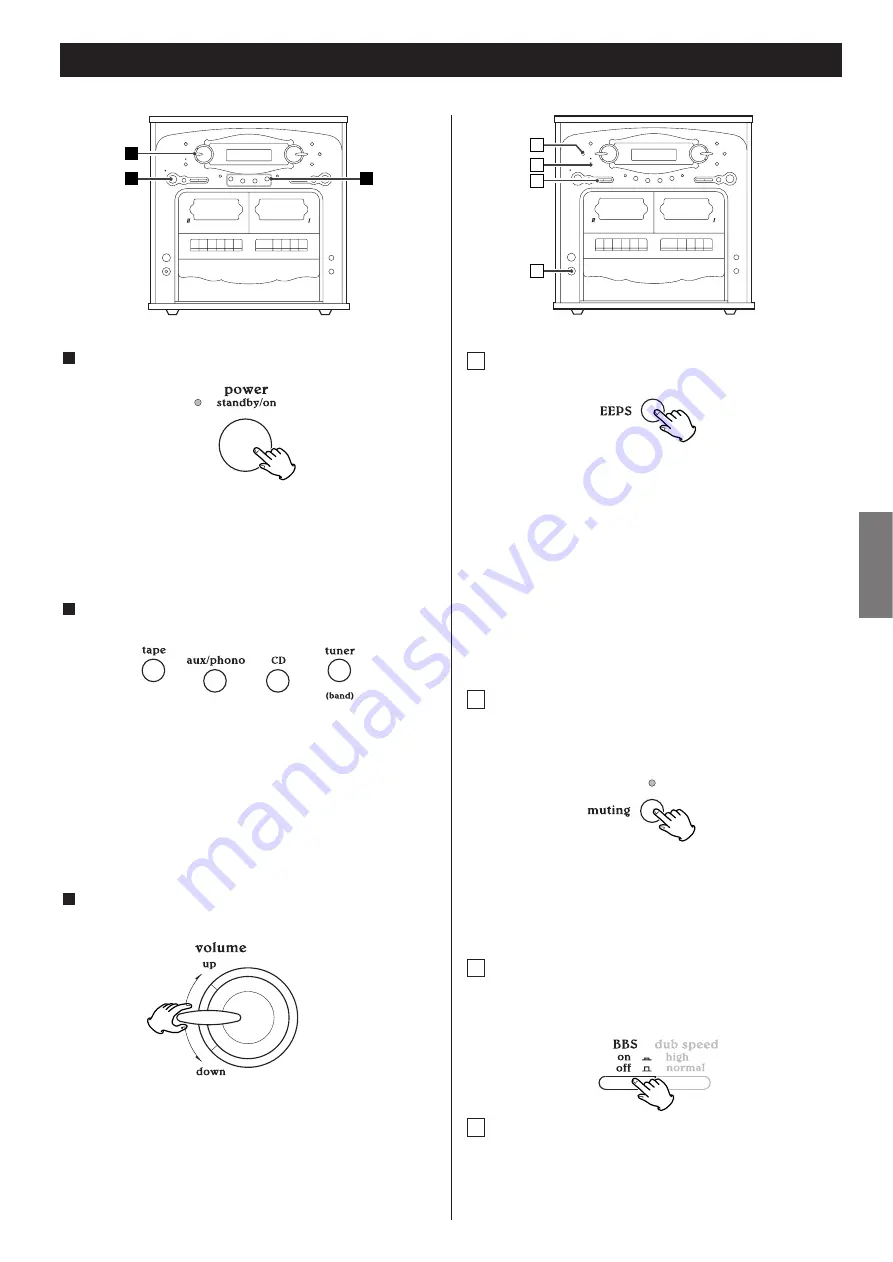
background image

41

FRANÇAIS

Opération de base

1

3

2

Appuyez sur la touche POWER pour allumer l'appareil.

1

Le témoin d'attente (standby) s'éteint.

<

Quand l'appareil est allumé, le témoin MUTING (SOURDINE)
s'allume momentanément. Ceci n'est pas un mauvais
fonctionnement.

Choisir une source en appuyant sur la touche correspondante.

2

<

Quand vous utilisez la télécommande, appuyez sur la touche
FUNCTION répététivement jusqu'à temps que la source
désirée apparait sur l'afficheur.

<

Pour écouter une source externe branchée aux prises AUX,
appuyez sur la touche AUX/PHONO.

<

Si vous jouez une source externe et un long jeu en même
temps, le son sera mélangé.

Jouez la source et réglez le volume en tournant le bouton du
VOLUME.

3

B

D

C

A

EEPS (Système d’égalisation électronique
pré-réglé)

A

Chaque fois que la touche EEPS est appuyée, le mode
change tel qui suit:

CLASSIC:

Un son équilibré; convenable pour la musique classique.

ROCK: 

Fourni un son puissant et lourd; convenable pour la musique
rock.

POPS:

Rehausse les tonalités vocales; convenable pour la musique
populaire

FLAT: 

Le EEPS est désengendré.

Sourdine

Pour mettre le son momentanément en sourdine, appuyez
sur la touche MUTING. Appuyez sur la touche MUTING de
nouveau pour faire revenir le son.

B

<

Quand l'appareil est en sourdine, le témoin MUTING
s'allume.

<

Le témoin MUTING s'allume aussi en mode d'arrêt ou pause
d'un CD, même si vous n'avez pas engendrer la sourdine.
Quand la touche PLAY est appuyée, il s'éteint.

Système de rehausse des graves

Pour rehausser les graves, appuyez sur la touche BBS.
Appuyez la touche de nouveau pour le désengendrer.

C

Écouteurs

Pour une écoute privée, insérez la prise des écouteurs dans
la prise PHONE et réglez le volume en tournant le bouton
VOLUME. Aucun son provient des haut-parleurs quand les
écouteurs sont branchés.

D

Summary of Contents for GF-600

Page 1: ...OWNER S MANUAL MANUEL DU PROPRI TAIRE 9A09703200 GF 600 Compact Hi Fi Stereo System ENGLISH FRAN AIS Z...

Page 2: ...rong The wide blade or the third prong are provided for your safety If the provided plug does not fit into your outlet consult an electrician for replacement of the obsolete outlet 10 Protect the powe...

Page 3: ...g to FDA regulations title 21 CFR chapter 1 subchapter J based on the Radiation Control for Health and Safety Act of 1968 and is classified as class 1 laser product There is not hazardous invisible la...

Page 4: ...o this unit If the unit is to be packed and moved a large distance it is also advisable to tighten the turntable transport locking screw See page 12 for instructions Beware of condensation When the un...

Page 5: ...zers with this unit will damage the mechanisms and cause them to malfunction Do not use irregular shape CDs octagonal heart shape etc CDs of this sort can damage the unit Discs which can be played on...

Page 6: ...C 120 tapes are physically weak and could become entangled in the transport mechanism do not use them b c a Tape Selection Metal and chrome cobalt tapes have identification holes This unit can play no...

Page 7: ...the quality of your record label grooves edge How to Replace the Stylus Stylus should last about 50 hours under normal use However it is recommended to replace the stylus as soon as you notice a chan...

Page 8: ...o remove the power cord from the AC outlet before repositioning the voltage converter switch 1 Locate the voltage selector on the rear panel 2 Using a flat bladed screwdriver set to the appropriate 23...

Page 9: ...inserted with their positive and negative _ poles positioned correctly Close the cover Battery Replacement If the distance required between the remote control unit and main unit decreases the batteri...

Page 10: ...10 Z X S R V U Y a W A B F G C D H E N O P Q M K L J I T R a Y b U N O Q B S X P...

Page 11: ...t playback In TUNER mode use this button to select preset stations STOP Use this button to stop playback of CD PLAY Use this button to start or pause playback of CD DISC 1 2 3 Use these buttons to sel...

Page 12: ...wise to fix the turntable cue lever Use this lever to lift the tone arm tone arm holder tone arm speed selector 45 RPM adaptor G F E D C B A How to open close the turntable cover To Open 1 Lift the tu...

Page 13: ...ime the EEPS button is pressed the mode is changed as follows CLASSIC A balanced sound suitable for classical music ROCK Provides a heavy powerful sound suitable for rock music POPS Emphasizes vocal t...

Page 14: ...1 Gently open the turntable cover Be careful not to pinch your finger 2 Put the record on the turntable When playing a 45 RPM record use the included adaptor 4 tone arm cue lever Gently push the clam...

Page 15: ...k The turntable will begin to turn 7 Gently lower the tone arm by slowly releasing the cue lever You can lower the tone arm manually if the cue lever has not been raised 8 Playing records with the tur...

Page 16: ...to load the disc No buttons will work during loading Wait until the total number of the tracks and the total play time of the disc are displayed When no disc is set NO DISC blinks If you want to selec...

Page 17: ...n the track you want to listen to is found Press the PLAY PAUSE button to start playback from the selected track When the SKIP knob is tapped up during playback the track being played will be played f...

Page 18: ...k is programmed and P 02 is displayed Repeat step to to program more tracks You can program up to 20 tracks When the selection of track numbers is completed press the PLAY PAUSE button to start progra...

Page 19: ...he program In the stop mode press the PROGRAM button repeatedly until 00 appears on the display Select a track number by tapping the SKIP knob and then press the PROGRAM button The track is added to t...

Page 20: ...de Repeat Playback Every time the REPEAT button is pressed the mode is changed as follows Repeat one track Press the REPEAT button once during playback The repeat indicator lights steadily The track b...

Page 21: ...ection When the TUNING knob is tapped momentarily the frequency changes by a fixed step Tap the TUNING knob up or down repeatedly until the station you want to listen to is found FM MODE button Pressi...

Page 22: ...sing the PRESET buttons and then press the PROGRAM button 5 The station is stored and the MEMORY indicator goes off To store more stations repeat steps to 5 2 Select AM or FM by pressing the TUNER BAN...

Page 23: ...pe tape only You can use either TAPE or TAPE for playback Press the PLAY button to start playback 3 To stop playback A Press the STOP EJECT button to stop playback To suspend playback temporarily paus...

Page 24: ...select TAPE Prepare the source to be recorded When you select TUNER tune in a station Press the RECORD button to start recording 3 When you select CD the playback of CD starts simultaneously To stop...

Page 25: ...eed by pressing the DUB SPEED button 3 high Dubbing is performed at high speed You may lose some fidelity during high speed dubbing Make a trial recording to verify the audio quality normal Dubbing is...

Page 26: ...AY button once or twice to display the clock will blink Press the CLOCK ADJ button The hour value blinks 1 Hold up or down the knob to set the current hour 2 Press the CLOCK ADJ button The minute valu...

Page 27: ...he CLOCK ADJ button 6 The hour value starts flashing REMAIN CH REPEAT SHUFFLE TIMER AUX CD TAPE TUNER ON OFF STEREO CLASSIC ROCK POPS FLAT PLAY TRACK MHz kHz INTRO MEMORY 2 1 3 REMAIN CH REPEAT SHUFFL...

Page 28: ...e unit off standby 4 When TAPE is selected press the PLAY button of TAPE or The unit will turn on and off at the specified time The timer doesn t work when the unit is turned on manually When you don...

Page 29: ...unit off standby 5 Press the RECORD button of TAPE 6 5 6 3 2 4 Display Each time the DISPLAY button is pressed the display is changed as follows During playback of CD When the unit is on clock timer o...

Page 30: ...in a CD recorder and try again Sound skips ePlace the unit on a stable place to avoid vibration and shock eIf the disc is dirty clean the surface of the disc eDon t use scratched damaged or warped di...

Page 31: ...e System Belt Drive Speed 33 1 3 rpm 45 rpm 78 rpm Wow and Flutter less than 2 5 WRMS S N ratio More than 50dB Cartridge type Ceramic Stereo Cartridge Stylus STL 103 SPEAKER SYSTEM Section Type 2 way...

Page 32: ...ure NE PAS D PLACER L APPAREIL DURANT LA LECTURE Ne PAS soulever ou d placer l appareil durant la lecture el peut endommager le disque QUAND VOUS D PLACEZ CET L APPAREIL Quand vous changez l endroit o...

Page 33: ...it d ab mer la surface enregistr e du disque Ne jamais utiliser de stabilisateurs L utilisation avec cet appareil de stabilisateurs pour CD disponibles dans le commerce pourrait endommager les m canis...

Page 34: ...e de transport ne pas les utiliser b c a Choix de bande Pour que le choix automatique de bande fonctionne correctement les bandes m tals ou chromes cobalt doivent poss der des trous d identification C...

Page 35: ...disque qui va graduellement d t riorer la qualit de vos disques tiquette sillons bord Comment remlacer l aiguille L aiguille devrait durer environ 50 heures avec un usage normal Par contre il est reco...

Page 36: ...A Assurez vous de d brancher l appareil avant de changer la position du convertisseur de tension 1 Trouver le s lecteur de tension sur le panneau arri re 2 Utilisant un tourne vis lame plate placer en...

Page 37: ...onctionne dans le voisinage d autres appareils g n rant des rayons infrarouges ou si d autres t l commandes utilisant des rayons infrarouges sont utilis es pr s du lecteur le lecteur peut de ne pas bi...

Page 38: ...38 Z X S R V U Y a W A B F G C D H E N O P Q M K L J I T R a Y b U N O Q B S X P...

Page 39: ...cette touche pour une lecture r p t e En mode TUNER utilisez cette touche pour choisir les postes pr r gl s STOP Utilisez cette touche pour arr ter la lecture du CD PLAY Utilisez cette touche pour en...

Page 40: ...platine Pour ouvrir 1 Soulevez le couvercle de la platine jusqu temps qu il s arr te 2 Le verrou devrait se d sengager et vous pouvez maintenant doucement abaissez le couvercle 3 Assurez vous de tenir...

Page 41: ...est appuy e le mode change tel qui suit CLASSIC Un son quilibr convenable pour la musique classique ROCK Fourni un son puissant et lourd convenable pour la musique rock POPS Rehausse les tonalit s voc...

Page 42: ...Doucement poussez l attache vers la droite pour rel cher le bras 5 attache Soulever le levier de rep rage pour soulever le bras de son appui 6 Choisir la vitesse 3 1 9 2 3 7 5 6 8 4 Avant l utilisatio...

Page 43: ...a pas t utilis 8 Tenant le couvercle baiss durant l coute de disque emp che la poussi re de se d poser sur la table tournante bras levier de rep rage Tournez le bouton du VOLUME pour r gler le volume...

Page 44: ...touche fonctionne durant le chargement Attendre jusqu temps que le nombre total de pistes ainsi que la dur e totale de lecture du disque sont affich s Si il n y a pas de disque NO DISC clignote Si vo...

Page 45: ...t et la relacher quand la piste d sir e est atteinte Appuyez la touche PLAY PAUSE pour engendrer la lecture partir de la piste choisie Quand la touche SKIP est pouss e vers le haut durant la lecture l...

Page 46: ...PROGRAM 5 La piste est programm e et P 02 est affich R p tez les tapes pour programmer d autre pistes Vous pouvez programmer jusqu 20 pistes Quand votre choix de num ros de pistes est termin appuyez l...

Page 47: ...ode d arr t appuyez la touche PROGRAM r p t tivement jusqu temps que 00 est affich Choisir un num ro de piste en poussant la touche SKIP et ensuite appuyez la touche PROGRAM La piste est ajout e la fi...

Page 48: ...ion de la lecture Chaque pression sur la touche REPEAT modifie comme suit le mode de fonctionnement R p tition d une piste Appuyez sur la touche REPEAT une fois durant la lecture Le t moin REPEAT s al...

Page 49: ...anuel Quand la touche TUNING est pouss e momentan ment la fr quence change par une tape fixe Poussez la touche TUNING vers le haut ou le bas r p t tivement jusqu temps que le poste que vous d sirez co...

Page 50: ...tilisant les touches PRESET et ensuite appuyez la touche PROGRAM 5 Le poste est sauvegard et le t moin MEMORY s teint Pour sauvegarder d autre postes r p tez les tapes 5 2 Choisir AM ou FM en appuyant...

Page 51: ...uvez utiliser TAPE ou TAPE pour la lecture Appuyez la touche PLAY pour engendrer la lecture 3 Pour arr ter la lecture A Appuyez la touche STOP EJECT pour arr ter la lecture Pour suspendre la lecture m...

Page 52: ...ce d enregistrement Quand vous choissisez TUNER syntonisez un poste Appuyez la touche RECORD pour engendrer l enregistrement 3 Quand vous choisissez CD la lecture du CD commence automatiquement Pour u...

Page 53: ...a touche DUB SPEED 3 high La copie se fait haute vitesse Il est possible qu il existe une d t rioration de la fidelit durant le copiage haute vitesse Faite une copie d essaie pour v rifier la qualit s...

Page 54: ...AY une ou deux fois pour afficher l horloge clignote Appuyez la touche CLOCK ADJ heure clignote 1 Tenir vers le haut ou le bas le bouton pour r gler l heure 2 Appuyez la touche CLOCK ADJ minute cligno...

Page 55: ...ouche CLOCK ADJ 6 heure clignote REMAIN CH REPEAT SHUFFLE TIMER AUX CD TAPE TUNER ON OFF STEREO CLASSIC ROCK POPS FLAT PLAY TRACK MHz kHz INTRO MEMORY 2 1 3 REMAIN CH REPEAT SHUFFLE TIMER AUX CD TAPE...

Page 56: ...our teindre l appareil standby 4 Si TAPE est choisi appuyez la touche PLAY de TAPE ou L appareil s allumera et s teindra aux heures sp cifi s La minuterie ne fonctionne pas si l appareil est allum man...

Page 57: ...uche RECORD de TAPE 6 5 6 3 2 4 Afficheur Chaque fois que la touche DISPLAY est appuy e l afficheur change comme suit Durant la lecture d un CD Quand l appareil est allum clock timer on ou timer off e...

Page 58: ...jouer des disques CD R non finalis s Finalisez le disque dans un graveur CD et essayez de nouveau Son saute eInstallez l appareil dans un endroit stable pour viter les vibrations et les heurts eSi le...

Page 59: ...UE Moteur moteur servo CC Engrenage Par courroie Vitesse 33 1 3 rpm 45 rpm 78 rpm Pleurage et scintillement moins de 2 5 WRMS Rapport signal bruit Plus de 50dB Cartouche Cartouche c ramique st r o Aig...

Page 60: ...Canada Phone 905 890 8008 TEAC MEXICO S A De C V Campesions 184 Col Granjas Esmeralda 09810 Mexico Phone 525 581 5500 TEAC UK LIMITED 5 Marlin House Croxley Business Park Watford Hertfordshire WD18 8T...

Reviews: