background image

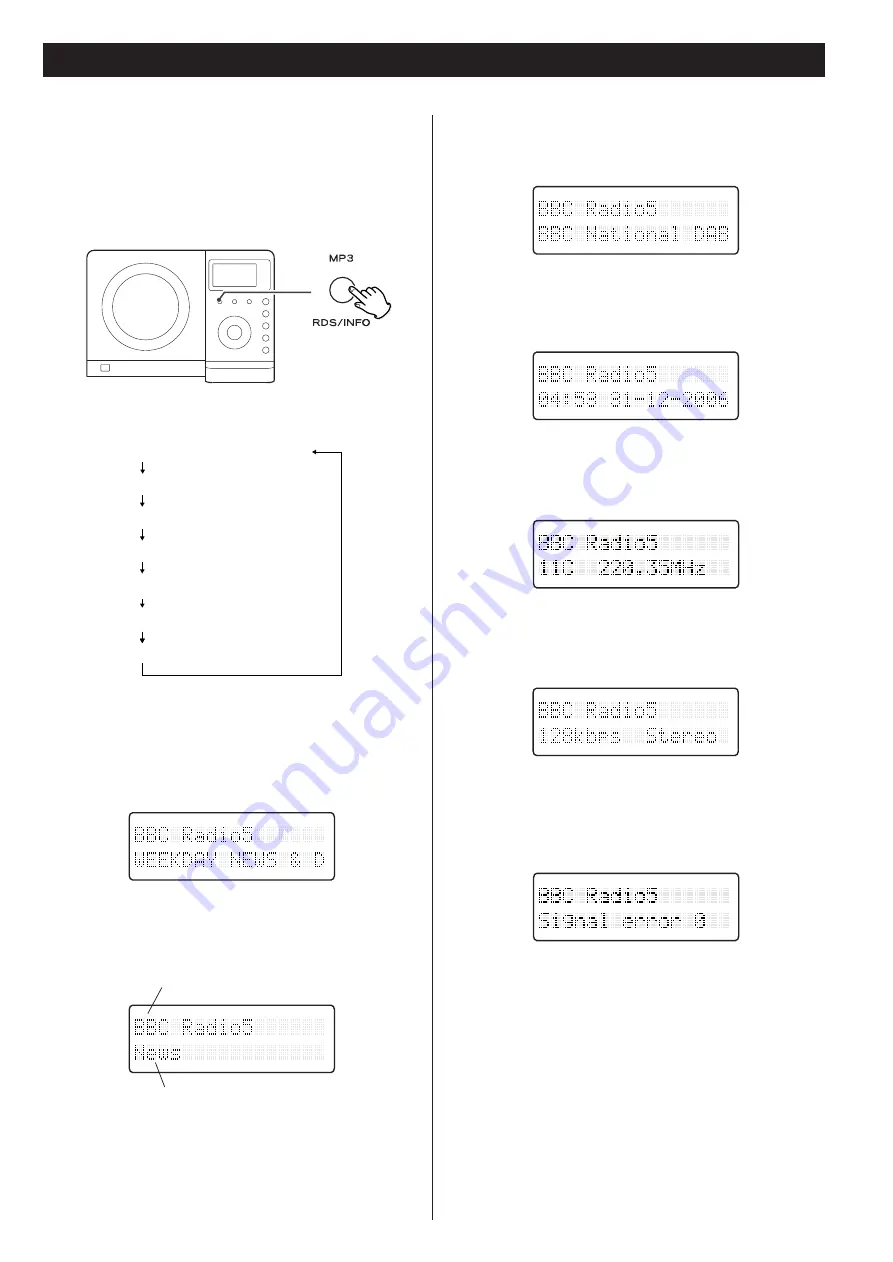
You can choose the type of information displayed in the second
line of the display while listening to DAB.

Each time the INFO button is pressed, the information is
displayed as follows.

DLS

The Dynamic Label Segment (DLS) is the scrolling text label
supplied by the radio station. It may be information on music
titles or details regarding the programme or station.

Programme type

This is a description of the type of broadcast supplied by the
radio station such as Pop, Rock or Classical music.

Programme type

Bitrate

Ensemble name

Channel and Frequency

Date and Time

Signal error rate

DLS (Dynamic Label Segment)

23

Ensemble name

This displays the name of the Ensemble that is broadcasting
the programme.

Date and time

This displays the current date and time, which is supplied by
the radio station and should always be accurate.

Channel and frequency

This displays the channel and frequency of the current playing
broadcast.

Bitrate

The bitrate and sound mode of the current receiving
broadcast is displayed.

Signal error rate

This displays the digital bit error rate (0–99) of the currently
tuned channel. The lower the figure the better the quality of
the received broadcast.

Station

Programme type

Display Setting of the DAB

Summary of Contents for CX-200iDAB

Page 1: ...20I0520 Z Micro Hi Fi System OWNER S MANUAL CX 200iDAB Includes adapters for iPod nano iPod with video iPod mini iPod with Click Wheel iPod with color display Adapters sold separately iPod with dock c...

Page 2: ...he cart stand tripod bracket or table specified by the manufacturer or sold with the apparatus When a cart is used use caution when moving the cart apparatus combination to avoid injury from tip over...

Page 3: ...not place any objects filled with liquids such as vases on the apparatus Do not install this apparatus in a confined space such as a book case or similar unit The apparatus draws nominal non operatin...

Page 4: ...ence CAUTION DO NOT MOVE THE UNIT DURING PLAYBACK During playback the disc rotates at high speeds Do NOT lift or move the unit during playback Doing so may damage the disc or the unit WHEN MOVING THIS...

Page 5: ...heat and ultraviolet rays than ordinary CDs It is important that they are not stored in a location with direct sunlight and keep your discs away from sources of heat such as radiators or heat generati...

Page 6: ...t before making connections Read instructions of each component you intend to use with this unit Be sure to insert each plug securely To prevent hum and noise do not bundle the connection cords with t...

Page 7: ...speakers to these terminals AC Power Cord Be sure to connect the power cord to an AC outlet which supplies the correct voltage Hold the power plug when plugging or unplugging the power cord Never pull...

Page 8: ...ws 2 Use the supplied guide sheet to mark the exact drilling points on the wall 3 Drill holes in the wall at the marked points 4 Screw the supplied long screws into the wall Leave about 5 mm space bet...

Page 9: ...30GB for iPod with color display 20GB 30GB U2 Special Edition 60GB color Photo 40GB 60GB for iPod with color display 40 GB 60 GB 20GB U2 for iPod with Click Wheel 20 GB U2 Special Edition 40GB for iP...

Page 10: ...s in this manual refer to the names of the buttons and controls on the front panel only Associated controls on the remote control will also operate similarly Unit Functions G R Q U V S H M L G F H I J...

Page 11: ...adio or AUX OPEN CLOSE In CD mode use this button to open and close the CD door FM DAB Use this button to select DAB or FM SELECT This button is equivalent to the Center button on your iPod In iPod or...

Page 12: ...subwoofer 1 Press the STANDBY ON switch on the main unit 2 2 3 4 Rear panel of the subwoofer To listen to an external source connected to the AUX IN jack select AUX In iPod and AUX modes the display...

Page 13: ...n interval from 90 down to 10 minutes after which you want the unit to automatically turn off and shift into Standby mode Each press of the SLEEP button changes the time indication by 10 minutes 90 80...

Page 14: ...minimised power consumption to meet the regulation of IEA If you need to recharge iPod please power on the unit When headphones are plugged into the iPod sound comes from both the speakers of the CX 2...

Page 15: ...e menu item you want and then press the SELECT button To activate the repeat mode During playback press the REPEAT button to change the repeat mode Each time the REPEAT button is pressed the REPEAT se...

Page 16: ...ns will work during loading Wait until the total number of the tracks and the total play time of the disc are displayed When no disc is loaded in the CD player No Disc is displayed When a CD is loaded...

Page 17: ...during playback the track being played will be played from the beginning To return to the beginning of the previous track press the button twice During programmed playback the next or previous track...

Page 18: ...k name and a track name are displayed 1 Press the PLAY PAUSE button G J Playback starts from the selected track 4 To cancel the search mode press the STOP button H Select the initial letter of the tra...

Page 19: ...f you skip step playback will start from the first track in the selected folder 3 4 3 2 1 Shuffle Playback The tracks can be played randomly Press the SHUFFLE button during playback or when in the sto...

Page 20: ...teps and to program more tracks You can program up to 64 tracks 4 3 Programmed Playback Press the SKIP button or repeatedly to select a track then press the MEMORY button 4 When the playback of all th...

Page 21: ...the programmed contents will be cleared Every time the REPEAT button is pressed the mode is changed as follows When a CD is loaded When a MP3 disc is loaded If one of the following buttons is pressed...

Page 22: ...o see if there are new channels available in your area you can scan to find new channels automatically Press the AUTO SCAN button If you want to search stations internationally press and hold the AUTO...

Page 23: ...rate Ensemble name Channel and Frequency Date and Time Signal error rate DLS Dynamic Label Segment 23 Ensemble name This displays the name of the Ensemble that is broadcasting the programme Date and t...

Page 24: ...your area from the service list Those invalid stations in the service list have a question mark displayed in front of the station name Select Prune stations and press the SELECT button All stations th...

Page 25: ...to select the station you want to listen to 4 3 2 1 Press the SELECT button when the channel you wish to tune in is displayed in the second line of the display The current signal strength and the req...

Page 26: ...audio and is sometimes applied at the broadcast source Pop music may have a high value of DRC applied appropriate for constantly high listening levels while classical music broadcasts may have no DRC...

Page 27: ...mation only and no adjustment is available While listening to a DAB broadcast press the DISPLAY button Select Sw version using the SKIP button or The version number of the installed software is displa...

Page 28: ...FM MODE button Pressing this button alternates between STEREO mode and MONO mode Listening to the FM Radio 1 3 2 Press the FUNCTION button to select Radio 1 You can also use the FM DAB button to selec...

Page 29: ...hin 5 seconds press the MEMORY button 4 The station is stored To store more stations repeat steps to 4 1 Press the PRESET button repeatedly until the desired preset station is found 2 How to select pr...

Page 30: ...the FUNCTION button to select AUX 2 When using the PHONES jack of your mini player you must adjust the volume of the mini player or you may hear no sound from your CX 200iDAB The Radio Data System RDS...

Page 31: ...1 Press the SKIP button to set the current hour 3 Press the TIME SET button The minute value blinks 4 Press the SKIP button to set the current minute 5 Press the TIME SET button The clock starts 6 ST...

Page 32: ...et the stop time hour and then press the TIMER button 4 Setting the Timer The unit can be programmed to turn on and off at a specified time Adjust the clock before setting the timer Press and hold the...

Page 33: ...Radio mode When the source is set to Radio and the unit turns on it will tune in to the station you selected last time Press the TIMER button once and during the timer settings being displayed press...

Page 34: ...ipe with a soft cloth or use diluted mild liquid soap Never spray liquid directly on this unit Apply your cleaner to your cleaning cloth and wipe gently Be sure to remove any excess completely Do not...

Page 35: ...x D Main Unit 255 x 169 5 x 115 mm L R Speakers 210 x 169 5 x 81 mm Subwoofer 160 x 245 x 335 mm Weight Net Main Unit 1 4 kg L R Speakers 0 7 kg each Subwoofer 5 3 kg Standard Accessories Remote cont...

Page 36: ...egraph Road Montebello California 90640 Phone 323 726 0303 TEAC CANADA LTD 5939 Wallace Street Mississauga Ontario L4Z 1Z8 Canada Phone 905 890 8008 TEAC MEXICO S A De C V Campesinos N 184 Colonia Gra...

Reviews: