background image

Removing the Battery Pack

6

TEAC PortaCD-RW User’s Manual

Removing the Battery Pack

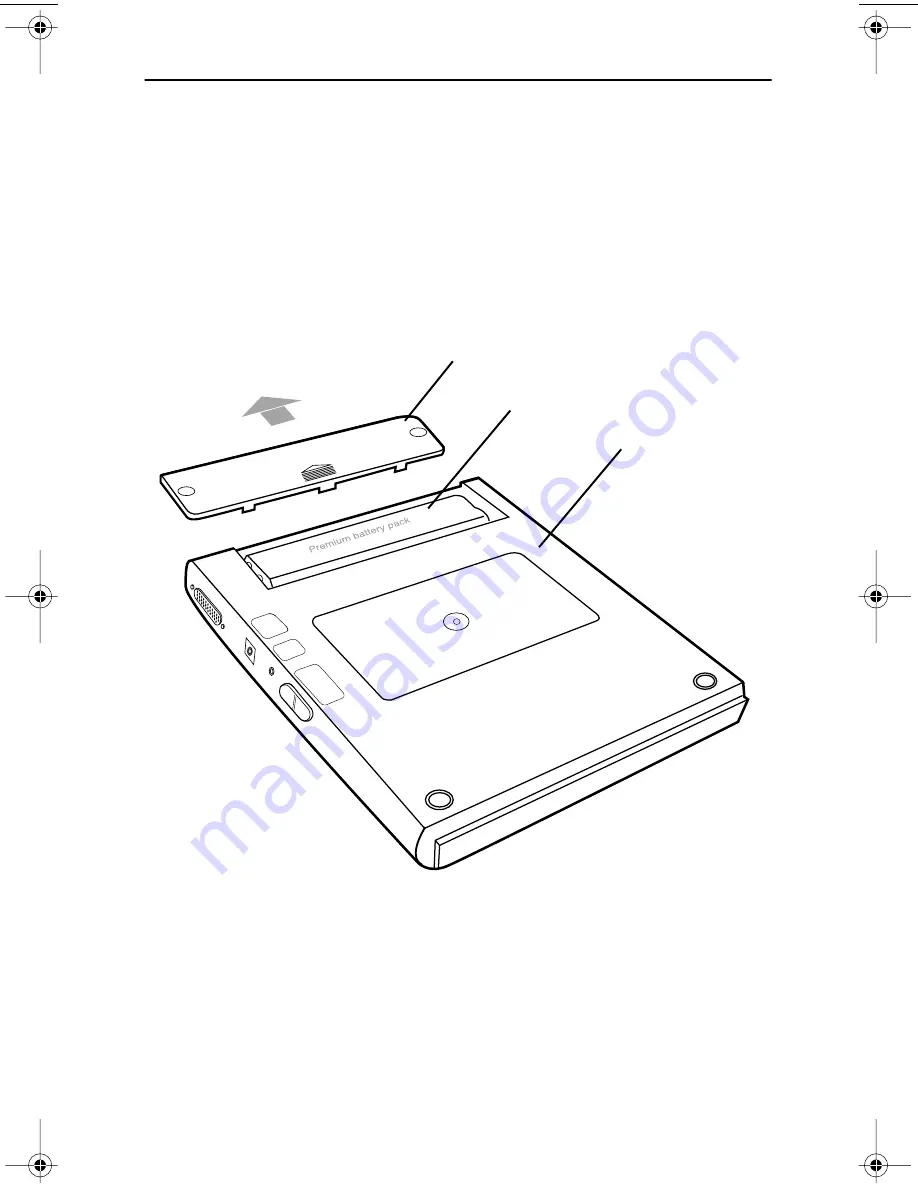
To remove the battery pack, turn the drive upside down and slide open the battery 
pack cover as illustrated in Figure 2, below.

Do not use a metal object to pry or remove the battery pack from the PortaCD-RW 
drive. Doing so could short circuit the battery pack or damage the drive.

Use only TEAC integrated rechargeable battery packs. Standard commercial 
batteries could damage the drive.

Figure 2. Removing the Battery Pack

battery compartment cover

battery

underside of drive

PortaCDRW.book  Page 6  Wednesday, April 4, 2001  10:49 PM

Summary of Contents for CDWE24E

Page 1: ...4X4X24 PortaCD RW Drive User s Manual CDWE24E PCMCIA 4X4X6 USB...

Page 2: ......

Page 3: ...s Reorient or relocate the receiving antenna Move the device and the receiver further apart Connect the equipment to an electrical outlet on a circuit different from that of the receiver Consult the d...

Page 4: ...apter 3 Connecting the PCMCIA PortaCD RW Drive to a Windows System This chapter explains how to connect the PCMCIA version of the PortaCD RW drive to an IBM PC compatible computer running Windows Chap...

Page 5: ...to disassemble the PortaCD RW drive Refer servicing to authorized personnel The TEAC PortaCD RW uses an invisible laser beam that can damage your vision if you stare directly into it or view it with o...

Page 6: ...Number CDWE24E Trade Name TEAC Responsible Party TEAC AMERICA Inc Address 7733 Telegraph Road Montebello California 90640 U S A Telephone Number 1 323 726 0303 This device complies with part 15 of the...

Page 7: ...Battery 5 Power Sources 5 Power Settings 5 Charging the Battery Pack 5 Removing the Battery Pack 6 Front and Right Panels 7 Operating Orientation 8 Chapter 2 Connecting the USB PortaCD RW Drive to a...

Page 8: ...43 Creating Archive CDs dataCD button 44 Creating Photo or Video CDs make a photo or video CD button 45 Copying Discs CD copier button 45 Upgrading the Software upgrade button 47 Updating the Software...

Page 9: ...18 Found New Hardware Wizard Completing 18 Figure 19 Device Manager 19 Figure 20 Freecom Driver Remove Panel 20 Figure 21 Freecom Driver Remove Remove Actions Panel 20 Figure 22 Freecom Driver Remove...

Page 10: ...e 55 CD Copier Welcome Panel 46 Figure 56 CD Copier Panel 46 Figure 57 Select a Project Web checkup Button 47 Figure 58 Select a Project CD Label Creator Button 48 Figure 59 Connecting Cables 49 Figur...

Page 11: ...rsion The USB version can write to CD R and CD RW discs at 4X speed and read CD ROM discs at a maximum of 6X speed It is designed for use with either IBM PC AT compatible portable computers that featu...

Page 12: ...r less Sufficient hard disk space for software installation approximately 70MB CD ROM drive DAE support for CD to CD RW audio recording For Windows systems both PCMCIA USB versions IBM PC compatible P...

Page 13: ...floppy disk TEAC PortaCD RW User s Manual this booklet One CD ROM disc containing the following software Easy CD Creator premastering software for Windows Direct CD drag and drop software for Windows...

Page 14: ...nual Figure 1 Package Contents PCMCIA card cable Installation software floppy disk PortaCD RW software plus two blank discs AC adapter USB interface cable only one software disc for PCMCIA version shi...

Page 15: ...settings 1 Set the power supply selection switch see page 7 to Batt DC to power the drive via the integrated battery pack or the AC adapter If the AC adapter is connected it will supply power to the d...

Page 16: ...s illustrated in Figure 2 below Do not use a metal object to pry or remove the battery pack from the PortaCD RW drive Doing so could short circuit the battery pack or damage the drive Use only TEAC in...

Page 17: ...a straightened paper clip into the emergency eject hole Press firmly to partially extend the disc tray Power supply selection switch Use this switch to set the power source for the PortaCD RW drive R...

Page 18: ...al LED AC Adapter Drive Battery Off Disconnected Off Green Not plugged in Connected Powered by battery Red Plugged in Disconnected Battery is being charged Blinking red Plugged in Disconnected Battery...

Page 19: ...er s documentation for information specific to your system Please read the following instructions thoroughly The installation procedure varies depending on the operating system you are using 1 Turn on...

Page 20: ...an AC power outlet This step turns on the power to the PortaCD RW drive and concludes this procedure Please see Installing the Driver Software on page 11 Note If you are connecting the cable to a USB...

Page 21: ...icon in the Systray see Figure 5 Figure 5 Unplug Icon All Users Before you disconnect the cable from the computer s USB port remove any inserted discs from the TEAC PortaCD RW drive Installing the Dri...

Page 22: ...system 1 Complete the steps described in Connecting the USB PortaCD RW Drive on page 9 Windows 98SE Me automatically detects the drive and displays the Add New Hardware Installation Wizard Figure 6 F...

Page 23: ...Add New Hardware Wizard Specify Search Location 4 Insert the provided floppy diskette which contains the USB driver soft ware into the computer s floppy disk drive 5 Select the Floppy disk drive optio...

Page 24: ...an access the Device Manager using the following menu sequence Start Settings Control Panel System Device Manager tab See Figure 11 Your system should now recognize the drive as a CD ROM drive Figure...

Page 25: ...teps 1 Select Start Settings Control Panel System Device Manager tab 2 Click on the CD ROM category See Figure 11 on page 14 3 Select the TEAC drive item click the Properties button then click the Set...

Page 26: ...00 system 1 Complete the steps described in Connecting the USB PortaCD RW Drive on page 9 Windows 2000 will detect the drive and display the Add New Hardware Installation Wizard Figure 13 Figure 13 Fo...

Page 27: ...software Figure 15 Figure 15 Found New Hardware Wizard Locate Driver Files 4 Insert the provided floppy diskette which contains the USB driver soft ware into the computer s floppy disk drive 5 Select...

Page 28: ...al Signature panel Figure 17 The driver software is 100 compatible with Windows 2000 Professional Figure 17 Digital Signature Not Found Panel 7 Click the Yes button on the Digital Signature panel The...

Page 29: ...an record to CD R and CD RW discs you must first install the Easy CD Creator Pre Mastering software For software installation instructions see Chapter 4 Installing and Using Easy CD Creator 5 Basic on...

Page 30: ...r software from an IBM PC compatible You can execute this file directly from the floppy disk drive or from the hard disk 1 In Windows Explorer double click on the file DriverRemove exe The system disp...

Page 31: ...3 Click the Next button The system advises you to restart your system Figure 22 Figure 22 Freecom Driver Remove Restart Windows 4 Select the Restart Windows now option then click the Finish button 5...

Page 32: ...Uninstalling the USB Driver Software 22 TEAC PortaCD RW Drive User s Manual...

Page 33: ...lowing instructions thoroughly The installation procedure varies depending on the operating system you are using 1 Connect the PCMCIA cable plug to the interface connector on the side panel of the Por...

Page 34: ...teps which may vary slightly with your version of Windows 1 Select Start Settings Control Panel from the pop up menu The system displays the Control Panel Figure 24 Figure 24 Control Panel 2 Double cl...

Page 35: ...gnized by the system In this case you must install the PCMCIA driver using the PCMCIA Card Wizard See Installing the PCMCIA Card Using the Windows PC Card Wizard on page 26 If the TEAC PCMCIA IDE card...

Page 36: ...The system displays the Welcome to the PC Card PCMCIA Wizard panel Figure 26 Welcome to PC Card Wizard Follow the instructions on the PC Card Wizard panels to complete the installation 3 Click the Nex...

Page 37: ...ng panel Figure 29 Figure 29 System Settings Change 6 Click the Yes button to shut down the computer The system shuts down the computer 7 Wait at least 30 seconds then restart the computer To fully ut...

Page 38: ...The other end of the card cable should already be connected to the interface connector on the PortaCD RW If not see Chapter 3 Connecting the PCMCIA PortaCD RW to a Windows System on page 23 for more i...

Page 39: ...l Figure 32 asking you to specify the location of the driver Figure 32 Select the Floppy Disk Drive 4 Insert the TEAC Installation Software for PCMCIA Card floppy diskette in your computer s floppy di...

Page 40: ...ays the following Add New Hardware Wizard panel Figure 34 indicating the installation is complete Figure 34 Installation Complete 7 Click the Finish button The system displays the following panel Figu...

Page 41: ...After you start the computer the system will assign a new drive letter and icon to the PortaCD RW drive To fully utilize the drive you should now install pre mastering software for your Windows system...

Page 42: ...For Windows 98SE Me 2000 32 TEAC PortaCD RW User s Manual...

Page 43: ...D RW disc using directCD create duplicate copies of discs assuming you have a second CD ROM drive using CD Copier software Uninstalling Old Versions of Easy CD Creator If you have an old version of Ea...

Page 44: ...m then click the End Task button Then proceed with the installation below Figure 36 Close Program Panel Follow these steps to install Easy CD Creator 5 software on your computer s hard disk 1 Insert t...

Page 45: ...etup language Panel 2 Select a language and click the OK button The system displays the following installShield Wizard Welcome panel Figure 39 Figure 39 InstallShield Wizard Welcome Panel 3 Click the...

Page 46: ...installation Figure 41 Figure 41 Ready to Install Panel 5 Click the Install button The system begins the installation and displays a bar graph marking progress Figure 42 Figure 42 Installing Status P...

Page 47: ...button to restart the computer Once the system reboots Easy CD Creator 5 is ready for use Online Registration There is no need to register any portion of this kit TEAC provides 100 support for the dri...

Page 48: ...on using each function please see Figure 45 on page 39 and About the Help Files help button on page 40 Using Easy CD Creator 5 Your copy of Easy CD Creator 5 Basic enables you to Create custom audio C...

Page 49: ...f you upgrade to CD Creator Platinum you can create that contain graphic images or photographs in various file formats You can also backup or archive any type of file photo albums and video postcards...

Page 50: ...u can better access the Help system by clicking the Help menu in the selected program The Select a Project panel Figure 45 on page 39 features a Help button that links to additional information about...

Page 51: ...displays the musicCD button Figure 48 This button enables you to create music CDs and save your record list between burns Two other buttons are also displayed on the panel with a screened or greyed o...

Page 52: ...cs make a data CD button Easy CD Creator 5 enables you to create data archive CDs and backup your important data to CDs in three easy ways When you roll the cursor over the make a data CD button on th...

Page 53: ...l over the make a data CD button on the main Select a Project panel Figure 45 on page 39 The system highlights the make a data CD button and displays three project buttons Figure 50 2 Click the direct...

Page 54: ...sc 1 Roll over the make a data CD button on the main Select a Project panel Figure 45 on page 39 The system highlights the make a data CD button and displays three project buttons Figure 50 on page 43...

Page 55: ...isc However you do not need the Platinum version to create custom video CDs The make a data CD feature of Easy CD Creator 5 Basic enables you to create discs containing video files in all popular form...

Page 56: ...The system displays the Welcome panel Figure 55 which warns against copyright infringement Figure 55 CD Copier Welcome Panel 3 Please read the panel then click the OK button The system displays the C...

Page 57: ...y CD Creator 5 Platinum directly Updating the Software web checkup button If your computer has access to the Internet you can download the latest software updates for Easy CD Creator 5 To download the...

Page 58: ...n is activated enabling you to create CD labels and design CD jackets Figure 58 Select a Project CD Label Creator Button Uninstalling Easy CD Creator 5 To uninstall Easy CD Creator 5 use the Add Remov...

Page 59: ...able into a USB port on your Macintosh computer 3 Connect the AC adapter cable to the AC power input on the PortaCD RW drive Figure 59 Figure 59 Connecting Cables Note You cannot interface the PCMCIA...

Page 60: ...cting the drive to your Apple Macintosh computer There is no need to install a software driver This functionality is contained within the Mac OS However you need to install Toast pre mastering softwar...

Page 61: ...and CD RW discs Follow the steps below to install Toast software on your Macintosh computer s hard disk 1 Insert the TEAC Toast Software for Macintosh CD ROM into your com puter s CD ROM drive or int...

Page 62: ...2 Figure 62 Continuation Panel 4 Click the Continue button Toast 4 1 2 installs an English language version of the software Toast F installs a French Fran ais version Toast D installs a German Deutsch...

Page 63: ...2 Installer Panel 7 Select the Full Install option by using the pull down menu in the upper right corner of the panel 8 If desired specify a location on the hard drive as the installation desti natio...

Page 64: ...stem then displays an Installation successful panel Figure 66 Figure 66 Installation Successful Panel 10 Click the Quit button to conclude the installation Starting Toast To start Toast follow these s...

Page 65: ...Double click the Toast 4 1 2 application icon The system loads the Toast software and displays the main panel Figure 68 Figure 68 Toast Main Panel For information on using Toast refer to the user s g...

Page 66: ...Installing Toast Software 56 TEAC PortaCD RW User s Manual...

Page 67: ...or powered speakers The PortaCD RW drive outputs a line level audio signal from the headphone jack on its side panel You can connect headphones or external powered speakers to the headphone jack whic...

Page 68: ...58 TEAC PortaCD RW User s Manual...

Page 69: ...c s data surface non label side Do not place discs in direct sunlight or in locations subject to high humidity high temperatures or dusty conditions If cleaning the disc becomes necessary erratic oper...

Page 70: ...front panel The PortaCD RW partially extends the disc tray Grasp the front bezel and slide the tray fully open Figure 71 Extending the Disc Tray 2 Insert a CD R CD RW CD ROM or audio CD into the drive...

Page 71: ...spinning Then press the Open Eject button on the front panel The PortaCD RW partially extends the disc tray Grasp the front bezel and slide the tray fully open 2 Carefully remove the disc You may need...

Page 72: ...cturer CD R Taiyo Yuden CD RW Mitsubishi Verbatim Mitsui Toatsu Chemical Ricoh Mitsubishi Verbatim Ricoh TDK Electronics Kodak Fuji Film Hitachi Maxell Pioneer Sony Maxell PVC Note You may purchase ad...

Page 73: ...Video CD CD Extra CD Text Mixed Mode CD Write Methods Track At Once Disk At Once Multi Session Incremental Write Verification Running Optimum Power Control to dynamically adjust laser write power Logi...

Page 74: ...please contact the dealer from whom you purchased the drive or the TEAC Service and Support Center nearest you TEAC America Inc USA Technical Support Telephone 323 727 4860 Fax 323 869 8751 Monday Fr...

Reviews: