background image

High Speed Recording Guidelines

TEAC CD-RW Drive User’s Manual

11

High Speed Recording Guidelines

To optimize your drive performance and avoid system lockup conflicts, especially 
when recording to CD-R discs at high speeds (40X or 52X speed), you need to 
exercise the following options to enable DMA on your system: 

Windows XP

1.

Right-click 

My Computer

 and select 

Properties

.

2.

Click 

Hardware

 and select 

Device Manager

.

3.

Double-click 

IDE/ATA/ATAPI Controllers

.

4.

Double-click 

Secondary IDE channel 

and select 

Advanced Settings

.

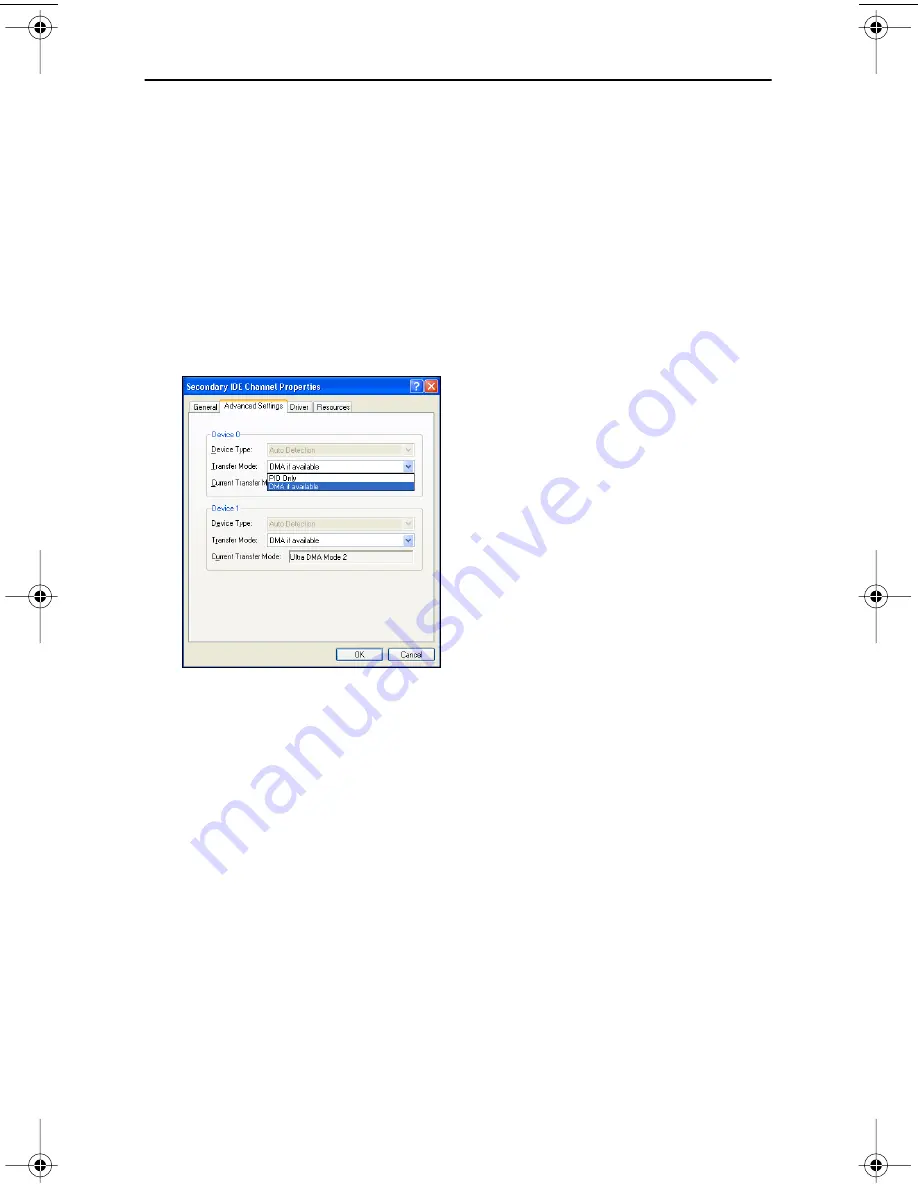
5.

Click 

Transfer Mode

 and select 

DMA 

if available.

Figure 8. Windows XP Transfer Mode setting

Windows 2000

1.

Right-click 

My Computer

 and select 

Properties

.

2.

Click 

Hardware

 and select 

Device Manager

.

3.

Click 

IDE/ATA/ATAPI Controllers

, double-click 

Secondary IDE Channel 

and select 

Advanced Settings

.

4.

Click

 Transfer Mode

 and select 

DMA if available

.

TEAC52x24x52.book  Page 11  Thursday, December 19, 2002  3:29 PM

Summary of Contents for CD-W552E

Page 1: ...User s Manual 52x24x52 CD RW Drive CD W552E Internal IDE Drive...

Page 2: ......

Page 3: ...ted and found to comply with the limits for a Class B digital device pursuant to Subpart J of Part 15 of the FCC Rules These limits are designed to provide reasonable protection against harmful interf...

Page 4: ...hapters Chapter 1 Introduction This chapter introduces the CD RW drive and describes shipping package contents and recommended system requirements Chapter 2 Configuring and Installing the CD RW Drive...

Page 5: ...ws 2000 11 Windows 98SE and Windows ME 12 Windows NT 4 0 Workstation 13 Connecting to Audio Equipment 14 Chapter 3 Installing and Launching Easy CD Creator 5 3x Basic on Windows Systems 15 Uninstallin...

Page 6: ...king the DMA Box 12 Figure 11 Connecting Analog Audio Speakers or Headphones 14 Figure 12 Close Program Panel 16 Figure 13 Auto Detect Panel 16 Figure 14 Choose Setup Language Panel 17 Figure 15 Insta...

Page 7: ...or convenient disc loading Recommended System Requirements IBM PC compatible computer Pentium II 300MHz or higher CD ROM drive with DAE support for disc to disc audio recording One available 5 25 inch...

Page 8: ...PhotoImpression photo editing software One blank CD R disc One blank CD RW disc Interface cable ribbon cable Audio cable to connect internally to your PC Mounting screws not shown TEAC CD Rewritable C...

Page 9: ...mm stereo mini plug For external speakers connect a stereo adapter to split the output into separate cables for the left and right channels Such adapters convert a male stereo mini jack to two female...

Page 10: ...itles disable the manual eject button and rely on software commands to eject the disc Refer to the documentation for these titles for more information Operation Right LED Left LED At tray loading gree...

Page 11: ...or Master mode For more information see Configuring the CD RW Drive and Figure 5 on page 7 interface connector Use the included IDE interface ribbon cable to connect the CD RW drive to an IDE interfa...

Page 12: ...Rear Panel 6 TEAC CD RW User s Manual...

Page 13: ...umper on the appropriate pair of pins you can set the drive to Master Slave or CSEL mode see Figures 4 and 5 Figure 4 Jumper Pins on Rear Panel The Master Slave CSEL jumper configuration of your TEAC...

Page 14: ...l of the CD RW drive is configured to its default setting of Master 4b Slide the CD RW drive into an empty 5 25 drive bay Install the CD RW drive in your computer in a horizontal or vertical orientati...

Page 15: ...n 1 on an interface cable is usually designated by a colored strip along one edge of the cable The interface ribbon cable connector may feature a tab on one side Insert the cable so that the tab align...

Page 16: ...iddle connector on your existing CD ROM DVD interface cable If your original cable does not have an available middle connector remove this cable and use the cable provided with the TEAC drive 5d Your...

Page 17: ...ick My Computer and select Properties 2 Click Hardware and select Device Manager 3 Double click IDE ATA ATAPI Controllers 4 Double click Secondary IDE channel and select Advanced Settings 5 Click Tran...

Page 18: ...2 Click Device Manager and double click the CD ROM icon 3 Double click on your original CD ROM drive reference and click the Settings tab The system displays the following screen Figure 10 Figure 10...

Page 19: ...that will require you to reinstall Windows NT Be very careful and always back up your files before you make any changes Notes The IDE CD RW drive is a true Plug N Play device therefore it will be det...

Page 20: ...ert a male stereo mini jack to two female phono jacks Alternatively if you are using a sound card in your PC you can connect external powered speakers to the audio connectors on the rear panel of the...

Page 21: ...using DirectCD create duplicate copies of discs assuming you have a second CD ROM drive using CD Copier software Uninstalling Old Versions of Easy CD Creator If you have an old version of Easy CD Crea...

Page 22: ...y need to repeat this process since you can only disable one application at a time Then proceed with the installation below Figure 12 Close Program Panel Follow these steps to install Easy CD Creator...

Page 23: ...ure 14 Choose Setup Language Panel 2 Select a language and click the OK button The system displays the following installShield Wizard Welcome panel Figure 15 InstallShield Wizard Welcome Panel 3 Click...

Page 24: ...in the installation Figure 17 on page 18 Figure 17 Ready to Install Panel 5 Click the Install button The system begins the installation and displays a progress bar Figure 18 Figure 18 Installing Statu...

Page 25: ...nce the system reboots Easy CD Creator 5 3x Basic will be ready for use Online Registration There is no need to register any portion of this kit TEAC provides 100 support for the drive and the Roxio s...

Page 26: ...n page 22 Using Easy CD Creator 5 3x Basic Your copy of Easy CD Creator 5 3x Basic enables you to Create custom audio CDs from audio tracks MP3 les or WAV les Create data CDs from graphic images photo...

Page 27: ...you upgrade to CD Creator Platinum you can create that contain graphic images or photographs in various file formats You can also backup or archive any type of file photo albums and video postcards H...

Page 28: ...to additional information about Easy CD Creator To access on line help 1 On the Select a Project panel Figure 22 on page 22 position the cursor over the help rollover button in the lower right corner...

Page 29: ...Platinum directly Updating the Software web checkup button If your computer has access to the Internet you can download the latest software updates for Easy CD Creator 5 3x To download the latest sof...

Page 30: ...Updating the Software web checkup button 24 TEAC CD RW Drive User s Manual...

Page 31: ...ace Do not touch the disc s data surface unlabeled side Do not place discs in direct sunlight or in locations subject to high humidity high temperatures or dusty conditions If cleaning the disc become...

Page 32: ...ed blank CD R and high speed 4X 10X or 12X rated CD RW media from TEAC or the following manufacturers Disc Type Manufacturer Disc Type Manufacturer CD R Acer CD RW Acer CMC CMC Fuji Film Digimaster Ko...

Page 33: ...he front of the drive to extend the disc tray refer to Figure 25 Remove the disc from the disc tray and place it in its protective case Then press the Eject button again to retract the disc tray back...

Page 34: ...r write power Logical Recording Format IS09660 UDF CDR FS Packet Write Read Compatibility CD DA CD ROM Mode 1 CD ROM XA Mode 2 Form 1 and 2 Multi session PhotoCD CD I Video CD CD Plus CD RW CD R CD TE...

Page 35: ...User s Manual 29 Appendix C Technical Support For technical support please contact TEAC America Inc USA Technical Support Telephone 323 727 4860 Fax 323 869 8751 Monday Friday 8 00 a m 5 00 pm PST htt...

Page 36: ...Loading and Ejecting Discs 30 TEAC CD RW Drive User s Manual...

Reviews: