background image

Upgrading the Software (

upgrade

 button)

TEAC CD-RW Drive User’s Manual

29

Upgrading the Software (

upgrade

 button)

If your computer has access to the Internet, you can upgrade 

Easy CD Creator 5.2 

Basic 

to 

Easy CD Creator Platinum

 by clicking the 

upgrade 

button on the 

Select 

a Project

 panel and following the instructions.

Roxio will handle technical support for 

Easy CD Creator 5.2 Platinum

 directly.

Updating the Software (

web-checkup

 button)

If your computer has access to the Internet, you can download the latest software 
updates for 

Easy CD Creator 5.2

.

To download the latest software update:

1.

Roll over the 

web-checkup 

button on the main 

Select a Project

 panel 

(Figure 21 on page 21).

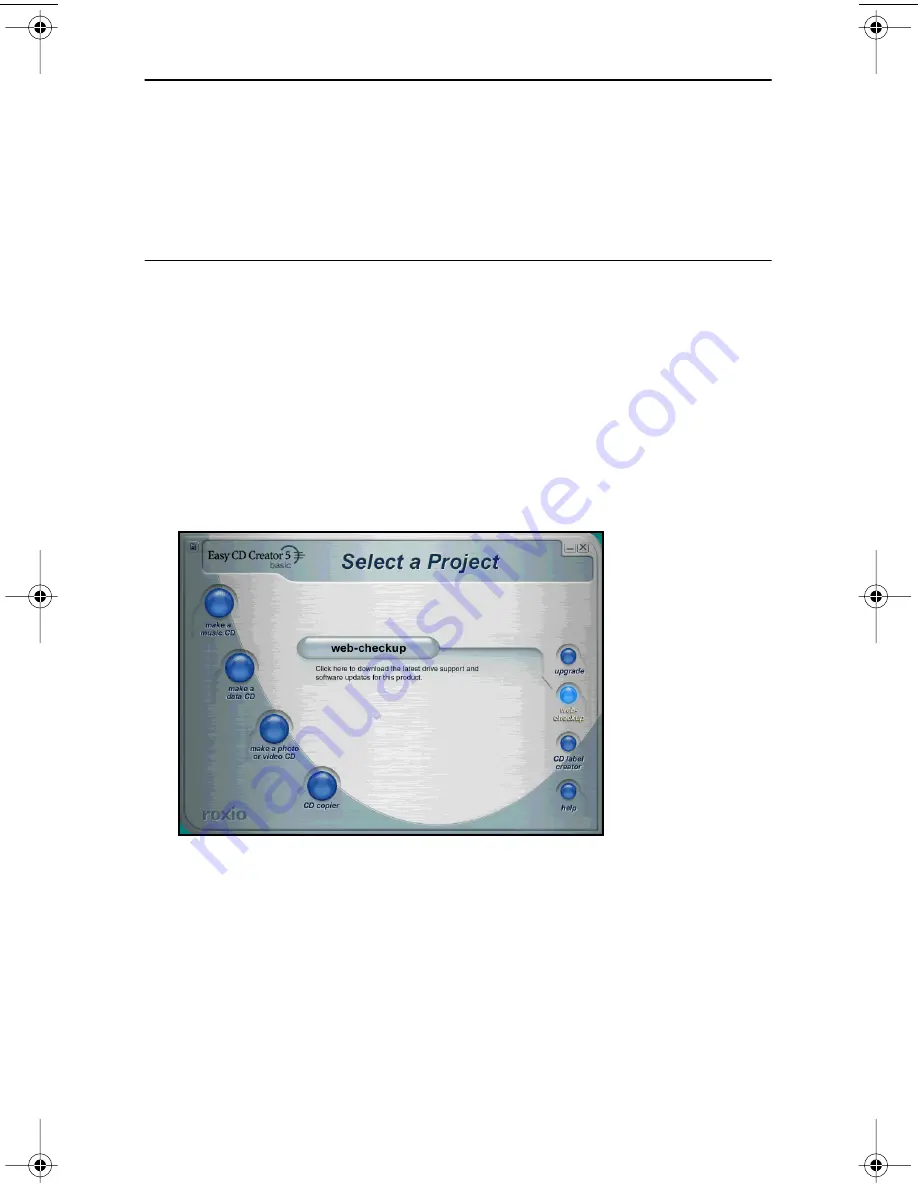
The system displays another 

web-checkup

 button and a short description of 

the web-checkup function (Figure 33 on page 29).

Figure 33. Select a Project: Web-checkup Button

2.

Click the 

web-checkup 

button and follow the instructions on the web 

page to download the software updates.

TEAC40x12x48.book  Page 29  Sunday, March 17, 2002  7:27 PM

Summary of Contents for CD-W540E

Page 1: ...User s Manual 40x12x48 CD RW Drive CD W540E Internal IDE Drive...

Page 2: ......

Page 3: ...ted and found to comply with the limits for a Class B digital device pursuant to Subpart J of Part 15 of the FCC Rules These limits are designed to provide reasonable protection against harmful interf...

Page 4: ...install and operate the TEAC CD RW drive It is divided into the following chapters Chapter 1 Introduction This chapter introduces the CD RW Drive and describes shipping package contents and recommende...

Page 5: ...CD Creator 5 2 Basic on Windows Systems 15 Uninstalling Old Versions of Easy CD Creator 15 Installing Easy CD Creator 5 2 Basic Software 16 Online Registration 19 Starting Easy CD Creator 5 2 Basic 2...

Page 6: ...iv TEAC CD RW Drive User s Manual Recommended Media 31 Disc Formats 32 Loading and Ejecting Discs 32 Appendix B Specifications 33 Appendix C Technical Support 34...

Page 7: ...up Type Panel 17 Figure 17 Ready to Install Panel 18 Figure 18 Installing Status Panel 18 Figure 19 InstallShield Wizard Completed Panel 19 Figure 20 Restart Panel 19 Figure 21 Easy CD Creator Select...

Page 8: ...vi TEAC CD RW Drive User s Manual...

Page 9: ...tray for convenient disc loading Recommended System Requirements IBM PC compatible computer Pentium II 300MHz or higher CD ROM drive with DAE support for disc to disc audio recording One available 5 2...

Page 10: ...ry Installation Manuals including English French and Spanish versions One blank CD R disc One blank CD RW disc Interface cable ribbon cable Audio cable to connect internally to your PC Mounting screws...

Page 11: ...mm stereo mini plug For external speakers connect a stereo adapter to split the output into separate cables for the left and right channels Such adapters convert a male stereo mini jack to two female...

Page 12: ...itles disable the manual eject button and rely on software commands to eject the disc Refer to the documentation for these titles for more information Operation Right LED Left LED At tray loading gree...

Page 13: ...d Figure 5 on page 7 interface connector Use the included IDE interface ribbon cable to connect the CD RW drive to an IDE interface in your computer For more information see Installing the CD RW Drive...

Page 14: ...Rear Panel 6 TEAC CD RW User s Manual...

Page 15: ...umper on the appropriate pair of pins you can set the drive to Master Slave or CSEL mode see Figures 5 and 6 Figure 4 Jumper Pins on Rear Panel The Master Slave CSEL jumper configuration of your TEAC...

Page 16: ...Master 4b Slide the CD RW drive into the empty 5 25 drive bay Install the CD RW drive in your personal computer in a horizontal orientation within 10 of horizontal The Eject button should be located o...

Page 17: ...ce while trying to insert the cable into position 4d Connect the opposite end of the interface ribbon cable to the interface connector on the rear panel of the CD RW drive Figure 7 Cable Connections 4...

Page 18: ...e power cable to the power connector on the rear panel of the CD RW drive Insert the power cable plug in the correct orientation into the power connector The plug is shaped so that it can be easily in...

Page 19: ...lick My Computer and select Properties 2 Click Hardware and select Device Manager 3 Click IDE ATA ATAPI Controllers double click Secondary IDE Channel and select Advanced Settings 4 Click Transfer Mod...

Page 20: ...from the Microsoft KnowledgeBase You can access article number Q158873 How to Enable IDE DMA Bus Mastering Using SP2 Atapi sys at www microsoft com Enter article number Q158873 in the search field It...

Page 21: ...CD ROM DRIVE ATAPI version 1 2 driver is installed If not open the Control Panel double click SCSI Adapters click the Driv ers tab then click the Add button At the Select a SCSI Adapter Option window...

Page 22: ...ert a male stereo mini jack to two female phono jacks Alternatively if you are using a sound card in your PC you can connect external powered speakers to the audio connectors on the rear panel of the...

Page 23: ...ng directCD create duplicate copies of discs assuming you have a second CD ROM drive using CD Copier software Uninstalling Old Versions of Easy CD Creator If you have an old version of Easy CD Creator...

Page 24: ...need to repeat this process since you can only disable one application at a time Then proceed with the installation below Figure 12 Close Program Panel Follow these steps to install Easy CD Creator 5...

Page 25: ...ure 14 Choose Setup Language Panel 2 Select a language and click the OK button The system displays the following installShield Wizard Welcome panel Figure 15 InstallShield Wizard Welcome Panel 3 Click...

Page 26: ...in the installation Figure 17 on page 18 Figure 17 Ready to Install Panel 5 Click the Install button The system begins the installation and displays a progress bar Figure 18 Figure 18 Installing Statu...

Page 27: ...Once the system reboots Easy CD Creator 5 2 Basic will be ready for use Online Registration There is no need to register any portion of this kit TEAC provides 100 support for the drive and the Roxio s...

Page 28: ...r information on using each function please see Figure 21 on page 21 and About the Help Files help button on page 22 Using Easy CD Creator 5 2 Basic Your copy of Easy CD Creator 5 2 Basic enables you...

Page 29: ...f you upgrade to CD Creator Platinum you can create that contain graphic images or photographs in various file formats You can also backup or archive any type of file photo albums and video postcards...

Page 30: ...t panel Figure 22 on page 22 features a Help button that links to additional information about Easy CD Creator To access on line help 1 On the Select a Project panel Figure 22 on page 22 position the...

Page 31: ...displays the musicCD button Figure 24 on page 23 This button enables you to create music CDs and save your record list between burns Two other buttons are also displayed on the panel with a screened o...

Page 32: ...ng Data Discs make a data CD button Easy CD Creator 5 2 Basic enables you to archive your important data to CDs in three easy ways When you roll the cursor over the make a data CD button on the Select...

Page 33: ...tton and displays three project buttons Figure 26 2 Click the directCD button The system displays the DirectCD format utility panel Figure 27 For more information click the help button illustrated in...

Page 34: ...sc 1 Roll over the make a data CD button on the main Select a Project panel Figure 21 on page 21 The system highlights the make a data CD button and displays three project buttons Figure 26 on page 25...

Page 35: ...iles to disc However you do not need the Platinum version to create custom video CDs The make a data CD feature of Easy CD Creator 5 2 Basic enables you to create discs containing video files in all p...

Page 36: ...splays the Welcome panel Figure 31 which warns against copyright infringement Figure 31 CD Copier Welcome Panel 3 Please read the panel then click the OK button The system displays the CD Copier Figur...

Page 37: ...Platinum directly Updating the Software web checkup button If your computer has access to the Internet you can download the latest software updates for Easy CD Creator 5 2 To download the latest softw...

Page 38: ...Creator Button Uninstalling Easy CD Creator 5 2 Basic To uninstall Easy CD Creator 5 2 Basic use the Add Remove Program tool in the Control Panel Follow these steps 1 Select Start Settings Control Pan...

Page 39: ...rface of the disc from the center to the outside edge Do not use benzene alcohol thinner or other solvents Figure 35 How to Handle Compact Discs CD R and CD RW Recommended Media One blank TEAC CD R di...

Page 40: ...the Eject button on the front of the drive to extend the disc tray refer to Figure 36 Remove the disc from the disc tray and place it in its protective case Then press the Eject button again to retrac...

Page 41: ...er write power Logical Recording Format IS09660 UDF CDR FS Packet Write CD Formats Supported CD DA CD ROM Mode 1 CD ROM XA Mode 2 Form 1 and 2 Multi session PhotoCD CD I Video CD CD Plus CD MRW Disc L...

Page 42: ...ve User s Manual Appendix C Technical Support For technical support please contact TEAC America Inc USA Technical Support Telephone 323 727 4860 Fax 323 869 8751 Monday Friday 8 00 a m 5 00 pm PST htt...

Reviews: