background image

Installing Easy CD Creator 5 Software

16

TEAC CD-RW Drive User’s Manual

Installing Easy CD Creator 5 Software

Before you install 

Easy CD Creator 5 Basic

, disable any applications that may be 

running in the background, including anti-virus software, screen savers, 
schedulers, etc. 

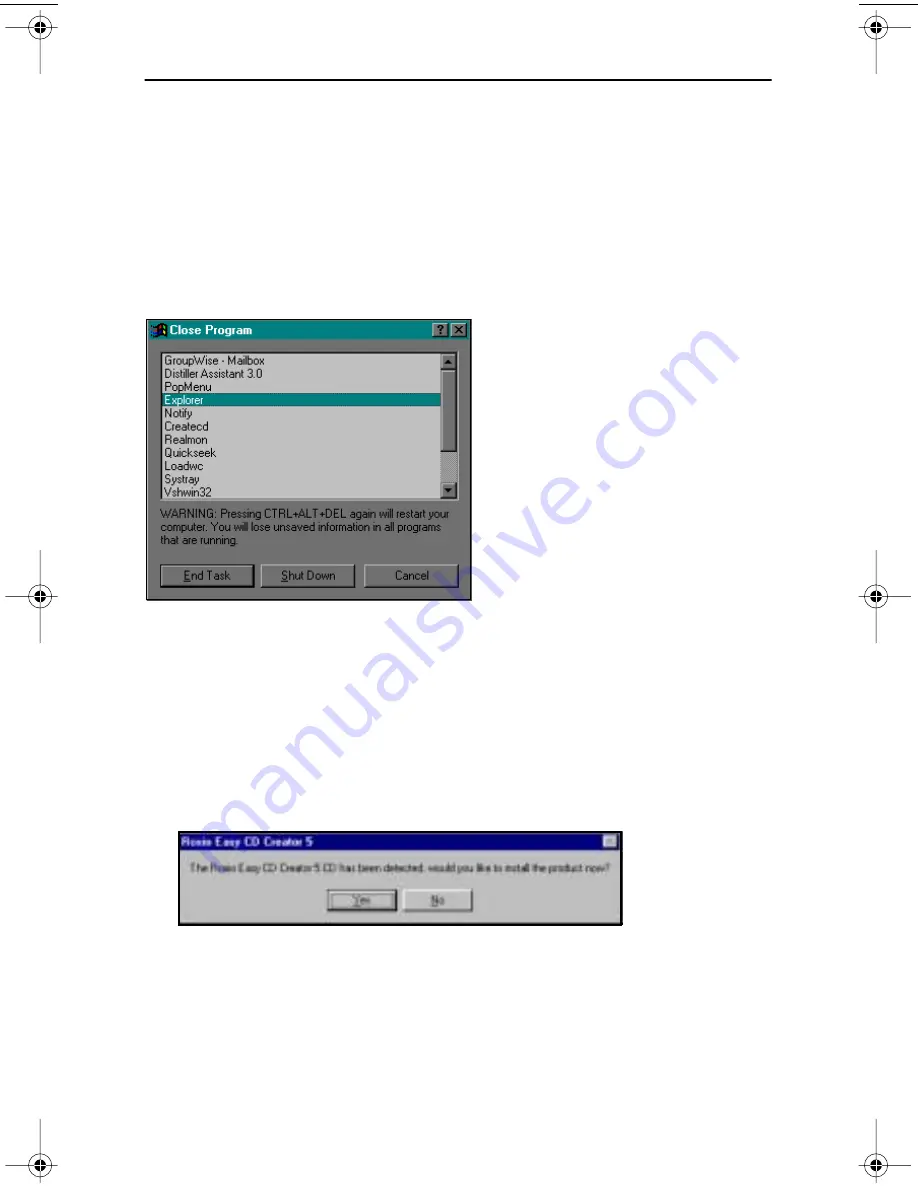
To do so, press CTL-ALT-DEL on your keyboard. The 

Close Program

 panel will 

display a list of all current programs in memory (Figure 11). With the exception 
of “Explorer” and “Systray,” select each program, then click the 

End Task

 button. 

Then proceed with the installation below.

Figure 11. Close Program Panel

Follow these steps to install 

Easy CD Creator 5

 software on your computer’s hard 

disk.

1.

Insert the Easy CD Creator 5 CD-ROM into your computer’s CD-ROM 
drive or into the TEAC CD-RW drive.

If the Autoplay function is enabled, the system displays the auto detect screen 
(Figure 12). Click 

Yes

 to continue.

Figure 12. Auto Detect Panel

If the auto detect panel is not displayed, double-click the 

My Computer

 icon, 

then double-click the icon for the CD-ROM drive, and double-click on 

setup.exe

.

The system displays the following 

Choose Setup Language 

panel 

(Figure 13 on page 17).

TEAC16x10x40.book  Page 16  Thursday, March 15, 2001  11:15 AM

Summary of Contents for CD-W516EB

Page 1: ... User s Manual 16x10x40 CD RW Drive CD W516EB Internal IDE Drive ...

Page 2: ......

Page 3: ...sted and found to comply with the limits for a Class B digital device pursuant to Subpart J of Part 15 of the FCC Rules These limits are designed to provide reasonable protection against harmful interference in a residential installation However there is no guarantee that interference will not occur in a particular installation To ensure compliance with FCC rules the cable that connects the unit t...

Page 4: ...te the TEAC CD RW drive It is divided into the following chapters Chapter 1 Introduction This chapter introduces the CD RW Drive and describes shipping package contents and recommended system requirements Chapter 2 Configuring and Installing the CD RW Drive This chapter explains how to configure the CD RW drive s CSEL Slave Master setting by positioning a jumper pin It also explains how to install...

Page 5: ...pter 3 Installing and Using Easy CD Creator 5 on Windows Systems 15 Uninstalling Old Versions of Easy CD Creator 15 Installing Easy CD Creator 5 Software 16 Online Registration 19 Starting Easy CD Creator 5 20 Using Easy CD Creator 5 20 About the Help Files help button 22 Creating Audio Discs make a music CD button 23 Creating Music CDs musicCD button 24 Creating Data Discs make a data CD button 2...

Page 6: ...iv TEAC CD RW Drive User s Manual Recommended Media 31 Disc Formats 32 Loading and Ejecting Discs 32 Appendix B Specifications 33 Appendix C Technical Support 34 ...

Page 7: ...ady to Install Panel 18 Figure 17 Installing Status Panel 18 Figure 18 InstallShield Wizard Completed Panel 19 Figure 19 Restart Panel 19 Figure 20 Easy CD Creator Select a Project Panel 21 Figure 21 Select a Project Panel Help Button 22 Figure 22 Help Topics Panel 23 Figure 23 Select a Project Panel Make Music CD 23 Figure 24 Untitled Music CD Project Panel 24 Figure 25 Select a Project Panel Mak...

Page 8: ...vi TEAC CD RW Drive User s Manual ...

Page 9: ...y for convenient disc loading Recommended System Requirements IBM PC compatible computer Pentium II 300MHz or higher CD ROM drive with DAE support for disc to disc audio recording One available 5 25 inch drive bay 64MB of RAM A hard drive that meets or exceeds the following minimum specifications 1GB hard disk space or more for CD Image creation 1 2MB second data transfer rate or faster 12ms averag...

Page 10: ...p software One blank CD R disc One blank CD RW disc Interface cable ribbon cable Audio cable to connect internally to your PC Mounting screws not shown TEAC CD Rewritable CD RW Drive User s Manual this booklet Figure 1 CD RW Drive Kit Package Contents Note If any of these items is missing from the package please contact the vendor immediately to have the kit replaced interface cable user s manual ...

Page 11: ... Use a 3 5mm stereo mini plug For external speakers connect a stereo adapter to split the output into separate cables for the left and right channels Such adapters convert a male stereo mini jack to two female phono jacks volume control Use the volume control to adjust the volume Turn the control right to increase the volume left to decrease Lower the volume before you start a CD ROM audio program...

Page 12: ...titles disable the manual Eject button and rely on software commands to eject the disc Refer to the documentation for these titles for more information Operation Right LED Left LED At tray loading green LED flashes off At tray eject green LED flashes off During write erase off green LED flashes During audio play green LED flashes off During seek data transfer green LED lights off Note The right LE...

Page 13: ...he CD RW Drive on page 7 interface connector Use the included IDE interface ribbon cable to connect the CD RW drive to an IDE interface in your computer For more information see Chapter 2 Configuring and Installing the CD RW Drive on page 7 power connector Connect the power connector to the 5VDC and 12VDC power sources The 5VDC terminal is on the left as you face the rear panel the 12VDC terminal ...

Page 14: ...Rear Panel 6 TEAC CD RW User s Manual ...

Page 15: ...he jumper on the appropriate pair of pins you can set the drive to Master Slave or CSEL mode see Figure 5 Figure 4 Jumper Pins on Rear Panel The Master Slave CSEL jumper configuration of your TEAC CD RW drive will depend on whether or not you have an IDE CD ROM DVD drive installed in your system The following section will guide you through most typical system configurations Figure 5 CSEL Slave and...

Page 16: ... Master 4b Slide the CD RW drive into the empty 5 25 drive bay Install the CD RW drive in your personal computer in a horizontal orientation within 10 of horizontal The Eject button should be located on the right side of the unit Secure the drive using the included 3x5mm mounting screws Figure 6 Installing the CD RW Drive in a Computer Note The recommended configuration calls for your CD RW to be ...

Page 17: ...rce while trying to insert the cable into position 4d Connect the opposite end of the interface ribbon cable to the interface connector on the rear panel of the CD RW drive Figure 7 Cable Connections 4e Connect one end of the included analog audio cable to the analog audio connector on the rear panel of the CD RW drive and connect the opposite end to your sound card Go to Step 6 5 If you have an I...

Page 18: ...e power cable to the power connector on the rear panel of the CD RW drive Insert the power cable plug in the correct orientation into the power connector The plug is shaped so that it can be easily inserted in only one orientation do not force the plug into the connector The 5v terminal is on the left as you face the rear of the panel the 12v terminal is on the right The two center terminals are g...

Page 19: ...Windows 98SE and Windows ME 1 Right click My Computer and select Properties 2 Click Device Manager and double click the CD ROM icon 3 Double click on your original CD ROM drive reference and click the Settings tab The system displays the following screen Figure 9 Figure 9 Checking the DMA Box 4 Check the DMA box then click OK 5 Repeat Step 4 for your hard disk drive in the Disk Drives section 6 Cl...

Page 20: ...ious problems that will require you to reinstall Windows NT Be very careful and always back up your files before you make any changes Notes The IDE CD RW drive is a true Plug N Play device therefore it will be detected automatically by Windows 98SE Me 2000 Professional There is no need to install any drivers Windows NT 4 0 Workstation Users Windows NT 4 0 does not support the Plug N Play feature T...

Page 21: ...vert a male stereo mini jack to two female phono jacks Alternatively if you are using a sound card in your PC you can connect external powered speakers to the audio connectors on the rear panel of the PC Figure 10 Connecting Analog Audio Speakers or Headphones Note If you connect external powered speakers to the sound card on the rear panel of the PC monitoring sound via headphones connected to th...

Page 22: ...Connecting to Audio Equipment 14 TEAC CD RW Drive User s Manual ...

Page 23: ...D create duplicate copies of discs assuming you have a second CD ROM drive using CD Copier software Uninstalling Old Versions of Easy CD Creator If you have an old version of Easy CD Creator and or other recording software on your system you must uninstall it before you install Easy CD Creator 5 To uninstall the old version of Easy CD Creator select Start Programs Adaptec Easy CD Creator 4 or your...

Page 24: ...ram then click the End Task button Then proceed with the installation below Figure 11 Close Program Panel Follow these steps to install Easy CD Creator 5 software on your computer s hard disk 1 Insert the Easy CD Creator 5 CD ROM into your computer s CD ROM drive or into the TEAC CD RW drive If the Autoplay function is enabled the system displays the auto detect screen Figure 12 Click Yes to conti...

Page 25: ... 13 Choose Setup language Panel 2 Select a language and click the OK button The system displays the following installShield Wizard Welcome panel Figure 14 InstallShield Wizard Welcome Panel 3 Click the Next button The system displays the following panel Figure 15 Setup Type Panel ...

Page 26: ...tallation Figure 16 on page 18 Figure 16 Ready to Install Panel 5 Click the Install button The system begins the installation and displays a bar graph marking progress Figure 17 Figure 17 Installing Status Panel If you wish to abort the installation click the Cancel button any time When installation is complete the system displays the following panel Figure 18 on page 19 ...

Page 27: ...utton to restart the computer Once the system reboots Easy CD Creator 5 will be ready for use Online Registration There is no need to register any portion of this kit TEAC provides 100 support for the drive and the Roxio software If a Registration Reminder panel appears when you launch the Easy CD Creator 5 Basic software check the Do not show this reminder again box and close the Registration Rem...

Page 28: ...n using each function please see Figure 20 on page 21 and About the Help Files help button on page 22 Using Easy CD Creator 5 Your copy of Easy CD Creator 5 Basic enables you to Create custom audio CDs from audio tracks MP3 files or WAV files Create data CDs from graphic images photos video clips or your personal files Use DirectCD to drag and drop files to CD as simply as you copy files to a standard ...

Page 29: ...If you upgrade to CD Creator Platinum you can create that contain graphic images or photographs in various file formats You can also backup or archive any type of file photo albums and video postcards However you can record video files to CD using the make a data cd function With an additional CD ROM drive you can duplicate discs Access the on line Help system If you upgrade to CD Creator Platinum...

Page 30: ...ram you can better access the Help system by clicking the Help menu in the selected program The Select a Project panel Figure 20 on page 21 features a Help button that links to additional information about Easy CD Creator To access on line help 1 On the Select a Project panel Figure 20 on page 21 position the cursor over the help rollover button in the lower right corner The system displays the he...

Page 31: ...plays the musicCD button Figure 23 on page 23 This button enables you to create music CDs and save your record list between burns Two other buttons are also displayed on the panel with a screened or greyed out appearance These buttons link to additional functionality available only in the upgraded Platinum version of Easy CD Creator 5 This functionality may simplify or enhance the process of creat...

Page 32: ...iscs make a data CD button Easy CD Creator 5 enables you to create data archive CDs and backup your important data to CDs in three easy ways When you roll the cursor over the make a data CD button on the Select a Project panel Figure 25 on page 25 the system displays buttons for the following functions directCD enables you to format a blank disc so you can drag files to a CD R or CD RW using Window...

Page 33: ...ake a data CD button on the main Select a Project panel Figure 20 on page 21 The system highlights the make a data CD button and displays three project buttons Figure 25 2 Click the directCD button The system displays the DirectCD format utility panel Figure 26 For more information click the help button illustrated in Figure 26 Figure 26 DirectCD Format Utility Panel Drag and drop files to CD Crea...

Page 34: ...ive disc 1 Roll over the make a data CD button on the main Select a Project panel Figure 20 on page 21 The system highlights the make a data CD button and displays three project buttons Figure 25 on page 25 2 Click the dataCD button The system displays an Untitled Data CD project panel For more information click the Help menu on the toolbar and select Content and Index Figure 27 Untitled Data CD P...

Page 35: ...files to disc However you do not need the Platinum version to create custom video CDs The make a data CD feature of Easy CD Creator 5 Basic enables you to create discs containing video files in all popular formats including Quicktime AVI MPEG etc Figure 28 Select a Project CD Label Creator Button Copying Discs CD copier button You can make a backup copy of an entire CD with a single click To copy ...

Page 36: ...n The system displays the Welcome panel Figure 30 which warns against copyright infringement Figure 30 CD Copier Welcome Panel 3 Please read the panel then click the OK button The system displays the CD Copier Figure 31 panel For more information click the Help menu on the toolbar and select Help topics Figure 31 CD Copier Panel CD copier rollover CD copier button ...

Page 37: ...CD Creator 5 Platinum directly Updating the Software web checkup button If your computer has access to the Internet you can download the latest software updates for Easy CD Creator 5 To download the latest software update 1 Roll over the web checkup button on the main Select a Project panel Figure 20 on page 21 The system displays another web checkup button and a short description of the web check...

Page 38: ...l Creator button is activated enabling you to create CD labels and design CD jackets Figure 33 Select a Project CD Label Creator Button Uninstalling Easy CD Creator 5 To uninstall Easy CD Creator 5 use the Add Remove Program tool in the Control Panel Follow these steps 1 Select Start Settings Control Panel 2 Double click the Add Remove Program icon 3 Click Easy CD Creator 5 Basic 4 Click the Add R...

Page 39: ...of the disc from the surface to the outside edge Do not use benzene alcohol thinner or other solvents Figure 34 How to Handle Compact Discs CD R and CD RW Recommended Media One blank TEAC CD R disc and one blank CD RW rewritable disc are included in the package with your CD RW For optimum performance use only 74 or 80 minute 16X speed rated blank CD R and high speed 4X 10X rated CD RW media from T...

Page 40: ... the Eject button on the front of the drive to extend the disc tray refer to Figure 35 Remove the disc from the disc tray and place it in its protective case Then press the Eject button again to retract the disc tray back into the drive Figure 35 Ejecting the Disc Tray Disc Format Data Capacity CD DA 74 or 80 minutes CD ROM Mode 1 650MB or 700MB CD ROM XA Mode 2 Form 1 650MB or 700MB CD ROM XA Mod...

Page 41: ... Packet Write CD Formats Supported CD DA CD ROM Mode 1 CD ROM XA Mode 2 Form 1 and 2 Multi session PhotoCD CD ROM XA CD R CD RW CD I Video CD CD Extra CD Plus CD Text Disc Loading Power Tray caddy not required Front Panel Built in Headphone Jack Dual Status LEDs Volume Control Knob and Power Eject Button MTBF 100 000 POH Dimensions 5 75 W x 1 63 H x 7 56 D Weight 2 65 lbs Power Supplies 5VDC 12VDC...

Page 42: ...a teac de TEAC UK Ltd 5 Marlin House Croxley Business Park Watford Hertfordshire WD1 8YA Telephone 0923 225235 Fax 0923 236290 TEAC France S A 17 rue Alexis de Tocqueville CE 005 92182 ANTONY CEDEX Telephone 1 42 37 01 02 Fax 1 42 37 65 45 Japan Asia Middle East TEAC Corporation 3 7 3 Nakacho Musashino shi Tokyo 180 0006 Japan Field Service and Technical Support Section Data Storage Products Sales...

Reviews: