background image

139

ENGLISH

11. Support and Service

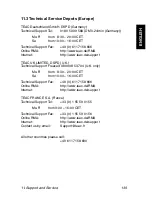
11.3 Technical Service Depots (Europe)

TEAC Deutschland GmbH, DSPD (Germany)
Technical Support Tel:

0180 5 999 588 (DM 0.24/min (Germany))

Mo-Fr

from   8:30 – 20:00 CET

Sa

from 10:00 – 16:00 CET

Technical Support Fax:

+49 (0) 611 7158 666

Online RMA:

http://www.teac.de/RMA

Internet:

http://www.teac.de/support

TEAC UK LIMITED, DSPD (U.K.)
Technical Support Freecall: 0800 08 53 704 (U.K. only)

Mo-Fr

from   8:30 – 20:00 CET

Sa

from 10:00 – 16:00 CET

Technical Support Fax:

+49 (0) 611 7158 666

Online RMA:

http://www.teac.de/RMA

Internet:

http://www.teac.de/support

TEAC FRANCE S.A. (France)
Technical Support Tel:

+33 (0) 1 55 59 01 55

Mo-Fr

from 9:00 – 16:00 CET

Technical Support Fax:

+33 (0) 1 55 59 01 56

Online RMA:

http://www.teac.de/RMA

Internet:

http://www.teac.de/support

Contact us by email:

[email protected]

All other countries please call:

+49 611 7158 600

Summary of Contents for CD-W224PUK

Page 1: ...rive CD W224PUK User s manual To ensure the smooth handling of your warranty please write the serial number of your drive into the box In the case of warranty you are expected to send it together with a copy of your invoice to your nearest TEAC sales representative ...

Page 2: ...ny and product names provided herein are trade marks of their respective companies Windows 98 Second Edition Windows Me Windows 2000 andWindows XP are registered trademarks of Microsoft Cor poration in the U S Changes in specifications and features may be made with out notice or obligation ...

Page 3: ...dure Outline for Installation and Operation 85 3 COMPONENTS 86 3 1 Precautions when unpacking the package 86 3 2 Package List 87 4 PRECAUTIONS FOR SETTING AND HANDLING 88 Daily Maintenance 89 5 NAMES AND FUNCTIONS 90 5 1 Front panel top 90 5 2 Rear panel 92 5 3 AC Adapter 94 5 4 USB Cable 94 6 SETTING UP THE DRIVE 95 6 1 Connecting the Cables 95 6 2 Disconnecting the Drive 99 6 3 Driver installati...

Page 4: ...emoving the media 123 9 OPERATION 124 9 1 Playing Music CDs 124 9 2 Before using the write function of Windows XP 129 9 3 Suspend Resume 131 9 4 Using USB 2 0 131 9 5 RPC and Setting of region code DW 224PUK only 132 10 MEDIA 134 10 1 Readable media 134 10 2 CD R RW writing speed 135 10 3 Supported media 137 11 SUPPORT AND SERVICE 138 11 1 Warranty period 138 11 2 Requests for repair 138 11 3 Tech...

Page 5: ... document to assure accuracy contactTEAC if there is any doubt or error in this document Note however that TEAC may not assume responsibility for the support or results of the above TEAC assumes no responsibility for data loss caused by the opera tion that is not in accordance to this document or data loss caused by natural disaster fire power outage or spontaneous defect of this product The produ...

Page 6: ...el lectual property rights 1 Grant of License This Agreement permits you to have the following rights Use and copy TEAC approves you to use the Software for the drive unit purchased from TEAC and owned by you hereinafter called Your Drive Unit You may make a copy of the Software for use with all ofYour Drive Units or for backup purposes 2 Restrictions All the copies of the Software must hold the c...

Page 7: ...d its suppliers do not provide a warranty of any kind either express or implied including but not limited to any implied warranties or condi tions of merchantability quality fitness for a particular purpose and no infringement 6 No Liability for Consequential Damages In no event shall TEAC or its suppliers be liable for any other damages whatsoever including without limitation damages for loss of ...

Page 8: ...vice This is a drive that is used by connecting it to the USB terminal of a personal computer The drive functions as a device conforming to the USB1 1 when connected to the USB1 1 terminal and as a device con forming to the USB2 0 when connected to the USB2 0 terminal A floppy disk drive may be required for installing software when using this drive You may download the needed driver routines from ...

Page 9: ...he DVD Video depending on your environ ment or DVD titles for DW 224PUK only When the DVD Video is played by connect ing to the USB1 1 interface picture and sound cannot be smoothly played due to its limited transfer rate 1 2 Conforming Operating Systems Any one of the following operating systems is required Microsoft Windows 98 Second Edition Microsoft Windows Me Microsoft Windows 2000 Profession...

Page 10: ... in the computer must be operating normally Ex ecute the following steps to check the operation state of the USB con troller In Windows 98SE or Windows Me 1 Click Start Settings Control Panel 2 Double click System In Windows Me System may not appear in the Control Panel In that case left click view all Control Panel op tions to display it ...

Page 11: ...evice Manager tab Confirm that USB Universal Serial Bus controller exists in the de vice list The name of the USB controller depends on the PC used the figure below represents a USB controller provided by Intel 1 Before Using ...

Page 12: ...dows 2000 1 Click Start Settings Control Panel 2 Double click System 3 Click the Hardware tab 4 Click the Device Manger button 5 Confirm that USB Universal Serial Bus controller exists in the de vice list 1 Before Using ...

Page 13: ...n Windows XP 1 Click Start Control Panel 2 Click Performance and Maintenance and then System 3 Click the Hardware tab 4 Click the Device Manger button 5 Confirm that USB Universal Serial Bus controller exists in the de vice list ...

Page 14: ...mputer is allowed with the power of the computer on Perform proper disconnecting procedure using an unplug utility on your operating system when disconnecting the drive Latest high speed interface The drive conforms to the USB2 0 High Speed A read speed of 24X at the maximum can be fully realized with the CD ROM Stable writing of 24X at the maximum for CD R and 10X at the maximum for the CD RW is ...

Page 15: ... CD and Video CD DVD Video using your computer It is recommended to connect the drive to a USB 2 0 interface for playing a DVD Video When playing it by connecting to the USB 1 1 interface frame dropouts or sound dropouts are caused due to limited data transfer rate Writing data on the CD R CD RW media creating a back up copy of your CD You can store your computer data on the rewritable CD R or CD ...

Page 16: ...according to regulations such as copyright law or the licensing agreement between users and owners Please use this drive properly by checking the conditions of the copyrighted materials before creating a copy and so on TEAC will not hold any responsibility for such violation by users 3 COMPONENTS 3 1 Precautions when unpacking the package Open the product packing box and check to make sure that th...

Page 17: ...3 2 Package List DW 224PUK drive or CD W224PUK drive USB interface cable AC adapter Driver disk CD R RW writing software User s Manual this document Warranty booklet User Registration card DVD Playback software DW 224PUK only ...

Page 18: ...ibrations or tilt Avoid placing the drive in a place subject to considerable temperature change such as in direct sunlight or near a heater Avoid placing the drive in a dusty or damp place Do not place the drive very close to an AV device or a dis play monitor 4 PRECAUTIONS FOR SETTING AND HANDLING ...

Page 19: ...ction Daily Maintenance Wipe off soil on the drive using a soft cloth If soil is persistent use a cloth dampened with a diluted neutral detergent after squeezing all the water out If liquid is allowed into the drive it may cause a serious malfunction an electric shock or a fire When cleaning with liquid be sure to remove the provided AC adapter from the wall outlet after disconnecting the drive fr...

Page 20: ...D or DVD media on the tray for read ing writing and playing Press the eject but ton to open it Set the media with the label face side on which the title and so on is printed upward and press the tray front into the drive unit to close it Eject button Press this button to open the tray in a few seconds This button is valid only when the power is on ...

Page 21: ...insert a thin metal rod with a diameter of 1 2mm or less into the emergency hole to release the lock and open the tray Perform this operation after disconnecting the drive from the computer and pulling off the plug of the AC adapter from the outlet Operation State LED During seek data transfer The indicator lights During start media set The indicator blinks at an interval of about 0 5 second Durin...

Page 22: ...ing the drive and the computer is removed or when the power of the computer is off When the switch is set to AUTO the drive power turns on only when the drive is con nected to the computer with the USB con nection cable and the power of the compu ter is on The power of the drive will not be on when the power of the computer is off or the drive is not connected to the computer When the switch is se...

Page 23: ...nector NEVER con nect other AC adapters This drive cannot operate with only the bus power of the USB cable Be sure to provide power by connecting the provided AC adapter to the drive Y Audio output jack Insert the 3 5mm dia stereo mini plug of an audio cable to connect to speakers equipped with an amplifier etc for playing a music CD W a r n i n g C a u t i o n ...

Page 24: ... other purposes AC input plug Connect this plug to a 220V AC power source DC output plug Connect this plug to the DC input connector at the back of the drive unit 5 4 USB Cable 1 2 A plug Connect to the USB terminal of your compu ter or the USB hub Mini B plug Connect to the USB connector at the back of the drive unit 3 1 2 ...

Page 25: ...224PUK and the DW 224PUK has to be in stalled when using Windows 98 Second Edition Windows 98SE THis is also necessary with Windows Me if running DW 224PUK Insert the provided driver disk in the floppy drive of your computer Do not connect the drive when the computer is in the sleep or suspend mode Connect the drive after restor ing to the normal operating state by releasing the sleep or suspend m...

Page 26: ...of the provided AC adapter to the DC input connector of the drive 3 Connect the other DC plug of the provided AC adapter to an outlet Set the power switch of your USB drive to on 4 Connect the drive and the computer using the provided USB cable Insert the mini B plug of the provided USB connector to the USB connector at the back of the drive ...

Page 27: ...ed near the USB terminal 6 Setting up the Drive Insert the A plug of the USB connector to the USB terminal of the computer When the power switch at the back of the drive is set to AUTO the power indicator lights up 6 There appear some messages on the screen followed by the ap pearance of an CD ROM icon in the window My Computer Now the drive is ready to use ...

Page 28: ...ve is recognized by the Device manager either asTEAC CD W224EA CD R RW drive or as DW 224E DVD CD RW drive Connection of the line output When listening to an audio CD by using the speakers of your compu ter connect the line output jack of the drive and the line input jack of the computer using an audio cable Use a ø3 5mm stereo mini plug audio cable commercially available 6 Setting up the Drive W ...

Page 29: ...t this procedure if the power of the computer is off Do not disconnect the drive if the computer is in the sleep or suspend mode The screen displays as shown below are one example with Windows 98SE and the other one with Windows 2000 Part of the message may differ depending on the operating systems 1 Terminate any applications CD R RW writing software etc that are using the drive or a file on the ...

Page 30: ...reen A list of removable devices appears as a menu Left click on the applicable drive Windows 98SE with TEAC CD W224PUK Windows 98SE with TEAC DW 224PUK Windows 2000 Windows 98SE Windows 2000 4 The message that the USB storage device can be safely discon nected appears in a few seconds to allow you to remove the USB cable connecting the drive and the computer ...

Page 31: ...or more applications are still using the drive Perform the disconnecting pro cedure after terminating the applications 5 Click the OK button to pull out the USB cable Do not remove and reconnect the drive from or to the computer in rapid succession The drive may not be recognized Reconnect the drive approx 20 seconds after removing C a u t i o n W a r n i n g ...

Page 32: ...s using that connector create a new folder on your hard disk drive and save the contents of the driver disk for Windows 98SE or Windows Me before connecting this drive The equivalent of the contents of the driver disk for Windows 98SE and Windows Me can be downloaded from our web site When you cannot use a floppy disk drive and you can connect to the Internet download it to your hard disk drive be...

Page 33: ...are is detected Searching necessary soft ware appears After that Add New Hardware Wizard is started and the USB CD R RW UNIT driver resp USB CD RW DVD UNIT driver search window appears Depending on the connected drive the shown messages are different see the following pictures Click the Next button CD W224PUK DW 224PUK ...

Page 34: ...tting up the Drive 4 Insert the dedicated driver disk a floppy disk to the FDD of your computer select Floppy disk drives then choose Next 3 Select Search for the best driver for your device Recommended and click Next ...

Page 35: ...tored in advance or it is downloaded from the Internet select Specify a location and input the location of the folder where the driver disk contents are stored The window below is an example when a folder called CDW224PU is created and stored in the C drive Click the Next button ...

Page 36: ...file search for the device TEAC USB CD RW DVD Unit respectively TEAC USB CD RW DVD Unit and Location of driver A TPP300 INF appears click Next A in the drive location A TPP300 INF may differ when the file is stored in the incorporated hard disk drive in ad vance CD W224PUK DW 224PUK ...

Page 37: ...107 ENGLISH 6 Setting up the Drive 6 When the following window appears after displaying several mes sages for reading the driver click Finish to complete the installa tion CD W224PUK DW 224PUK ...

Page 38: ...4EA resp TEAC DW 224E at CDROM TEAC USB 2 0 CD R RW Unit resp TEAC USB 2 0 CD RW DVD Unit at Universal Serial Bus controllers If you cannot find the TEAC entry under Universal Se rial Bus controllers and the entry USB Mass Storage Device can be found you have to carry out the steps described in section 6 5 to install theTEAC device driver CD W224PUK W a r n i n g ...

Page 39: ... the driver available from the Internet are for Windows 98SE only With the DW 224PUK the driver is also available for Windows Me Do not set it up for other operating systems If an exclamation mark is in the USB unit icon it means that the driver has not been installed properly Install the driver again referring to the following section 6 4 DW 224PUK W a r n i n g W a r n i n g ...

Page 40: ...r the connecting procedure 2 Open Control Panel System Device Manager Check the Univer sal Serial Bus controllers category 3 Select TEAC USB CD R RW Unit resp TEAC USB CD RW DVD Unit and click the Properties button When it is not found in the Universal Serial Bus controllers cat egory check Other Devices Select Other devices USB Device and click the Properties button ...

Page 41: ...111 ENGLISH 6 Setting up the Drive 4 Select the Driver tab and click the Update Driver button ...

Page 42: ...112 ENGLISH 6 Setting up the Drive 5 The TEAC UNIT driver search window appears Click Next 6 The next steps for the installation procedure are similar to that in section 6 3 steps 3 to 8 ...

Page 43: ... DW 224PUK only 1 Connect the drive to the USB terminal of the computer again See 6 1 Connection for the connecting procedure 2 Open Control Panel System Device Manager Check the Univer sal Serial Bus controllers category 3 Select USB Mass Storage Device and click the Properties button ...

Page 44: ...py disk to the FDD of your computer select Automatic search for a better driver Recom mended then choose Next 4 Select the Driver tab and click the Update Driver button The TEAC device driver is now installed Ensure that the drive was recognized correctly see section 6 3 step 7 ...

Page 45: ...y out the steps 6 and 7 as shown below 6 When the content of the driver disk is stored in advance or it is downloaded from the Internet select Specify the location of the driver Advanced and click the Next button 7 Select Specify a location and input the location of the folder where the driver disk contents are stored Click the Next button The TEAC device driver is now installed Ensure that the dr...

Page 46: ...eps 1 Logout the drive at your PC and disconnect it 2 Insert the provided floppy disk in the computer and open it using Explorer with the drive disconnected When uninstalling from the downloaded file open the corresponding folder in Explorer Dou ble click tppun exe 3 When the following window appears click the Yes Y button 4 When the following window prompting the restart appears clickYes Y button...

Page 47: ...e drive has been recognized after connection by using Device Manager A green question mark may appear in USB Mass Storage Device on Device Manager This indicates that the Windows device driver that conforms to the drive is being used and this is normal You should see the following entries TEAC CD W224EA at CDROM USB Mass Storage Device at Universal Serial Bus controllers USB CD ROM at Storage devi...

Page 48: ...used You do not have to perform any special installation or uninstallation You can confirm that the drive has been recognized after connection by using Device Manager You should see the following entries USB Mass Storage Device at Universal Serial Bus controllers TEAC CD W224EA USB Device at DVD CD ROM drives for the TEAC CD W224PUK unit resp TEAC DW 224E USB Device at DVD CD ROM drives for the TE...

Page 49: ...d You do not have to perform any special installation or uninstallation You can confirm that the drive has been recognized after connection by using Device Manager You should see the following entries USB Mass Storage Device at Universal Serial Bus controllers TEAC CD W224EA USB Device at DVD CD ROM drives for the TEAC CD W224PUK unit resp TEAC DW 224E USB Device at DVD CD ROM drives for the TEAC ...

Page 50: ...le and the outer edge of the disc Do not touch the surface of the me dia T Do not drop or stack the discs on top of each other Do not place anything heavy on the disc or give a strong shock to it When an excessive force is applied to the media the reliability of data may not be maintained T If the recording surface of the me dia is marred data write may be come impossible Do not touch the recordin...

Page 51: ... in use even for a short period of time in order to protect it from being scratched or damaged T Do not keep the media in places that contain dusts hu midity high temperature or are in direct sun light Wrong handling of the media may make data unread able or prevent further writing C a u t i o n ...

Page 52: ...on at the front of the drive to automatically open the tray 2 Pull out the tray sufficiently and place the media on the tray with the label face upward Align the center hole of the disc with the clamp at the center of the tray and fit the disc in securely by pressing the outer vicinity of the center hole Center hole clamp ...

Page 53: ...ess to the media 8 2 Removing the media 1 Press the eject button at the front of the drive to eject the tray a little from the drive 2 Pull out the tray sufficiently and lift the disc by holding the disc edges carefully while pressing down the clamp 3 Press the tray front gently until the tray is inserted in the drive unit completely At this time confirm if it is securely housed Be careful not to ...

Page 54: ...er or speakers with a built in amplifier using an audio cable as well as connecting the drive to the computer using the USB cable In the case of digital play sound is output from the speakers of the computer just by connecting the drive to the com puter with the USB cable 9 1 1 Using the CD Player Windows 98 Second Edition The method to play a music CD using the CD Player is described be low Doubl...

Page 55: ...lay cannot be used 9 1 2 Using the CD Player Windows 2000 In Windows 2000 you will find the same setting item with Device man ager DVD CD ROM drives TEAC CD W224EA resp DW 224E USB device Properties the picture below is an example for the TEAC DW 224PUK C a u t i o n ...

Page 56: ...GLISH 9 Operation 9 1 3 Using the Windows Media Player 7 Select Option in the Tool menu of Windows Media Player 7 and the following window appears Select CD Audio tab to perform the Digital playback settings ...

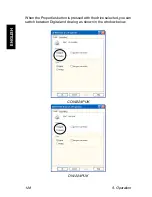
Page 57: ...n in the Tool menu of Windows Media Player 8 and the following window appears Select the Devices tab and select CD RW Drive or DVD CD RW Drive whichever is indicated in the drive list If multiple CD drives are shown select this drive using the drive letter CD W224PUK DW 224PUK ...

Page 58: ...128 ENGLISH 9 Operation When the Properties button is pressed with the drive selected you can switch between Digital and Analog as shown in the window below CD W224PUK DW 224PUK ...

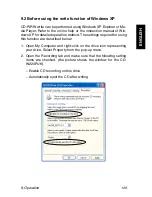
Page 59: ...for detailed operation method The settings required for using this function are described below 1 Open My Computer and right click on the drive icon representing your drive Select Property from the pop up menu 2 Open the Recording tab and make sure that the following setting items are checked the picture shows the window for the CD W224PUK Enable CD recording on this drive Automatically eject the ...

Page 60: ...recaution the installation of the hardware has to be car ried out as described before The software installation starts with acti vating the reading functionality of the drive as this is well known with any conventional CD ROM drive If the reading functionality is available the next installation step is to achieve the writing functionality provided of the writer software More details according the ...

Page 61: ...er is in the suspend mode Suspend This may be called standby sleep mode or hibernation depending on computers and operating systems 9 4 Using USB 2 0 T An operating system and a personal computer that conforms to the USB 2 0 or a USB 2 0 interface card and a driver are required for the operation using the USB 2 0 T When using the USB 2 0 a problem in usage may be caused de pending on the host card...

Page 62: ...called a phase 2 drive To play DVD titles it is required that the region code set in the drive is included or agrees with the code the DVD titles have The region code in this product is set to 2 Europe The region code in some DVD titles is set to ALL Such titles can be played regardless of the region code set in the DVD ROM drive 9 Operation C a u t i o n Region code Area 1 United States Canada 2 ...

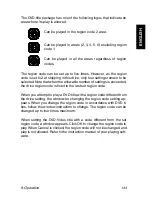
Page 63: ...of settings is exceeded the drive region code is fixed to the last set region code When you attempt to play a DVD title with a region code different from the drive setting the window for changing the region code setting ap pears When you change the region code in accordance with DVD ti tles follow the window instruction to change The region code can be changed up to four times maximum When setting...

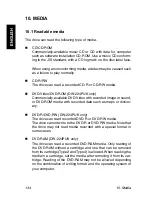
Page 64: ...h recorded image or sound or DVD ROM media with recorded data such as maps or diction ary T DVD R DVD RW DW 224PUK only The drive can read recorded DVD R or DVD RW media The drive cannot write to the DVD R or DVD RW media Note that the drive may not read media recorded with a special format in some cases T DVD RAM DW 224PUK only The drive can read a recorded DVD RAM media Only reading of the DVD R...

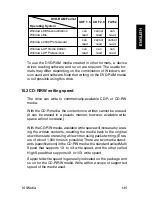
Page 65: ...rease by eras ing the written contents resetting the media back to the original unwritten state or erasing a file written using packet writing Eras ure of about 1 000 times is possible There are two media stand ards specifications in the CD RW media the standard called Multi Speed that supports 1X to 4X write speed and the other called High Speed that supports 4X to 10X write speed Supported write...

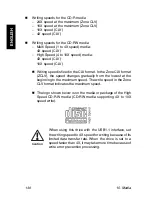
Page 66: ...ZCLV the speed changes gradually from the lowest at the beginning to the maximum speed The write speed in the Zone CLV format indicates the maximum speed T The logo shown below is on the media or package of the High Speed CD RW media CD RW media supporting 4X to 10X speed write 10 Media When using this drive with the USB1 1 interface set the writing speed to 4X speed for writing because of its lim...

Page 67: ...terns may appear on the recorded surface due to the change of writing speed depending on the media used Even when using media of which write operation has been confirmed normal write operation may not be performed due to variations of the product lot etc or a read using other CD ROM drives or CD players cannot be performed due to the deterioration of the write qual ity of the CD R RW media It is r...

Page 68: ... If you think you need a repair please let us know details about the defect after checking the corresponding operation in accordance with the instruction manual When you ship or bring the drive to our sales dealer or service depot it is most safe to use the original packing box in which the drive was packed when you purchased it However damage incurred during trans portation is not covered in the ...

Page 69: ...port TEAC UK LIMITED DSPD U K Technical Support Freecall 0800 08 53 704 U K only Mo Fr from 8 30 20 00 CET Sa from 10 00 16 00 CET Technical Support Fax 49 0 611 7158 666 Online RMA http www teac de RMA Internet http www teac de support TEAC FRANCE S A France Technical Support Tel 33 0 1 55 59 01 55 Mo Fr from 9 00 16 00 CET Technical Support Fax 33 0 1 55 59 01 56 Online RMA http www teac de RMA ...

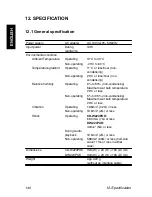
Page 70: ...ensing Maximum wet bulb temperature 29 C or less Non operating 5 to 95 non condensing Maximum wet bulb temperature 29 C or less Vibration Operating 1 96m s2 0 2G or less Non operating 19 6m s2 2G or less Shock Operating CD W224PUK 68 0m s2 7G or less DW 224PUK 49m s2 5G or less During Audio playback 19 6m s2 2G or less Non operating 588m s2 60G or less half sine wave 11ms or less in either case Di...

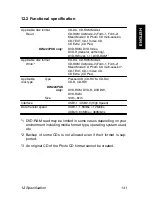
Page 71: ...D multi session 3 CD TEXT CD I Video CD CD Extra CD Plus Applicable disc type Type Pressed CD CD ROM CD DA CD R CD RW _________ DW 224PUK__ only __ DVD ROM DVD R DVD RW DVD RAM Size 12cm 8cm Interface USB1 1 USB2 0 High Speed Data transfer speed USB1 1 1 5MB s 12Mbit s USB2 0 60MB s 480Mbit s 12 2 Functional specification 1 DVD RAM read may be limited in some cases depending on your environment in...

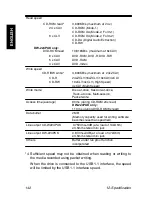
Page 72: ...e mode Disc at once Session at once Track at once Multi session Packet write Access time average 90ms during CD ROM 24x read DW 224PUK only 110 ms during DVD ROM 8x read Data buffer 2MB Memory capacity used for writing software becomes less than specified Line output CD W224PUK 0 75Vrms 3dB at a load of 10kOhm ø3 5mm stereo mini jack Line output DW 224PUK 0 8Vrms 3dB at a load of 47kOhm ø3 5mm ste...

Reviews: