background image

408-8959 

Rev C


of 6


Visual Inspection 

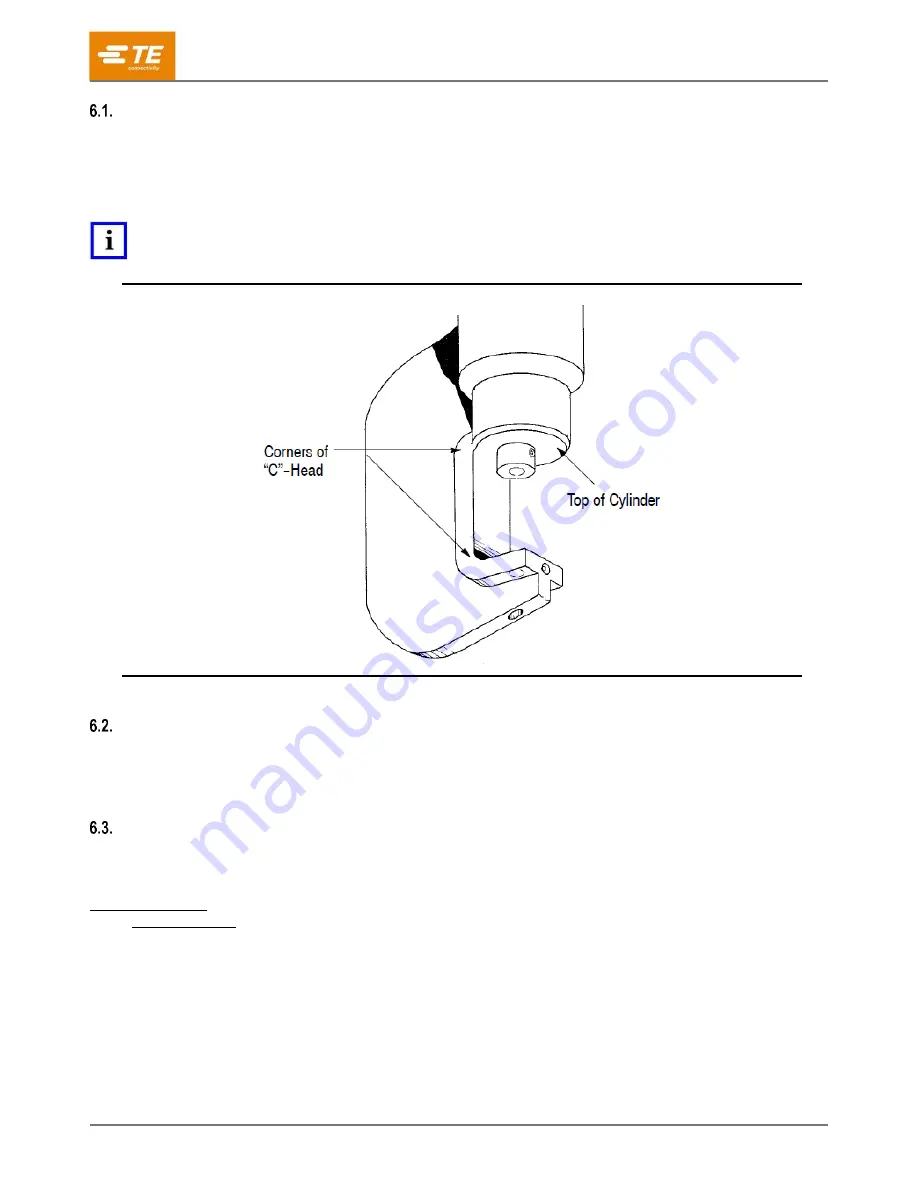
Refer to Figures 3 and 5; proceed as follows: 

1.  Inspect the assembled crimping head for nicks, scratches, cracks, and excessive wear, especially 

where sliding contact occurs. 

2.  Inspect for cracks particularly at the corners of the 

C

-Head and around the top of the cylinder. 

NOTE 

Once per year, or every 7,500 cycles (whichever comes first), the hydraulic head should be returned to TE for magnetic 
particle inspection.  Additionally, inspect and service the head every month or 1,000 cycles. 


Figure 3 


Cleaning 

1.  Remove accumulations of dirt and grease on the crimping head; especially in areas where dies are 

installed and product is crimped. 

2.  Clean the entire head frequently with a clean, lint-free cloth. 


Crimping Head Check-Out Procedure 

If the ram fails to retract after completion of a crimping cycle, the cause may be in the crimping head.  To 
determine whether the trouble is in the crimping head or not, release pressure in the power unit. 
 
If the ram retracts, the trouble is not in the crimping head. 
If ram does not retract, refer to paragraph 7. REPLACEMENT and REPAIR 


Summary of Contents for SOLISTRAND 1752868-1

Page 1: ...or use with Foot Hydraulic Pump PN 1583659 1 Hand Hydraulic Pump PN 1583661 1 or Electric Hydraulic Pumps PN 1804700 1 115 VAC and PN 1804700 2 220 VAC Warning To avoid personal injury and potential damage to the crimp head TE Connectivity TE requires the crimp head to operate at 9 800 to 10 200 PSI 676 to 703 bar TE recommends using 10 000 PSI 689 bar TE Hydraulic Pumps as other manufacturers pum...

Page 2: ...ned NOTE If crimping head must be removed after being in production pressure must be released in the hydraulic system before head is removed If using Electric Hydraulic Power Unit 1804700 1 or 2 disconnect power unit from power supply When using Hydraulic Foot Pump PN 1583659 1 or Hydraulic Hand Pump PN 1583661 1 depress the pressure release pedal to release pressure 4 DIE INSTALLATION AND REMOVAL...

Page 3: ...hold terminal or splice in place 3 Insert the stripped wire into the terminal or splice 4 Activate the power unit to complete the crimp 6 INSPECTION AND MAINTENANCE DANGER Verify hydraulic pressure is released and power supply is disconnected before following inspection and maintenance procedures unless otherwise specified in the procedure Each crimping head is assembled and inspected before shipm...

Page 4: ... Additionally inspect and service the head every month or 1 000 cycles Figure 3 Cleaning 1 Remove accumulations of dirt and grease on the crimping head especially in areas where dies are installed and product is crimped 2 Clean the entire head frequently with a clean lint free cloth Crimping Head Check Out Procedure If the ram fails to retract after completion of a crimping cycle the cause may be ...

Page 5: ... entire tool for evaluation and repair with a written description of the problem to CUSTOMER SERVICE 38 35 TE CONNECTIVITY CORPORATION P O BOX 3608 HARRISBURG PA 17105 3608 Tools may also be returned for evaluation and repair For tool repair service contact a TE representative at 1 800 526 5136 Item Number Part Number Description Quantity Per Head 1 21013 4 Screw Socket Head Self Locking 1 4 20 UN...

Page 6: ...s applied with a wrench Quick Disconnect Coupling The coupling mates hard or will not mate or release or it leaks oil or it sticks at the hose connection Replace coupling Ram Inspect the ram in the Power ON ram advanced position for evidence of galling cracks or oil leaks between the ram and the cylinder If there are cracks or leaks return the tool for repair see Section 7 If there is galling remo...

Page 7: ...Mouser Electronics Authorized Distributor Click to View Pricing Inventory Delivery Lifecycle Information TE Connectivity 1752868 1 ...

Reviews: