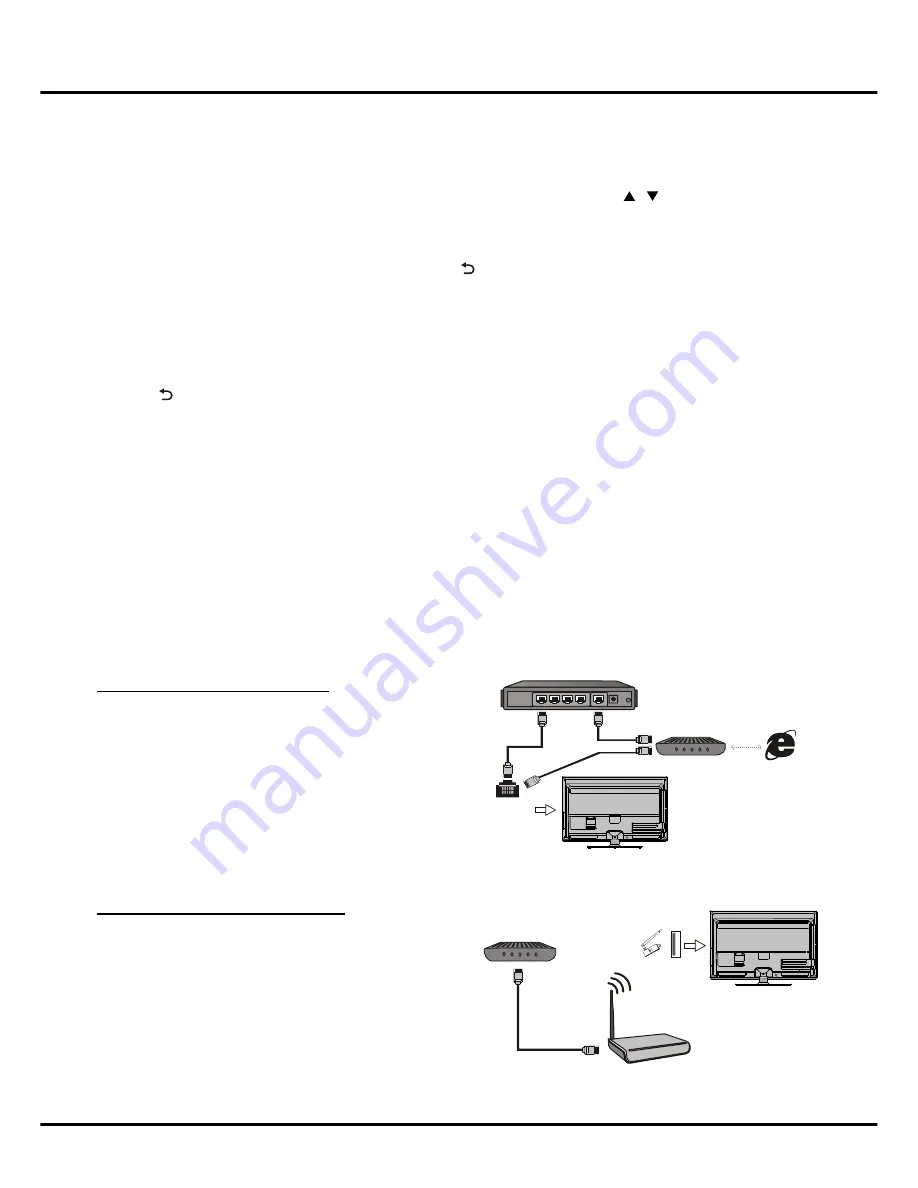
TCL LED55E5700UDS Operation Manual Download Page 9

8

Network Connection 

To access the internet, you must subscribe high speed broadband internet service from your internet service provider.
Your TV can be connected to your home network in two ways:

• Wired, using the RJ45 (LAN) connector on the back panel.
• Wireless, using the internal wireless or external wireless USB adapter and your home wireless network.

Note

: Instructions below are just the usual ways to connect your TV to the wired or wireless network. The connection 

method may be different depending on your actual network configuration. If you have any questions about your home 

network, please refer to your ISP (Internet Service Provider).

Modem

Internet

TV Set

Router

Ethernet

Port on the

back panel


or

Wireless

USB Adapter

Wireless Router

Modem

USB

port on the

back panel

TV Set

Channel Scan

Make sure that the television is switched on and follow all the steps in turn specified hereafter. 

1. 

Press 

MENU

 on the remote control under ATV source. 

2. 

Press the ◄/► to select 

TV Setting

, then press 

OK 

to enter the submenu. Press   

/

   to select 

Scan

 and press 

OK 

to enter. 

•  Auto Scan

: Press ◄/► to select 

Auto


Scan

 and press 

OK

 button to start channel search automatically.     

Note

: Depending on the number of channels you receive, it may take several minutes for the channel search to 

finish. If you want to interrupt the process, press 

OK

 or  . The channels already found will be stored, and the 

channels may not be stored in the order of standard channel list.


•  Manual Scan

: Press ◄/► to select 

Manual


Scan

 and press 

OK

 button to enter.  Select 

Start Freq, 

press 

OK

 to 

edit the frequency. The same goes to 

End Freq

, then select 

Start

 to begin manual channel scan. When Manual 

scan started, the TV will search the channel from the start frequency and will exit after finding a channel.

•  Fine Tune

: If the picture is not clear you can fine tune the channel. Press ◄/► to select 

Fine Tune

 and press 

OK


to enter. Select 

Frequency 

and press 

OK

, use ◄/► to edit the frequency until getting a better picture. 

3. 

Press   to return.

Note

:


1. For models with DTV, it only has 

Auto Scan

 and 

Manual Scan

 to tune the TV, please refer to  the above 

steps and follow the prompt on the screen. 2. Digital channels support DVB-T2 & DVB-T.


General Operation

Connecting to a wired network 

To connect to a wired network:

1. 

Ensure you have:

• 

An ethernet cable long enough to reach your TV

• 

A router or modem with an available Ethernet port

• 

A high-speed internet connection

• 

An Ethernet (LAN) port on the back of the TV

2. 

Connect your ethernet cable to the router and to the 

Ethernet port

 on the back of the TV.

3. 

Use the 

Network Settings

 to configure the TV.

Connecting to a wireless network

To connect to a wireless network 

1. 

Ensure you have:

• 

A router broadcasting a high-speed wireless signal

• 

A high-speed internet connection

• 

A wireless USB Adapter (not need for a built-in 

wireless connection).

2. 

Remember to connect your wireless USB Adapter to 

your TV's USB port.

Summary of Contents for LED55E5700UDS

Page 1: ...R0 HZ2014 12 016R 72 RT95HB EAPAA L55E5700UDS 2014 12 9 BOM H7 55E57CY IRNC0AA LED55E5700UDS TCL OLK117942B RT95H AP PREPARED BY EN G C H EC KED BY C ON FIR M BY i ii iii SCALE SIZE COLOUR 1 1 B5 80g...

Page 2: ...ns in this User s Guide are provided for reference only and may differ from actual product appearance Product design and specifications may be changed without notice OPERATION MANUAL LED55E5700UDS LED...

Page 3: ...tion 7 Switching on 7 Switching off 7 Channel Scan 8 Network Connection 8 Network Settings 9 Chapter 3 Menu Operation 10 Menu Display 10 Using Home Menu 11 Recommendation 11 Entertainments 11 Utility...

Page 4: ...e set from overheating Keep the set away from direct sunlight Apparatus shall not be exposed to dripping or splashing and no objects filled with liquids such as vases shall be placed on the apparatus...

Page 5: ...may vary according to TV model and not all sockets are available on all models Introduction LAN RJ45 plug for connecting to external modem or network access equipment SPDIF socket output The SPDIF so...

Page 6: ...te The number of USB sockets on the TV may vary according to TV model SD CARD input The socket can be used to connect a SD card HDMI 1 MHL or HDMI 2 or HDMI 3 socket input The HDMI High Definition Mul...

Page 7: ...page listing all installed apps MENU Brings up the main menu S MENU Z Colored up down left and right direction buttons Highlights different items in the menu system and adjusts the menu controls OK Wh...

Page 8: ...d only be connected to an AC supply It must not be connected to a DC supply If the plug is detached from the cable do not under any circumstances connect it to a mains socket as there is a risk of ele...

Page 9: ...y found will be stored and the channels may not be stored in the order of standard channel list Manual Scan Press to select Manual Scan and press OK button to enter Select Start Freq press OK to edit...

Page 10: ...ngs In case there s no wireless network open the Wireless Switch enter Wireless Direct Settings As long as the smart phone check the TCL_p2p you can share files between the smart phone and the TV This...

Page 11: ...er 3 Menu Operation Menu Display Figure 1 Figure 2 Figure 3 Figure 4 Figure 5 Figure 6 Figure 7 Figure 8 Figures and illustrations are provided for reference only and may differ from actual product ap...

Page 12: ...d all installed apps here App Store Provide many useful and amusing apps After entering you can see the recommended excellent apps Press to select press OK to enter You can see the menu of App Store i...

Page 13: ...ternet related app management Software Manager app backup update move etc Security Protection enable or disable apps File Manager browse files Settings change the settings of TV Guard Menu Operation F...

Page 14: ...ess OK to enter For details please refer to Network Settings on page 9 System Update Includes System Software Update Factory Default and System Repair System Software Update This function allows you t...

Page 15: ...ight protection HD content recording protection Select Disk this option allows you to select the disk for time shift TimeShift Size this option allows you to select the size for time shift TimeShift O...

Page 16: ...damaged or the file cannot be decoded Do not disconnect the USB storage device when the system is reading a file or transmitting data otherwise the system or the device may be damaged By Side Top and...

Page 17: ...t the same time they will not be recognized some times All mobile hard disks consume a lot of power which may result in power supply problems We recommend inserting only one hard disk or a low power c...

Page 18: ...ange to the best resolution or other standard resolutions of the Windows system Snowy dots and interference If the antenna is located in the fringe area of a television signal where the signal is weak...

Page 19: ...72 RT95HB EAPAA...

Reviews: