TC-Helicon PERFORM-VK User Manual Download Page 14

14

PERFORM-VK User Manual

RPn/nRPn Implementation

RPN 0: Pitch Bend Sensitivity. This is a standard way to change pitch bend range.

MIDI Tempo

Perform-VK responds to incoming MIDI tempo and will adjust system Tap 

Tempo accordingly. 

Split Point and Transpose

When controlling harmony via MIDI, in either Notes mode or NaturalPlay, it is 

sometimes desirable to have one section of the keyboard designated to sending 

that control information. It could be the area that your left hand is, to play chords 

of harmonies. 
In order to designate an area of the keyboard to respond to, a Split Point is set. 

Any notes, either above or below the split point, are deemed useable by the 

system. Notes outside the range are rejected. 
To set the Split Point, hold the SET button and press the note on your keyboard 

that you want to act as the split note. Then, to choose a split ABOVE that note, 

release the split note and press a note ONE SEMITONE ABOVE your split note. 

To choose a split BELOW, release the split note and press a note ONE SEMITONE 

BELOW your split note. 
This creates a split, above or below, with no transposition. In order to set a split 

point AND transpose the incoming MIDI notes, you will choose a different note in 

place of the ABOVE/BELOW notes mentioned above. 
It will seem a bit confusing, but does allow you to make both a split above/below 

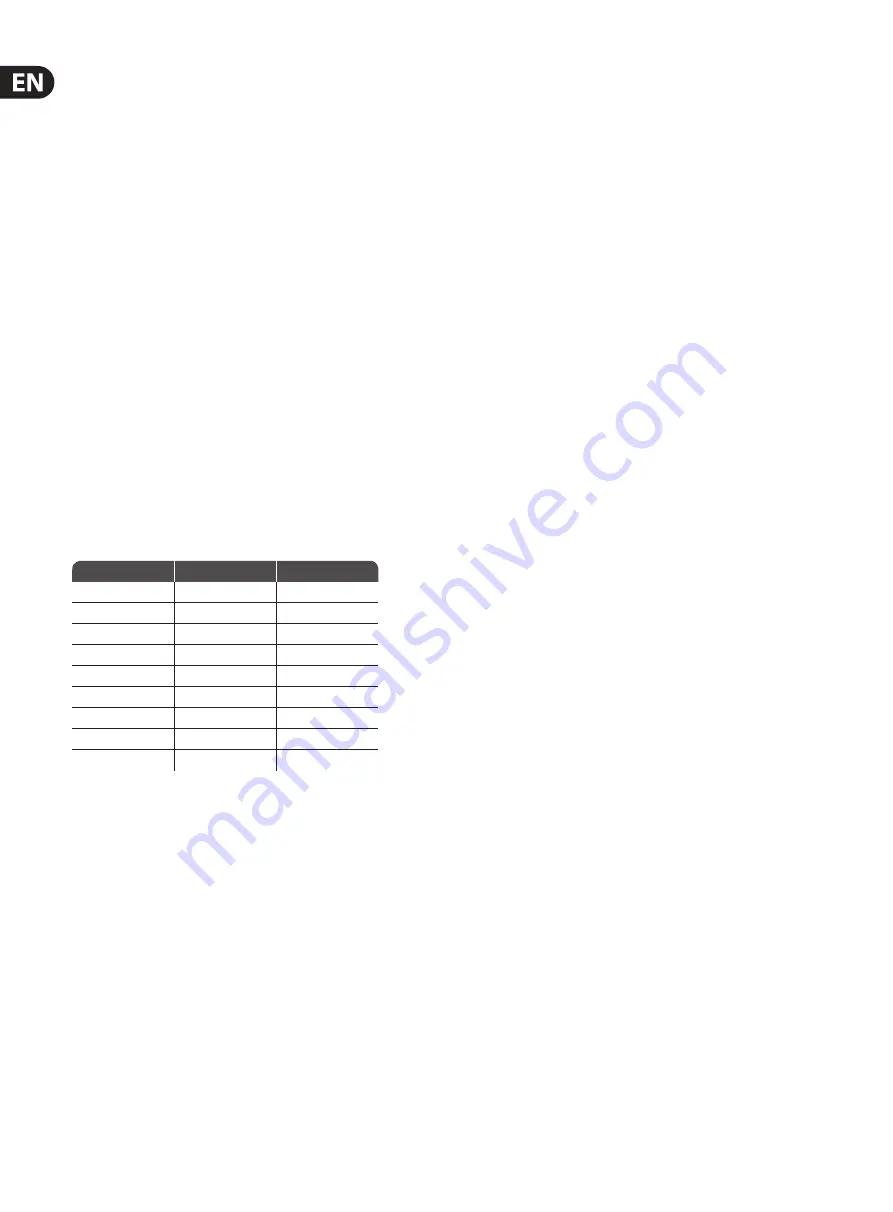
point AND transpose either up or down. So, here’s a chart and some explanation.

Second Note

Split

Transpose X To

X+6

Above

X5

Above

X+2

Above

X1

X+1

Above

X (no transpose)

X+0

X-1

Below

X (no transpose)

X-2

Below

X6

Below

X-6

Below

X2

In the chart above, “X” is the split note, the point at which you want to split the 

keyboard, as explained previously. 
To facilitate things like “split above, but transpose down” we need to have 

settings both above and below your split point. That’s where the chart comes in. 
For example, if you want to split ABOVE middle C, typically known as C4, 

but transpose DOWN so that C4 is actually C2, you’d do the following:
1.  Hold SET
2.  Press middle C (C4)
3.  Press the note 6 SEMITONES DOWN from middle C (F#)
If you want to split BELOW middle C (C4) and transpose up so that C4 is C6, you’d:
1.  Hold SET
2.  Press middle C (C4)
3.  Press the note 2 SEMITONES DOWN from middle C (A#)
You may need to experiment a bit to figure this out, but it does give you the 

ability to set your split point, split direction and transposition very quickly.

Factory Reset

To reset the unit back to factory settings, press and hold the Echo and Harmony 

buttons while powering up. 

Support

If you’ve read through this manual and still need a little help, you can contact us 

via our support portal and forums 

http://support.tc-helicon.com


Summary of Contents for PERFORM-VK

Page 1: ...PERFORM VK Ultimate Mic Stand Mount Vocal Processor for Studio Quality Sound with Expandable Effects and Keyboard I O ...

Page 2: ...ts 5 Turning Effects On and Off 6 Editing Effects 6 Preset 6 Importing Beaming a preset 7 HIT 7 Editing a Beamed preset 7 Editing HIT 8 Set 8 Tone 8 Anti Feedback 9 Pitch Correction 9 Pitch Guide 9 48V Phantom Power 10 Mic Control 10 Talk 10 Lock Mute 10 Tap Tempo 10 RoomSense 11 AUX Input 11 Aux to Main Out 11 Dimming the Buttons 11 USB Audio 12 MIDI Implementation 12 Factory Reset 14 Support 14 ...

Page 3: ...rer orsoldwith theapparatus Whenacart isused usecautionwhen movingthecart apparatus combinationtoavoid injuryfromtip over 13 Unplugthisapparatusduringlightningstormsor whenunusedforlongperiodsoftime 14 Referallservicingtoqualifiedservicepersonnel Servicingisrequiredwhentheapparatushasbeen damagedinanyway suchaspowersupplycordorplug isdamaged liquidhasbeenspilledorobjectshavefallen intotheapparatus...

Page 4: ...both live and rehearsal Audio and MIDI inputs for your keyboard give you a choice of methods to guide key and scale for harmony voices and HardTune Read the Quick Start We ll assume that you read the Quick Start Guide that came in the box hooked everything up and that you re able to sing and play through the product If you haven t made it that far please read the Quick Start Guide now and come bac...

Page 5: ...e effect shouting into a mountain range or very large space Some Echoes can have effects applied to the taps or repeats of the echo like Megaphone or Radio Double Beamable Simulates the classic double tracked studio sound that s common on recordings of all genres Double can include Octave Up and Octave Down voices too Megaphone beamable Anything that filters or distorts your voice falls into the M...

Page 6: ...u ve now changed the Style of the effect Continuing to turn the Control Knob will increase the Level of that Style Each effect has four different styles to choose from Three of the styles are available out of the box and one is reserved for a Beamed preset Style described next Reverb Room Club Hall Beamed preset Style Harmony High Higher Low Lower High Low High Higher Higher Lower Low Lower Notes ...

Page 7: ...erb then adds Harmony via HIT The beamed preset s green light changes to blue to indicate that HIT is on When a preset is beamed in HIT is turned on by default Editing a Beamed preset The process to change the sound of Reverb Harmony and Echo within a beamed preset is exactly the same as the one you did without a beamed preset with one small exception When you press hold to edit the Reverb Harmony...

Page 8: ...t The LED ring will turn red and you can now turn the knob to adjust the gain manually Setting the gain this way will remove the nudge function so you won t have to worry about any changes to this setting during your performance Note that pressing the Set button at all after setting the gain manually even to adjust the brightness will cause the nudge function to become active again The gain settin...

Page 9: ...Pitchbutton WhiteisOFF GreenisON AnimportantnoteaboutPitchCorrection it snormaltohear phasing between yourheadvoice nottobeconfusedwith thevoices inyourhead andthe correctedvoicecomingfromspeakersorheadphones Thecollisionofthe twosignalscreatesthephasedeffect Youraudience orarecording doesn t experiencethesound Youcanactuallyusethephasedsoundtoimproveyourpitchovertime Thelessof thephasedsoundyouhe...

Page 10: ...p button controls Harmony The Left button controls Preset 1 The Right button controls Preset 2 The Bottom button controls Preset 3 MP 75 and MP 76 modes can control the following Harmony Reverb Echo Tap Tempo Talk Preset 1 Preset 2 Preset 3 Tone Anti Feedback Pitch Talk During a performance especially between songs you might want to speak with the audience It s unlikely that you ll want all the ef...

Page 11: ... on the music player to create the appropriate mix with your vocals Audio from the AUX input is slightly delayed from input to output so that we can better detect chords This won t have any effect on music you re singing or playing along with but it does mean this input isn t intended to support instruments that you d play live They d feel strangely laggy Use the INST IN for live instruments If yo...

Page 12: ...outs If you use a computer for backing tracks they will get sent analog to the PA Volume control for those tracks happens at the computer NaturalPlay IN is not connected to the audio output It is used only for NaturalPlay chord input This is intended to allow you to use a guide track for NatualPlay that you may not want heard in the mix It could be dry guitar chords or piano chords with different ...

Page 13: ...eel e18 Mod Wheel volatile Notes Sustain 64 sustain pedal e20 Sustain Pedal volatile Harmony Level 11 expression e21 Expression Pedal volatile Not Default Mapped to UMA25S Harmony Notes_Smoothing 16 general purpose 1 volatile Harmony Notes_Gender 17 general purpose 2 volatile Harmony Notes_Porta 18 general purpose 3 volatile Harmony Attack 29 undefined volatile Harmony Release 31 undefined volatil...

Page 14: ...BOVE BELOW notes mentioned above It will seem a bit confusing but does allow you to make both a split above below point AND transpose either up or down So here s a chart and some explanation Second Note Split Transpose X To X 6 Above X5 Above X 2 Above X1 X 1 Above X no transpose X 0 X 1 Below X no transpose X 2 Below X6 Below X 6 Below X2 In the chart above X is the split note the point at which ...

Page 15: ...15 PERFORM VK User Manual ...

Page 16: ......

Reviews: