background image

24

PERFORM-VE User Manual
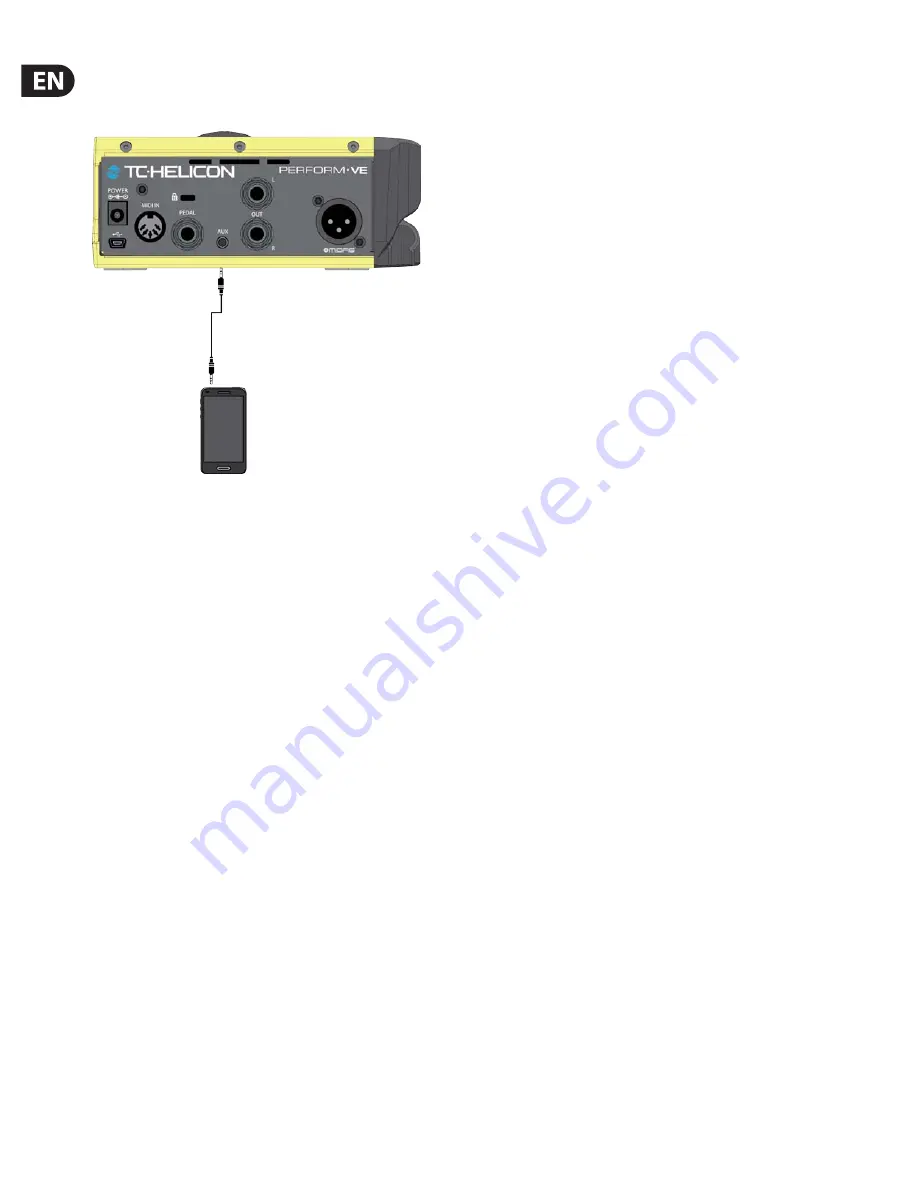
9.  I/O Section

9.1  AUX Input

Perform-VE’s AUX input allows you to connect a separate stereo audio source as a 

source of backing tracks – this could be a smartphone, pod device, music player, 

secondary laptop or any device connecting via a 1/8th inch stereo jack. 
When you have a music player connected to the AUX input, incoming 

chord information will not be used to determine key/scale for HardTune’s 

NaturalPlay detection.  
You will hear the AUX input mixed with your Mic input (vocals). If the AUX is 

too loud or too quiet, use the volume control on the music player to create the 

appropriate mix with your vocals. 

Aux to Main Out

Sometimes, you’d like to have a signal from the Aux input guide key/scale, but 

you don’t want that Aux signal mixed into your main outputs. If you’d like to 

remove audio from Aux to the main out, simply press/hold the Headphone 

button while connecting your Aux (1/8") cable. 
This parameter resets each time you unplug and re-plug the Aux cable, and when 

you power cycle the unit. Perform-VE doesn’t save this parameter because it’s 

not immediately obvious how you’d “toggle” things and we don’t want to trap 

unsuspecting users like you in a mode you can’t find a way out of. 
As for Perform-VE’s headphone output jack - the Aux in is always routed to it 

regardless of the 

Aux to Main Out

 setting.

9.2  Switch3/Switch6 (Pedal) In

When a Switch3 or Switch6 is connected (using the TRS cable that came in the 

S3/S6 box) you can control various aspects of Perform-VE remotely. 
The default behavior for Switch3 is to change presets according to the numbers 

on Switch3. 
Switch1 = Preset 1
Switch2 = Preset 2
Switch3 = Preset 3
You can reassign any of the Perform-VE buttons to be activated by a footswitch, 

with the exception of TRIM, +48V, Headphone Level, and Lock/Mute 

(TALK is assignable). 
Press and hold the desired footswitch, then press the button on Perform-VE that 

you’d like the switch to control. Release both buttons. 
Switch6 acts in the same manner as Switch3 but adds buttons 4, 5, and 6. 

The default controls for the extra buttons are:
Switch4 = Harmony
Switch5 = Reverb
Switch6 = Echo

9.3  USB Audio

Perform-VE has 5 input and 6 output channels for USB audio. A driver is required 

for both USB audio and MIDI use. It can be found and downloaded from 

tc-helicon.com/products/Perform-VE/support/

USB IN

CH 1 Backing Track L
CH 2 Backing Track R
CH 3 Dry vocal in
CH 4 Sample IN
CH 5 NaturalPlay IN
If no signal is transmitted to the product on USB audio channel 3, the product 

will use the Microphone IN for the voice input. So, you could use channels 1&2 

to input stereo tracks from your DAW but sing into the product via your mic. 

Note that channel 1&2 input is NOT passed to the USB outputs, but IS passed to 

the Main analog outs. If you use a computer for backing tracks, they will be sent 

analog to the PA. Volume control for those tracks happens at the computer. When 

USB audio on channel 3 stops, the Set button will flash. Pressing the Set button at 

this time will change the voice input back to the Microphone input.  
NaturalPlay IN is not connected to the audio output - it is used only for NaturalPlay 

chord input. This provides the option to have a “guide track” for NatualPlay that the 

audience can’t hear. It could be dry guitar chords or piano chords, with different 

voicings or placement in order to create your desired vocal output.

USB OUT

CH 1 L processed vocal, Keyboard/ Aux in (same as what is on main outputs, less 

the audio received on USB in
CH 2 R processed vocal, Keyboard/ Aux in (same as what is on main outputs, less 

the audio received on USB in 2
CH 3 Dry Voice input
CH 4 SAMPLE Out
CH 5 Aux L 
CH 6 Aux R

Summary of Contents for PERFORM-VE

Page 1: ...User Manual PERFORM VE Revolutionary Vocal Manipulator with MIDI Pitch Controlled Sampling Vocal Synth and One Button Drum Looper A50 XXXXX XXXXX Rev 1 2...

Page 2: ...4 1 The Set Button 6 4 2 The Headphone Button 8 5 Effects 9 5 1 Double 9 5 2 Morph 9 5 3 HardTune 12 5 4 XFX 13 5 5 Echo 16 5 6 Filter 17 5 7 Tap Tempo 18 6 Looper 19 7 Sample 22 8 Presets 23 9 I O S...

Page 3: ...urer orsoldwith theapparatus Whenacart isused usecautionwhen movingthecart apparatus combinationtoavoid injuryfromtip over 13 Unplugthisapparatusduringlightningstormsor whenunusedforlongperiodsoftime...

Page 4: ...nds that will take your music to new levels But wait there s more Perform VE also includes a Drum and Audio Looper With several different kick snare and hi hat sounds available you can easily build a...

Page 5: ...e preamplifier equipped providing the much loved MIDAS soft clipping characteristic sound when pushed hard For learning purposes we recommend that you connect a MIDI keyboard to your Perform VE while...

Page 6: ...The pressed FX button will pulse on and off At this point you won t need to keep holding it down to continue editing Pressing any button including the button that is pulsing will quit the edit mode St...

Page 7: ...I channel SET Preset 1 Adaptive Tone Tone automatically adds EQ equalization Compression De Ess and Gate to your overall vocal sound Tone is enabled by default and we highly recommend leaving it on EQ...

Page 8: ...e headphone button plays the hi hat The loop needs to be erased to be able to adjust the headphone level Now that the basics are out of the way let s check out Perform VE s effects Holding down the SE...

Page 9: ...ing the Mode and Style parameters Morph Style Morph Style sets the MIDI Voices to be either Notes harmony voices or Synth Vocoder voices There are two styles of Notes harmony natural or warp and eight...

Page 10: ...recorded In this case your Lead vocal gets a dedicated synth voice and also acts as the modulator shaping signal for the vocoder Enabling the SAMPLE button changes the way the vocoder operates We ll c...

Page 11: ...ed LED selections set the MIDI Voices to Mono mode and adjust the portamento time from 0 to long Portamento time is how long it takes to glide from one note s pitch to the next Morph Shift Morph Shift...

Page 12: ...all 12 keys or Chromatic scale Hold key to edit HardTune Amount HardTune Amount changes the amount of pitch correction applied to your lead vocal Higher amounts mean more T Pain for you Hold amt to ed...

Page 13: ...largest time divisions you ll hear the audio as rhythmic repeats while at the smallest time divisions the audio cycles so quickly that it produces a different pitched tone or buzz for each division St...

Page 14: ...ivision in real time Hold mod1 to edit Chopper Mod 2 Depth Chopper Mod 2 changes the depth of the volume modulation gating relative to your Lead vocal Hold mod2 to edit On the ring Level is indicated...

Page 15: ...erted made negative producing a striking alternative to the classic sound of Flange 2 Stereo Flange which uses positive feedback Flange Mod 1 Speed Flange Mod 2 Depth Flanging is an audio effect produ...

Page 16: ...ur drums will always stand out in the mix This effect is also called SideChain Pumping The SideChain Compressor reduces the level of the non drums audio signal if the kick drum mix level exceeds a cer...

Page 17: ...sound like you re on an old radio or distort your voice for an edgy attack Be careful with Megaphone effects when you ve got a loud PA We need to adjust EQ a lot to create these sounds so they re a b...

Page 18: ...ee beats When pressed this light flashes in time with the Looper Chopper Stutter and Echo effects Provided you have not previously recorded a loop you can re tap the tempo at any time to sync up with...

Page 19: ...sing kick snare HEADPHONE or loop to erase the kick snare hi hat or audio loop respectively You can then re record the component Stopping Loop Playback Press the TAP button or double tap loop Start Lo...

Page 20: ...ve been recorded as quantized disabling quantize will not restore their original timing If you find that the drum patterns you wish to record do not play back as intended try erasing and re recording...

Page 21: ...rner again on the beat to set loop point and immediately begin playback How to add drums or audio to an existing loop Press the loop corner to begin overdub recording while the drum loop plays and eit...

Page 22: ...s recorded Sample Mode The four sample modes control how the sample is played back in response to MIDI notes The four sample modes are combinations of staccato legato normal and looped playback charac...

Page 23: ...o save your current settings as one of the three presets press and hold preset button 1 2 or 3 for one second The preset button will flash briefly when storage is complete You can now turn off your Pe...

Page 24: ...buttons to be activated by a footswitch with the exception of TRIM 48V Headphone Level and Lock Mute TALK is assignable Press and hold the desired footswitch then press the button on Perform VE that y...

Page 25: ...ou re singing into the RoomSense mic the Main Outputs will be muted to prevent feedback 2 If you activate HardTune effects with the NP Natural Play key set and you re not using MIDI keyboard audio or...

Page 26: ...ed Mono Portamento time XFX Style 1 Stutter 2 Mono Chopper 3 Stereo Chopper 4 Ring Mod 5 Stereo Flanger 6 Mono Flanger 7 Side Chain Pumping Mod1 Rate Mod2 Level Mod1 Rate Mod2 Depth Mod1 Rate Mod2 Dep...

Page 27: ...Div List 28 ECHO Reverb Style 0 3 See Style List 41 Top Mix LEAD Level 0 127 Lead is set independent of MIDI via CC 42 Top Mix MIDI Level 0 127 MIDI is set independent of LEAD via CC 43 MORPH Shift 0...

Page 28: ...ed above This may seem a bit confusing but does allow you to make both a split above below point AND transpose either up or down Here s a chart and some explanation In the chart above X is the split n...

Page 29: ...29 PERFORM VE User Manual...

Page 30: ...30 PERFORM VE User Manual...

Page 31: ...31 PERFORM VE User Manual...

Page 32: ......

Reviews: