background image

8

TTi


Colorimeter Series Quick-Start Guide

initial start-uP and oPeration

The following Quick-Start Test example will walk 

you through initial start-up, show you how to perform 

a typical test with a timing step, and how to automati-

cally read the sample using the AUTO function.  Test 

reagents are not required for this example.

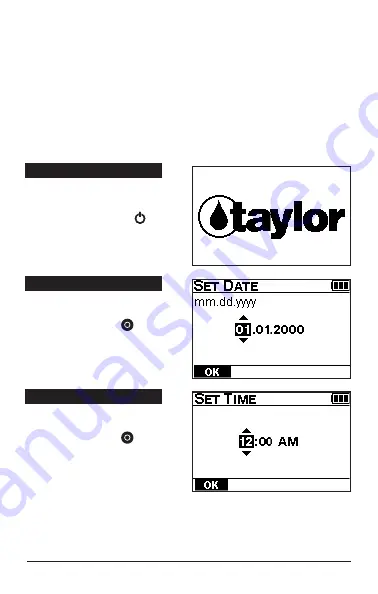
STEP 1

turn on the colorimeter 

Press POWER button
for approximately 0.5 
seconds.

STEP 2*

set date

 using 



,



then press ENTER  .
*Step 2 required for 

initial 

start-up only

STEP 3*

set time

 using 



,



then press ENTER  .
*Step 3 required for 

initial 

start-up only

Summary of Contents for TTI Series

Page 1: ...TTi Colorimeter Series Quick Start Guide Taylor Technologies Inc 800 TEST KIT 837 8548 www taylortechnologies com...

Page 2: ......

Page 3: ...erating controls and main menu 4 Battery installation or connection to a power supply 7 Initial start up and operation 8 Pc app 14 User s manual 15 Warranty information 16 Maintenance 17 If you need t...

Page 4: ......

Page 5: ...The user s manual and actual test instruction s should be read in their entirety before using this instrument Description and Use The TTi Colorimeter is a portable multiwave length microprocessor cont...

Page 6: ...visit the Product Info Documents area of our website www taylortechnologies com Keep reagents out of reach of children Use only Taylor reagents for preprogrammed tests Operational requirements During...

Page 7: ...rs To order from Taylor call toll free 800 TEST KIT 837 8548 Components Quantity Part Number 1 M XXXX TTi Colorimeter model number on instrument faceplate 1 6543 Quick Start Guide 2 9601 Sample Cell 2...

Page 8: ...Main Menu options Top View 1 Power Button 2 Main Menu Button 3 Backlight Button 4 Enter Button to enter the highlighted function 5 Scroll Up Arrow 6 Scroll Down Arrow 7 Scroll Right Arrow 8 Scroll Le...

Page 9: ...oduct Label shows model part and serial numbers 2 Timer Buzzer Opening 3 Battery Compartment Door Screw total of 4 4 Battery Compartment Door 5 Battery Compartment shown open Side View 6 USB Port show...

Page 10: ...add remove sort Favorites menu 4 Edit Series Select to create or edit add remove sort Series tests 5 Tools Select to transfer data or access the User Timer 6 Settings Select to access About displays F...

Page 11: ...ends on the batteries to the markings inside the battery compartment B Connect the AC power adapter supplied to the USB port on the instrument then plug the AC power adapter into a 120V AC wall outlet...

Page 12: ...al test with a timing step and how to automati cally read the sample using the AUTO function Test reagents are not required for this example STEP 1 Turn on the Colorimeter Press POWER button for appro...

Page 13: ...performed steps 2 4 will be skipped after turning on the instrument STEP 5 Select Quick Start Test 500 from ALL TESTS menu using then press ENTER Test Menu The user can select a test from one of thre...

Page 14: ...ge Upper Limit Chemical Form Optional chemical forms are available for most tests The Range or Range Upper Limit will change to correlate with the selected chemical form STEP 7 Prepare Blank Typical p...

Page 15: ...ayed STEP 9 Prepare Sample Typical procedure for preparing a sample a Remove sample cell from sample cell compartment then remove cap b Add test reagents not required for this example Replace cap and...

Page 16: ...ER using then press ENTER STEP 11 Start TIMER and AUTO Option Select START using then press ENTER A 30 second 00 30 countdown will begin Immediately select AUTO using then press ENTER Timer Icon start...

Page 17: ...hen the timer beeps the instrument will automatically read the sample and the result will be displayed Result Result will be displayed in terms of selected chemical form Timer Icon remains visible Res...

Page 18: ...r test results from your meter to the customer database you maintain on your PC or laptop Create proprietary i e user developed test files Keep the meter s operating software i e firmware up to date R...

Page 19: ...you will be able to download the PC App to your computer User s Manual Using the PC App installed on your computer described above obtain the TTi Colorimeter Series User s Manual and read in its entir...

Page 20: ...to return the unit to our factory The cost of all parts labor and return shipping to the owner will be borne by Taylor Technologies within the warranty period All other warranties express or implied...

Page 21: ...or mild detergent Display Be careful not to scratch the display Use a soft non abrasive cloth or lens tissue and water or mild detergent Sample Cell Compartment Be careful not to scratch the sample c...

Page 22: ...ll 877 TEST KIT 837 8548 On line guidance may be found at www taylorsoftwaresupport com Enter through the TTi Colorimeter portal Operation of the instrument itself General assistance for TTi Colorimet...

Page 23: ...acy 1 nm Wavelength Bandwidth 10 nm 1 nm Stray Light 1 0 Instrument Rating Power Source 4 x AA 1 5V alkaline or lithium batteries AC power adapter or USB cable Battery Life w o backlight 4 months typi...

Page 24: ...p to 1 meter for 30 minutes Symbol explanation Symbol Description Voltage Indicates DC Voltage On instrument label Action Indicates an action operation Appears on display Information Indicates relevan...

Page 25: ...ications Policy Interference Causing Equipment Standard Digital Apparatus CSA C22 2 No 61010 1 Safety Requirements for Electrical Equipment for Measurement Control and Laboratory Use Part 1 General Re...

Page 26: ...and used in accordance with the instructions may cause harmful interference to radio communications However there is no guarantee that interference will not occur in a particular installation If this...

Page 27: ...______________ ___________________________________________ ___________________________________________ ___________________________________________ ___________________________________________ _________...

Page 28: ......

Reviews: