


Maintenance, Service, and Repair
Steering
Page 14
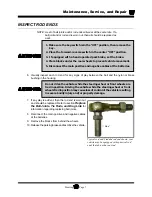
REPLACE THE BALL JOINTS, TIE RODS, AND DRAG LINK
This section will refer to two different types of ball joints. One
type is has a grease fitting and a tapered shaft where it is
installed on the steering arm or pitman arm. The second
cannot be greased and has a straight shaft. See the
illustrations to the right. Depending on the configuration of
your vehicle, it may be equipped one or both types of ball
joints.
In this text:
The first type will be referred to as a “Ball Joint.”
The second type will be referred to as a “Rod End.”
NOTE: If a rod end or ball joint is worn out, we
recommend replacing all of the ball joints
and/or rod ends as a set.
Replacing a Rod End
6. Raise the front of the vehicle and support with jack stands.
7. Loosen the rod end jam nut or clamp on the steering
sleeve.
8. Remove the rod end nut.
9. Remove the rod end from the steering arm.
HINT: Count the number of turns required to
remove the rod end from the steering
sleeve. This will make it easier to
realign the wheels.
Rod End
Ball Joint
1. Make sure the key-switch is in the “OFF” position, then remove the
key.
2. Place the forward-reverse switch in the center “OFF” position.
3. If equipped with a hand operated park brake, set the brake.
4. Place blocks under the rear wheels to prevent vehicle movement.
5. Disconnect the main positive and negative cables at the batteries.
Always use a lifting strap, hoist, and jack stands, of adequate capacity
to lift and support the vehicle. Failure to use lifting and support devices
of rated load capacity may result in severe bodily injury.
Rod End Nut
Rod End
Jam Nut
Steering
Sleeve
Steering Arm
Summary of Contents for B0-T48-48 Taylor Truck T48
Page 2: ......
Page 14: ...TAYLOR DUNN...
Page 30: ...TAYLOR DUNN...
Page 68: ...Maintenance Service and Repair Steering Page 22 Exploded View of Steering Gear...
Page 86: ...TAYLOR DUNN...
Page 112: ...TAYLOR DUNN...
Page 118: ...TAYLOR DUNN...
Page 130: ...TAYLOR DUNN...
Page 140: ...TAYLOR DUNN...
Page 152: ...Illustrated Parts Parts Page 2 Front Axle...
Page 154: ...Illustrated Parts Parts Page 4 Steering Knuckle...
Page 156: ...Illustrated Parts Parts Page 6 Steering Linkage...
Page 162: ...Illustrated Parts Parts Page 12 Rear Suspension View from rear...
Page 164: ...Illustrated Parts Parts Page 14 Transmission Gear Case...
Page 168: ...Illustrated Parts Parts Page 18 Rear Brakes Front Brakes...
Page 170: ...Illustrated Parts Parts Page 20 Brake Lines and Master Cylinder...
Page 172: ...Illustrated Parts Parts Page 22 Motor...
Page 174: ...Illustrated Parts Parts Page 24 Motor Mount Apply 94 421 34 grease to inside of motor coupler...
Page 186: ...Illustrated Parts Parts Page 36 Batteries FRONT OF VEHICLE...
Page 188: ...TAYLOR DUNN...


