Drive Axle
Page 56
B-200 & B-210 Models
MB-210-13
CHECK OIL LEVEL
Fluid type and capacities are listed in the Lubrication
chapter.
1: Raise the drive wheels off of the ground and
place a drain pan that can hold a minimum of
2-quarts of oil under the transmission level plug.
2: Remove the level plug and lower the drive axle to
the ground over the drain pan.
3: A small amount of oil may come out. This
indicates that the transmission has the correct
amount of oil.
4: If no oil comes out, then it may need to have oil
added; add oil through the open level plug until it
is overflowing out of the hole.
5: Reconnect the main positive and negative cables
at the batteries, remove blocks from behind the
wheels and test drive the vehicle.
This section is one section of a complete service
manual. Before starting any procedure, read all
warnings and instructions that are located in the
Service Guidelines chapter.
WARNING
CHANGE OIL
Fluid type and capacities are listed in the lubrication
section in the General Maintenance chapter.
1: Raise the rear of the vehicle and support with
jack stands.
2: Place a drain pan that can hold a minimum of
2-quarts of oil under the transmission.
3: Remove the transmission cover plate to drain the
oil.
4: Reinstall the cover plate and remove the level
plug.
5: Add 1-pint (500 ml) of oil through the open level
plug.
6: Lower to the ground over the drain pan and allow
excess to drain.
7: Reinstall the plug.
8: Reconnect the main positive and negative cables
at the batteries, remove blocks from behind the
wheels and test drive the vehicle.
This section is one section of a complete service
manual. Before starting any procedure, read all
warnings and instructions that are located in the
Service Guidelines chapter.
WARNING
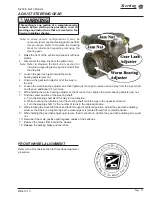
Level Plug
Summary of Contents for B0-200-00
Page 6: ......
Page 12: ...Page 12 MB 210 13 Introduction B 200 B 210 Models Notes...
Page 28: ...Lubrication Page 28 B 200 B 210 Models MB 210 13 Notes...
Page 53: ...Transaxle Page 53 MB 210 13 B 200 B 210 Models...
Page 62: ...Drive Axle Page 62 B 200 B 210 Models MB 210 13 Notes...
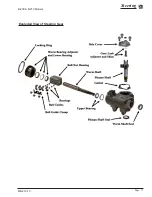
Page 71: ...Steering Page 71 MB 210 13 B 200 B 210 Models Exploded View of Steering Gear...
Page 81: ...Brakes Page 81 MB 210 13 B 200 B 210 Models...
Page 118: ...Tires Wheels Page 118 B 200 B 210 Models MB 210 13 Notes...
Page 130: ...Replacement Parts Page 130 MB 210 13 B 200 B 210 Models AXLE ASSEMBLY FRONT...
Page 134: ...Replacement Parts Page 134 MB 210 13 B 200 B 210 Models TRANSAXLE ASSEMBLY B 200...
Page 136: ...Replacement Parts Page 136 MB 210 13 B 200 B 210 Models TRANSAXLE ASSEMBLY B 210 REAR GT...
Page 140: ...Replacement Parts Page 140 MB 210 13 B 200 B 210 Models BATTERY...
Page 142: ...Replacement Parts Page 142 MB 210 13 B 200 B 210 Models BRAKES BRAKE LINES...
Page 144: ...Replacement Parts Page 144 MB 210 13 B 200 B 210 Models BRAKES MASTER CYLINDER LINKAGE...
Page 148: ...Replacement Parts Page 148 MB 210 13 B 200 B 210 Models BRAKES B 200 REAR AXLE...
Page 150: ...Replacement Parts Page 150 MB 210 13 B 200 B 210 Models BRAKES B 200 PARK BRAKE...
Page 152: ...Replacement Parts Page 152 MB 210 13 B 200 B 210 Models BRAKES B 210 PARK BRAKE...
Page 159: ...Replacement Parts Page 159 Not available at time of printing MB 210 13 B 200 B 210 Models...
Page 160: ...Replacement Parts Page 160 MB 210 13 B 200 B 210 Models DECALS...
Page 162: ...Replacement Parts Page 162 MB 210 13 B 200 B 210 Models ELECTRICAL MISCELLANEOUS...
Page 166: ...Replacement Parts Page 166 MB 210 13 B 200 B 210 Models FRAME DOORS...
Page 170: ...Replacement Parts Page 170 MB 210 13 B 200 B 210 Models FRAME AMBULANCE DECK...
Page 172: ...Replacement Parts Page 172 MB 210 13 B 200 B 210 Models FRAME TOPS...
Page 180: ...Replacement Parts Page 180 MB 210 13 B 200 B 210 Models STEERING COLUMN...
Page 186: ...Replacement Parts Page 186 MB 210 13 B 200 B 210 Models Notes...


