


Transmission
Transmission
Page 9
TRANSMISSION ASSEMBLY
Remove and Install
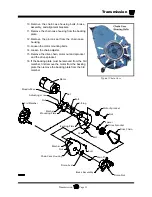
6. Remove the motor wires.
7. Disconnect the brake linkage from the brake arm.
8. Remove the treadle linkage.
9. Remove the nuts from the four transmission mounting bolts. Do not remove the bolts at this
time.
10. Place jack stands under the left and right side of the front cowling.
11. Lift the rear of the vehicle just enough to allow the removal of the mounting bolts and remove
the bolts.
12. Raise the rear of the vehicle high enough to roll the transmission out from under the vehicle.
13. Lower the rear of the vehicle to the ground.
14. Install in reverse order.
15. Check brake adjustment and adjust as needed. Refer to
Adjust the Brakes
for information
regarding adjusting the brakes.
16. Reconnect the main positive and negative at the batteries, remove the blocks from the wheels,
and test drive.
1. Make sure the key-switch is in the “OFF” position, then remove
the key.
2. Place the forward-reverse switch in the center “OFF” position.
3. Set the park brake.
4. Place blocks under the front wheels to prevent vehicle movement.
5. Disconnect the main positive and negative cables at the batteries.
Always use a lifting strap, hoist, and jack stands, of adequate capacity
to lift and support the vehicle. Failure to use lifting and support devices
of rated load capacity may result in severe bodily injury.
T
A Y
L OR - DU N
N
Th
e
B
e
st
W
ay
To
Go About
Yo
ur
Bu
si
n
e
ss
R
Summary of Contents for AN 171
Page 2: ......
Page 12: ...TAYLOR DUNN...
Page 26: ...TAYLOR DUNN...
Page 42: ...TAYLOR DUNN...
Page 50: ...TAYLOR DUNN...
Page 51: ...TABLE OF CONTENTS Throttle Linkage Adjustments 2 Throttle Linkage...
Page 60: ...TAYLOR DUNN...
Page 79: ...Transmission Transmission Page 19...
Page 80: ...Transmission Transmission Page 20 EXPLODED VIEW...
Page 94: ...TAYLOR DUNN...
Page 150: ...TAYLOR DUNN...
Page 152: ...Illustrated Parts Parts Page 2 Front Axle...
Page 154: ...Illustrated Parts Parts Page 4 Front Tire...
Page 156: ...Illustrated Parts Parts Page 6 Front Fork 7 10 Fork Collar in frame 1 2 4 5 5 4 3 6...
Page 158: ...Illustrated Parts Parts Page 8 Steering Linkage SC...
Page 159: ......
Page 160: ...Illustrated Parts Parts Page 10 Steering Linkage AN...
Page 164: ...Illustrated Parts Parts Page 14 Throttle Linkage 3 1 2 4 5 6 6 6 7 8 8 9 10 9 10...
Page 174: ...Illustrated Parts Parts Page 24 Power Traction...
Page 176: ...Illustrated Parts Parts Page 26 Differential...
Page 178: ...Illustrated Parts Parts Page 28 Brake...
Page 180: ...Illustrated Parts Parts Page 30 Rear Axle...
Page 182: ...Illustrated Parts Parts Page 32 Rear Tires 10 Ref wheel hub 1 2 5 assembly 4 3 6 7 8 9...
Page 184: ...Illustrated Parts Parts Page 34 Control Panel standard...
Page 186: ...Illustrated Parts Parts Page 36 Control Panel 40 bed...
Page 188: ...Illustrated Parts Parts Page 38 Instruments Gauges Model SC VKRZQ Model SC VKRZQ...
Page 190: ...Illustrated Parts Parts Page 40 Batteries Main positive Main negative 1 1 1 2 2 3 3 3 4 5 6 7...
Page 192: ...Illustrated Parts Parts Page 42 Decals...
Page 196: ...Illustrated Parts Parts Page 46 Miscellaneous Frame and Body AN...
Page 198: ...TAYLOR DUNN...


