


Electrical Troubleshooting
Signet Charger Troubleshooting
Page 2
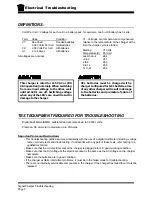
TEST EQUIPMENT REQUIRED FOR TROUBLESHOOTING
Digital Multi Meter (DMM), calibrated and accurate down to 0.00001 volts.
Clamp on DC ammeter to measure up to 20-Amps.
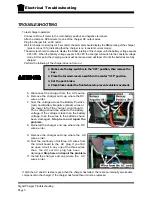
Important Notes and Instructions
• This troubleshooting guide assumes a familiarity with the use of a digital multimeter including, voltage
tests, continuity tests and diode testing. If not familiar with any part of these tests, refer testing to a
qualified technician.
• Make sure that the AC electrical socket the charger is plugged into is in good working condition.
• Make sure that the AC voltage at the electrical socket is the same as the AC voltage on the charger
nameplate.
• Make sure the batteries are in good condition.
• If the charger exhibits intermittent problems, it must be in the failed mode for troubleshooting.
• There are no internally serviceable components in the charger. If the charger has failed then it must be
replaced.
DEFINITIONS:
Volts Per Cell = Voltage for each cell in a battery pack. for example, one 6-volt battery has 3-cells.
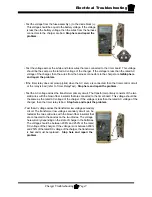
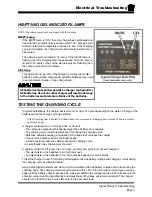
This charger is rated for 115 VAC or 230
VAC operation (nominal). When switching
from one input voltage to the other, wait
until all LED’s are off. Switching voltage
when any of the LED’s are on will result in
damage to the charger.
GEL batteries must be charged with a
charger configured for GEL batteries. Use
of any other charger will result in damage
to the batteries and premature failure of
the batteries.
Term
Value
Condition
V1:
See Chart
Flooded batteries
2.383 Volts Per Cell Gel Batteries
V2:
2.08 Volts Per Cell
All batteries
A1:
2 to 4 Amps
All batteries
All voltages are nominal.
V1: Voltages are temperature compensated
relative to the temperature of the charger at the
time the charge cycle is started.
Starting
V1 Volts
Temperature (C) Per Cell
Less than -4
2.64
-4 to 2
2.61
2 to 8
2.59
8 to 14
2.56
14 to 21
2.54
Summary of Contents for AN 171
Page 2: ......
Page 12: ...TAYLOR DUNN...
Page 26: ...TAYLOR DUNN...
Page 42: ...TAYLOR DUNN...
Page 50: ...TAYLOR DUNN...
Page 51: ...TABLE OF CONTENTS Throttle Linkage Adjustments 2 Throttle Linkage...
Page 60: ...TAYLOR DUNN...
Page 79: ...Transmission Transmission Page 19...
Page 80: ...Transmission Transmission Page 20 EXPLODED VIEW...
Page 94: ...TAYLOR DUNN...
Page 150: ...TAYLOR DUNN...
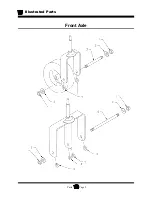
Page 152: ...Illustrated Parts Parts Page 2 Front Axle...
Page 154: ...Illustrated Parts Parts Page 4 Front Tire...
Page 156: ...Illustrated Parts Parts Page 6 Front Fork 7 10 Fork Collar in frame 1 2 4 5 5 4 3 6...
Page 158: ...Illustrated Parts Parts Page 8 Steering Linkage SC...
Page 159: ......
Page 160: ...Illustrated Parts Parts Page 10 Steering Linkage AN...
Page 164: ...Illustrated Parts Parts Page 14 Throttle Linkage 3 1 2 4 5 6 6 6 7 8 8 9 10 9 10...
Page 174: ...Illustrated Parts Parts Page 24 Power Traction...
Page 176: ...Illustrated Parts Parts Page 26 Differential...
Page 178: ...Illustrated Parts Parts Page 28 Brake...
Page 180: ...Illustrated Parts Parts Page 30 Rear Axle...
Page 182: ...Illustrated Parts Parts Page 32 Rear Tires 10 Ref wheel hub 1 2 5 assembly 4 3 6 7 8 9...
Page 184: ...Illustrated Parts Parts Page 34 Control Panel standard...
Page 186: ...Illustrated Parts Parts Page 36 Control Panel 40 bed...
Page 188: ...Illustrated Parts Parts Page 38 Instruments Gauges Model SC VKRZQ Model SC VKRZQ...
Page 190: ...Illustrated Parts Parts Page 40 Batteries Main positive Main negative 1 1 1 2 2 3 3 3 4 5 6 7...
Page 192: ...Illustrated Parts Parts Page 42 Decals...
Page 196: ...Illustrated Parts Parts Page 46 Miscellaneous Frame and Body AN...
Page 198: ...TAYLOR DUNN...


