background image

13

TROUBLE SHOOTING 

NOTE: Remove the plug from the socket before carrying out adjustment, servicing or 
maintenance.

PROBLEM

POSSIBLE CAUSE

REMEDY

Motor does not start

1. Fuse

1.  Replace/reset time delay 

fuse or circuit breaker

2. Brushes worn

2.  Have brushes replaced by 

authorized service agent

3. Other

3.  Return to authorized service 

agent 

Machine vibrates

1.  Router bit not suitable for 

application

1.  Seek guidance on bit 

selection

2.  Router bit blunt

2.  Stop machine, when 

stopped, replace with a 
sharp bit

3. Incorrect direction of travel

3. Change direction of travel

Bit will not cut

1.  Attempting to remove 

excess material

1. Reduce plunge depth

2. Router bit blunt

2.   Stop  machine, when 

stopped, replace with a 
sharp bit

3. Incorrect direction of travel

3. Change direction of travel

MAINTENANCE 

This tool requires no special maintenance.

1

. Before cleaning.

    When not in use or before cleaning, always disconnect the tool from the mains supply.

2. 

Cleaning guide.

     Regularly clean the outside of the tool with a soft damp cloth and dry it with a dry towel. Do 

not immerse adaptor or tool in water. Do not use harsh solvents to clean the plastic.

3. 

Damage check.

     Always inspect your tool, adaptor and cord before use. Do not use this tool if it has been 

damaged, dropped, left outdoors or dropped in water. Return it to an authorised service dealer for 
examination and repair.

4. 

Lubrication

.

     This tool requires no additional lubrication.

Summary of Contents for RT1254

Page 1: ...USER MANUAL 1200W ROUTER MODEL NO RT1254 ...

Page 2: ...e course of the first 1year after the date of purchase we will remedy the problem as quickly as possible once it has been brought to our attention In the unlikely event of such an occurrence or if you require any information about the product please contact us via our after sales support services details of which can be found in this manual and on the product itself Please fill in the Warranty Cer...

Page 3: ...ions page 10 Trouble Shooting page 13 Maintenance page 13 Explanation of Symbols page 14 INTRODUCTION Congratulations on choosing to buy this TAURUS product All products brought to you by TAURUS are manufactured to the highest standards of performance and safety and as part of our philosophy of customer service and satisfaction are backed by our comprehensive 1 Year Warranty We hope you will enjoy...

Page 4: ...t 1PC already fixed on main machine Instruction Manual 1PC Warranty Stickers 2PCs Warranty certificate 1PC SPECIFICATIONS Rated Input 230 240V 50Hz 1200W Collet size 1 4 and 5 16 No Load Speed 11 500 30 000rpm Cutting Capacity dia 30mm Plunge Stroke 0 38mm with Dust Extraction 0 50mm without Dust Extraction Sound Pressure Level 86dB A Sound Pressure Level 97dB A Vibration Level 3 6m S2 ...

Page 5: ...supervised to ensure that they do not play with the router 3 Don t force the tool Do not put undue strain or force on this equipment Do not operate any tool for extended periods continuously allow tool to cool Operate only as intended 4 Dress properly Always wear suitable clothing Do not wear loose clothing Wear suitable footwear and keep long hair away from moving parts 5 Safety glasses To avoid ...

Page 6: ...tmospheres such as in the presence of flammable liquids gases or dust Power tools create sparks which may ignite the dust or fumes c Keep children and bystanders away while operating a power tool Distractions can cause you to lose control 2 Electrical safety a Power ool plugs must match the outlet Never modify the plug in any way Do not use any adapter plugs with earthed grounded power tools Unmod...

Page 7: ...he job better and safer at the rate for which it was designed b Do not use the power tool if the switch does not turn it on and off Any power tool that cannot be controlled with the switch is dangerous and must be repaired c Disconnect the plug from the power source and or the battery pack from the power tool before making any adjustments changing accessories or storing power tools Such preventive...

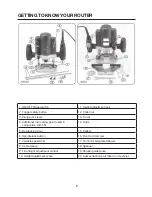
Page 8: ...ret 4 Additional rod locking point used in conjunction with 16 14 Rods 5 Rod locking poin 15 Collets 6 Spindle lock button 16 Pivot rod trammel 7 Variable speed dial 17 16 18mm template follower 8 Cable sleeve 18 Spanner 9 Fine height adjustment control 19 Parallel guide fence 10 Height adjustment scale 20 Dust extraction port fixed on machine ...

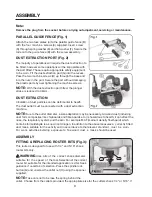
Page 9: ...be connected with a dust extraction machine NOTE Due to the outlet diameter a size adaptation may be necessary All wood dust including dust form composites like chipboards and fibre boards etc is hazardous to health it can affect the nose the respiratory system and the skin For example MDF medium density fiberboard which contains formaldehyde is a known carcinogen In addition to the above measures...

Page 10: ...ighten the collet nut WARNING Take care when handling the cutter bits as they are extremely sharp When cutting is complete remove the bit before cleaning and storing it in a safe place OPERATING INSTRUCTIONS NOTE Remove the plug form the socket before carrying out adjustment servicing or maintenance TIGGER SWITCH FIG 4 The router is fitted with a safety lock off switch to prevent accidental starti...

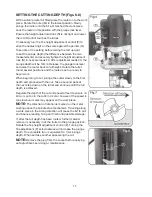
Page 11: ... the router is set up ready to begin work When beginning to cut plunge the cutter slowly to the first depth and proceed with the cut Take a second pass at the next step down on the turret and continue until the full depth is achieved Regulate the depth of the cut and speed of feed to ensure no strain is put on to the cutter or motor however if the speed is too slow burn marks may appear on the wor...

Page 12: ...il the cut is complete 16mm INNER 18mm OUTER DIAMETER TEMPLATE FOLLOWER Fig 10 For detailed information on templates refer to a routing woodworking book Lay the template follower S into the recess Ensure the template follower faces downward and secure with the two countersunk screws T NOTE For operations using the template follower without the dust extraction port fitted use the two 8mm nuts U PIV...

Page 13: ...xcess material 1 Reduce plunge depth 2 Router bit blunt 2 Stop machine when stopped replace with a sharp bit 3 Incorrect direction of travel 3 Change direction of travel MAINTENANCE This tool requires no special maintenance 1 Before cleaning When not in use or before cleaning always disconnect the tool from the mains supply 2 Cleaning guide Regularly clean the outside of the tool with a soft damp ...

Page 14: ...t least 5m away from unit during operation Explanation of the safety signal words used in this manual Warning signals a hazard that may cause serious injury or death if the recommended precautions are not followed Caution signals a hazard that may cause minor or moderate injury if the recommended precautions are not followed Double insulated ...

Page 15: ......

Page 16: ...16 ...

Reviews: