socket properly. Do not alter the plug. Do not
use plug adaptors.
- Do not force the power cord. Never use the
power cord to lift up, carry or unplug the
appliance.
- Do not clip or crease the power cord.
- Do not allow the power cord to hang or to
come into contact with the hot surfaces of the
appliance.
- Check the state of the power cord. Damaged
or tangled cables increase the risk of electric
shock.
- Do not touch the plug with wet hands.
- Do not use the appliance if the cable or plug is
damaged.
- If any of the appliance casings breaks, immedia-
tely disconnect the appliance from the mains to
prevent the possibility of an electric shock.
- Do not use the appliance if it has fallen on the
floor, if there are visible signs of damage or if it
has a leak
- Keep the working area clean and well lit. Clutte-
red and dark areas invite accidents.
- Use the appliance in a well ventilated area.
- Do not place the appliance on hot surfaces, such
as cooking plates, gas burners, ovens or similar.
- Place the appliance on a horizontal, flat, stable
surface, suitable for withstanding high tempe-
ratures and away from other heat sources and
contact with water.
- CAUTION: In order to prevent overheating do
not cover the appliance.
- Do not use or store the appliance outdoors.
- Do not leave the appliance out in the rain or
exposed to moisture. If water gets into the
appliance, this will increase the risk of electric
shock.
- Do not use the appliance in the case of persons
insensitive to heat (the appliance has heated
surfaces).
- Do not touch the heated parts of the appliance,
as it may cause serious burns.
USE AND CARE:
- Fully unroll the appliance’s power cable before
each use.
- Do not use the appliance if the parts or acces-
sories are not properly fitted.
- Do not use the appliance if the accessories
attached to it are defective. Replace them
immediately.
- Do not use the appliance when empty.
- Do not use the appliance if the timer switch does
not work properly.
- Do not move the appliance while in use.
- To keep the non-stick treatment in good condi-
tion, do not use metal or pointed utensils on it.
- Do not force the appliance’s work capacity.
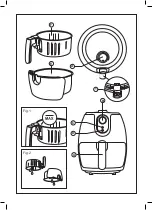
- Respect the MAX level. (Fig. 1)
- Disconnect the appliance from the mains when
not in use and before undertaking any cleaning
task.
- Store this appliance out of reach of children and/
or persons with physical, sensory or reduced
mental or lack of experience and knowledge.
- Do not store or transport the appliance if it is
still hot.
- Never leave the appliance connected and unat-
tended if is not in use. This saves energy and
prolongs the life of the appliance.
- Use only utensils appropriate to support high
temperatures.
- Turn the thermostat control to the minimum
(MIN) setting. This does not mean that the iron
is switched off permanently.
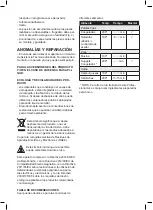
- As a reference, in the annexed table you will find
a recommendation on the cooking temperature
and time for several meals.
SERVICE:
- Any misuse or failure to follow the instruc-
tions for use renders the guarantee and the
manufacturer’s liability null and void.
DESCRIPTION
A Thermostat
B Timer
C Green power pilot light
D Red heating pilot light
E Non-stick bowl
F Basket
G Basket handle
H Basket release button
If the model of your appliance does not have the
accessories described above, they can also be
bought separately from the Technical Assistance
Service.
INSTRUCTIONS FOR USE
BEFORE USE:
- Make sure that the entire product’s packaging
has been removed.
- Before using the product for the first time, clean
the parts that will come into contact with food in
the manner described in the cleaning section.
Summary of Contents for PROFESSIONAL AIR
Page 2: ......
Page 3: ...Fig 1 A C B D E F G Fig 2...
Page 20: ......
Page 37: ...Professional Air Taurus 8 8...
Page 38: ...10 N MAX...
Page 39: ...1 MIN A B C D E F G H E F B C D D 3 0...
Page 40: ...0 min 0 min pH 2 2014 35 2014 30 2011 65 2009 125...
Page 41: ...200 min 180 8 2 min 180 min 200 min 180 min 200 13 15 min Professional Air...
Page 42: ...Professional Air Taurus 8 8 8...
Page 43: ...10 C H H H H 1...
Page 44: ...min A B C D E F G H e f a b c d d 3 h 0...
Page 45: ...ph 2 WEEE 2014 35 EU 2014 30 eu 2011 65 EU 2009 125 EC...
Page 46: ...200 180 8 180 200 180 200 13 15...
Page 51: ...Professional Air Taurus 8 8 8...
Page 52: ...10 c c MAX 1...
Page 53: ...MIN A B D F G H D D...
Page 54: ...0 min 0 min pH 2 U 2014 35 UE 2014 30 UE 2011 65 U 2009 125 CE...
Page 55: ...200 180 8 2 180 2 200 1 180 200 13 15 Professional Air...
Page 57: ...3 0 B H 0 0 2 giF EEEW UE 56 1102 UE 03 4102 UE 53 4102 CE 521 9002...
Page 58: ...1 GIF XAM NIM A B C D E F G H E F A B D C D...
Page 59: ...Professional Air 8 8 8 01...


