


•
When working with wood that has been
processed before, watch out for foreign bodies
such as nails or screws etc.
•
Before you actuate the On/Off switch, make
sure that the saw blade is correctly fitted and
that the machine’s moving parts run smoothly.
•
Use clamps or a vise to hold the workpiece
securely. This is safer than using your hand.
•
Follow the instructions for lubrication and
changing tools.
•
Keep handles dry, clean and free from oil and
grease.
•
Keep the push stick or handle for a push block
at the machine at all times, even when you are
not using them.
•
Do not cut rebates or grooves without fitting a
suitable guard, e.g. a tunnel-type guard, over
the saw table.
•
Use only the transport device for transporting
the machine.
•
While you are moving the machine it is best to
cover the top part of the blade, for example
using a guard.
Do not misplace these safety instructions.
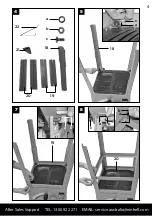
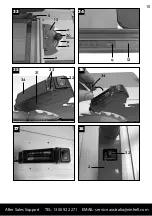
2. Layout
1.
Saw bench
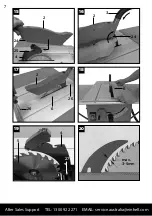
2. Saw blade guard
3. Extractor hose
4. Splitter
5. Saw blade
6. Table insert
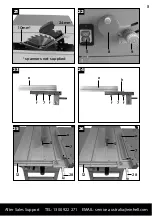
7. Parallel stop
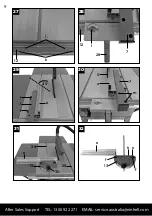
8. Hand crank
9. Adjustment and locking grip
10. Base frame
11.
ON/OFF switch
12. Chain bar for parallel stop
13. Cross stop
14. Width extension table
15. Length extension table
16. Extractor adapter
17. Push stick
18. Legs
19. Longitudinal and cross-struts
20. Middle struts
21. Rubber feet
22. Stability bar
23. Table supports
24. Screw with wing nut
25. Oval holes
26. Countersunk screws
27. Fixing screw
28. Eccentric lever
29. Groove
30. Knurled screw
31. Laser
32.
ON/OFF Switch for laser
33. Screws for battery compartment
34. Battery compartment cover
17
After Sales Support TEL: 1300 922 271 EMAIL: [email protected]
3. Items supplied
•
Operating Instructions
•
2 x Battery 1.5V LR 03
•
Base frame
•
Bench circular saw
•
2 x Carbide metal covered saw blades (1 x 24
•
teeth, 1 x 48 teeth)
•
Parallel stop
•
Cross stop
•
Push stick
4. Proper use
The bench-type circular saw is designed for the
slitting and cross-cutting (only with the cross
stop) of all types of timber, commensurate with
the machine’s size. The machine is not to be
used for cutting any type of round wood.
The equipment may only be used for the tasks it
is designed to handle. Any other use is deemed
to be a case of misuse. The user/operator - not
the manufacturer - will be liable for any damage
or injuries caused as a result thereof.
Please note that our equipment has not been
designed for use in commercial, trade or
industrial applications. Our warranty will be
voided if the equipment is used in commercial,
trade or industrial businesses or for equivalent
purposes.
Only saw blades designed for the machine
should be used (HM or CV saw blades). Use of
HSS saw blades and cutting disks is prohibited.
To use the machine properly you must also
observe the safety instructions, the assembly
instructions and the operating instructions to be
found in this manual.
All persons who use and service the equipment
have to be acquainted with this manual and
must be informed about the machine’s potential
hazards. It is also imperative to observe the
accident prevention regulations in force in your
area.
The manufacturer will not be liable for any
changes made to the machine nor for any
damage resulting from such changes. The following
hazards may arise in connection with the machine’s
construction and design:
•
Contact with the saw blade in places where it
is not covered.
•
Reaching into the moving saw blade (cuts)
•
Recoil of workpieces and parts of workpieces
from the machine.
•
Expulsion of defective hard metal parts from
the saw blade
•
Damage to hearing if ear-muffs are not used
as necessary along with harmful emissions of
wood dust when used in closed rooms.


