Use and care:
- Do not use the appliance if its accessories are
not properly fitted.
- Do not use the appliance if the on/off switch
does not work.
- Do not turn the appliance over while it is in use
or connected to the mains.
- Do not move the appliance while in use.
- Disconnect the appliance from the mains when
not in use, before cleaning, making any ad-
justment, battery charge or accessory change.
- This appliance is for household use only, not
professional or industrial use.
- This appliance should be stored out of reach of
children and/or the disabled.
- Keep the appliance in good condition. Check
that the moving parts are not misaligned or
locked and make sure there are no broken parts
or anomalies that may prevent the appliance from
operating correctly.
- Never leave the appliance connected and
unattended if is not in use. This saves energy and
prolongs the life of the appliance.
- Do not use the appliance for more than 3 conti-
nuous programmes. Leave it standing to cool for
3 to 5 minutes before reuse.
Service:
- Any misuse or failure to follow the instruc-
tions for use renders the guarantee and the
manufacturer’s liability null and void.
Instructions for use
Before use:
- Remove the appliance’s protective film.
- Ensure that the selected tension on the voltage
selector coincides with the tension of the mains.
- Before using this product for the first time, it is
advisable to test it without food.
- Before using the product for the first time, clean
the parts that will come into contact with food in
the manner described in the cleaning section.
Use:
- Unroll the cable completely before plugging it in.
- Connect the appliance to the mains.
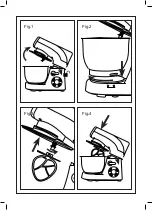
- Press down security lever (I) to lift machine arm
(Fig.1)
- Fix antisplash lid (B) on machine’s arm, trun
anticlockwise and check it is well fixed.
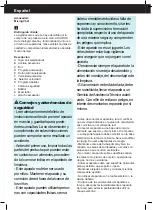
- Fix bowl (C) on to the base and, lock it as
arrowhead denotes. (Fig.2)
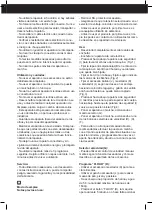
- Fix beater (J), mixer (K) or dough hook (L) as
desired in locking switch and trun anticlockwise
until it stays well fixed (Fig.3)
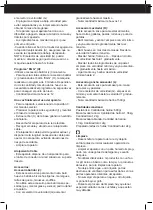
- Press down security lever (I) while pushing
down machine’s arm until security lever (I) retu-
runs to initial position. (Fig.4)
- Turn the appliance on, by using the selection
knob (G).
- Turn the appliance on, by using one of the speed
selection buttons (D), (H), ( F).
- To avoid a fierce start up, it is advisable to start
off from the lowest speed position and, once the
appliance has been switched on, progressively
increase the speed to the desired position.
Speed selector (G):
- User can use speed selector manually accor-
ding to desird function as described in acces-
sories part.
“FLOUR” Program (D):
- Use mixer accessory (K) to mix food.
- Use dough hook (L) to knead bread, pizza
dough and cake.
- It is advised to use a ratio of flour and water of
5:3; maximum quantity of flour is 1.500gr
- Press “FLOUR” (D) button to start, machines
Works during 5 minutes and is not required to use
speed selector.(G)
- Program starts at a low speed to avoid splash
and it will increase until dough is done.
- If you hear the machine labouring, switch off, re-
move half the dough and do each half separately.
- The ingredients mix best if you put the liquid in
first..
- When you fil in the bowl (C) through lid’s hole,
sure not to exceed the capacity of the appliance.
NOTE: Speed selector (G) and mix or knead
according users taste. Machine will be working
during 5 minutes.
“EGG” (H) programme:
-Use the whisk accessory (J) only.
- To mix egg whites use the whisk accessory (J)
pressing the “EGG” button (H). The machine will
run a 6-minute programme. Depending on the
quantity and size of the eggs, the programme
will need to be run a second time in order for the
whites to stiffen.
- Maximum quantity of eggs: 12.
Once you have finished using the appliance:
- Stop the appliance, selecting position 0 on the
selector control.
- Press security lever (I) and lift machine’s arm.
- Take out bowl(C) from base turning anticlockwi-
se.
- Unplug the appliance from the mains.
- Put the cable back in the cable housing.
Summary of Contents for 913516000
Page 2: ...A B L C E F D G H I J K ...
Page 3: ...Fig 1 Fig 3 Fig 2 Fig 4 ...


