background image

L7C SERIES LCD Monitor Service Manual (v1.0)

9

5.


General Connection and Applications

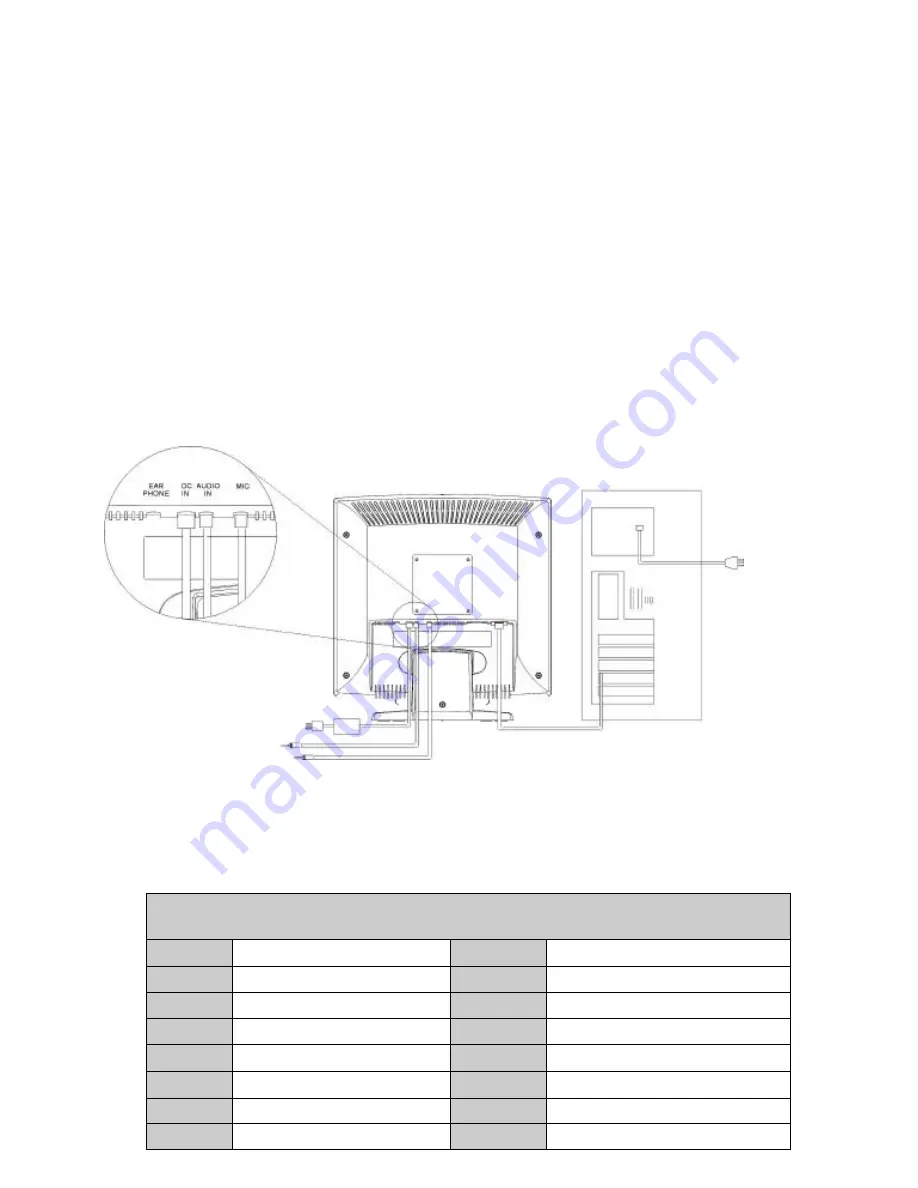
Procedures for installing and using this CML171SX LCD monitor are described as

below.

5.1


 Connecting the monitor to the computer

1)


Place the display on a flat, sturdy surface. Choose an area free from excessive heat,
moisture, and sunlight. Avoid possible sources of electromagnetic interference, such as
transformers, motors, and fluorescent lighting.

2)


Locate the AC power adapter with attached power cable and then connect the power cable
to the power jack on the back of the display. Plug the three-prong power cord into a power
outlet, and plug the other end into the AC power adapter. The three-prong power cord is a
shielded type and is provided as a safety precautions to ensure proper electrical grounding.

Plug the D-SUB 15-pin analog signal cable into the Analog Input port on the back of the
display. Connect the other end of the signal cable into your computer’s VGA output port. The
assignment of the pins of the connector is as follows:

Pin Assignment of 15-pin D-SUB connector

1

Red Video

9

+5V for DDC circuit

2

Green Video

10

Logic Ground

3

Blue Video

11

Monitor Ground

4

Monitor Ground

12

DDC-Serial Data

5

DDC-Return

13

H-Sync.

6

Red Ground

14

V-Sync.

7

Green Ground

15

DDC-Serial Clock

8

Blue Ground

Summary of Contents for L7CMS

Page 1: ...L7CMS L7CMT Tatung LCD Monitors Service Manual ...

Page 2: ...ng Supported Analog Inputs 5 3 Control Buttons and Functions 6 4 Disassembly Instructions 6 5 General Connection and Applications 6 5 1 Connecting the Monitor to the Computer 9 6 Electronic Block Diagram 11 Appendix A Troubleshooting Flow Chart Appendix B Mainboard Circuit Diagrams Appendix C Keyboard Circuit Diagrams Appendix D Audio Circuit Diagrams Appendix E Mechanical Disassembly Appendix F S...

Page 3: ...the customer a thorough safety test must be performed to verify that the display is safe to operate without danger or shock 1 2 Product Safety Notice 1 Many electrical and mechanical parts in this chassis provide special visual safety protection The protection afforded by them cannot necessarily be obtained by using replacement components rated for higher voltage wattage etc 2 Before replacing any...

Page 4: ...adapter Maximum power consumption 45W Signal Input Video Signal Sync signals RGB positive 0 7VPP 75ohm Separate Composite TTL Level Line horizontal frequency 31 5 kHz 80 kHz Raster vertical frequency 56 Hz 75 Hz Pixel dot clock 135 MHz maximum Recommended mode 1280 x 1024 60 Hz Pedestal tilt 20 forward 5 backward Dimensions W x H x D 424 x 438 x 86 mm without base Weight 7 0 kg Operating Condition...

Page 5: ...879 60 317 40 0 6 SVGA 72HZ 800 600 48 077 72 188 50 0 7 SVGA 75HZ 800 600 46 875 75 0 49 5 8 XGA 60HZ 1024 768 48 363 60 004 65 0 9 XGA 70HZ 1024 768 56 476 70 069 75 0 10 XGA 75HZ 1024 768 60 023 75 029 78 75 11 SXGA 60HZ 1280 1024 63 981 60 020 108 12 SXGA 75HZ 1280 1024 79 976 75 025 135 13 MAC SVGA 640 480 35 0 66 667 30 24 14 MAC SVGA 832 624 493725 74 550 57 283 15 US TEXT 720 400 31 469 70...

Page 6: ...eases the setting value Note This key is also used as direct key to bring up OSD Audio Menu ð Down Move downward through the choice in the OSD submenu If an adjustment bar is displayed this button decreases the setting value Note This key is also used as direct key When the OSD Main Menu is inactive press this key will execute Auto Setup function Detail contral function please reference User s Man...

Page 7: ...and Back Cover Removal As below after removing the hinge cover there will be 4 screws indicated by C and remove them Then you can remove the whole base of the monitor Remove 4 screws indicated as D of the back cover Then remove the back cover with care ...

Page 8: ...Caution When serving or replacing the panel disconnect the DC power jack completely a Unplug all connected wires from the PCB b Remove 3 screws indicated as K from the inverter board and then remove the board carefully c Remove 2 screws indicated as J from the audio board and then remove the board carefully d Remove 7 screws indicated as I from the main board connected with front cover ...

Page 9: ...ck of the display Plug the three prong power cord into a power outlet and plug the other end into the AC power adapter The three prong power cord is a shielded type and is provided as a safety precautions to ensure proper electrical grounding Plug the D SUB 15 pin analog signal cable into the Analog Input port on the back of the display Connect the other end of the signal cable into your computer ...

Page 10: ...rn the PC power switch ON Then apply power to the display by pressing the power button to turn the monitor on The power indicator LED will then illuminate Note Do not force the cable into the connector line it up carefully so that you don t bend the pins ...

Page 11: ...RED GREEN BLUE H_SYNC V_SYNC SCL SDA 3 3V 12V 5V Audio in ANALOG R G B INPUT 24WC02 DDC2B gmZAN1 PLL ADC OSD SCALER 160 pin PQFP Package LVDS MICROCONTROLLER Regulat or LVDS TFT LCD PANEL Audio Ampilier Speaker Earphone INVERTER ...

Page 12: ...of P006 pin 1 is 5V Replace PWB 0319 Voltage of C305 is 5V Replace PWB 0265 Is the frequency of R005 20 MHz Replace X001 Replace MCU I003 LED display is amber Is it entering power Saving Restart PC signal to ensure H V Sync are not absent End LED display is Green Replace MCU I003 Replace INVERTER Replace PWB 0265 ...

Page 13: ......

Page 14: ......

Page 15: ......

Page 16: ......

Page 17: ......

Page 18: ......

Page 19: ......

Page 20: ......

Page 21: ......

Page 22: ...8006502 SCREW ISO PPW M3 0X10 S ZN CC 7000311042 BASE 31455 5642283002 SCREW BFB M4 0X08 S ZN CC 7034251152 NECK F 31455 5642282802 SCREW PZP M4 0X10 7134251482 SCREW ISO PP M4 0X06 S ZN CC 7001260612 NECK B 31455 5642282902 SCREW PZS M4 0x08 S PC 7134251156 NECK BRACKET 5642721200 RUBBER FOOT 5642025400 HINGE L 5642721400 SCREW MS CROSS PANHEAD SW 7190030022 HINGE R 5642721500 SCREW MS CROSS PANH...

Reviews: