background image

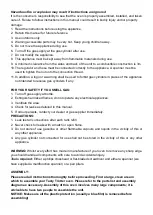
Hazardous fire or explosion may result if instructions are ignored 

It is the consumer’s responsibility to see that the oven is properly assembled, installed, and taken 
care of. Failure to follow instructions in this manual could result in bodily injury and/or property 

damage. 

1.  Read the instructions before using the appliance. 

2.  Retain this manual for future reference. 

3.  Use outdoors only. 

4.  Warning accessible parts may be very hot. Keep young children away. 

5.  Do not move the appliance during use. 

6.  Turn off the gas supply at the gas cylinder after use. 

7.  Do not modify the appliance. 

8.  This appliance must be kept away from flammable materials during use. 

9.  A minimum clearance from the sides and back of the unit to a combustible construction is 3m  

10. The regulator and hose must be connected correctly to the appliance. A spanner must be 

used to tighten the nut onto the connection thread. 

11. In addition, a logo or a warning shall be used to forbid gas cylinders in places of the appliance 

not intended to receive gas cylinders if any. 


FOR YOUR SAFETY IF YOU SMELL GAS: 

1.  Turn off gas supply at bottle. 

2.  Extinguish all naked flames; do not operate any electrical appliances. 

3.  Ventilate the area.


4.  Check for leaks as detailed in this manual. 

5.  If odour persists, contact your dealer or gas supplier immediately. 

PRECAUTIONS: 

1.  Leak test all connections after each tank refill. 

2.  Never check for leaks with a match or open flame. 

3.  Do  not  store of use gasoline or other flammable  vapours and liquids in the vicinity of this or 

any other appliance. 

4.  Any gas cylinder not connected for use shall not be stored in the vicinity of this or any other 

appliance. 


WARNING:

 Whilst every effort has made in manufacture of your oven to remove any sharp edge, 

you should handle all components with care to avoid accidental injury. 

Tools required: 

Either a philips crosshead or flat-bladed screwdriver and either a spanner (we 

have supplied a multifunction spanner) or a pair pliers. 


ASSEMBLY: 

Please read all instructions thoroughly before proceeding. Find a large, clean area in 

which to assemble your Tasty Trotter oven. Please refer to the parts list and assembly 

diagram as necessary. Assembly of this oven involves many large components; it is 

advisable to have two people to assemble the unit. 

NOTICE: Make sure all the plastic protection (usually a blue film) is removed before 

assembling! 

Summary of Contents for KYQ-GFT402G

Page 1: ...UCTIONS CAREFULLY BEFORE ASSEMBLY RETAIN THIS MANUAL FOR FUTURE REFERENCE USE ONLY THE HOSE AND HOSE CONNECTOR PROVIDED If a replacement is necessary please contact either our Customer Service Departm...

Page 2: ......

Page 3: ...as supply at bottle 2 Extinguish all naked flames do not operate any electrical appliances 3 Ventilate the area 4 Check for leaks as detailed in this manual 5 If odour persists contact your dealer or...

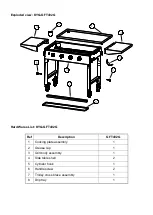
Page 4: ...res List KYQ GFT402G Ref Description GFT402G 1 Cooking plate assembly 1 2 Grease cup 1 3 Grill body assembly 1 4 Side table shell 2 5 Cylinder hook 1 6 Handle screw 2 7 Trolley cross brace assembly 1...

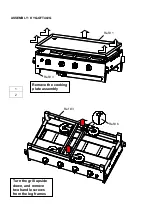
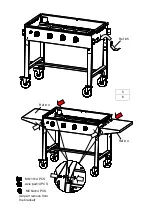
Page 5: ...ASSEMBLY KYQ GFT402G 1 2 Remove the cooking plate assembly Ref 1 Ref 3 Turn the grill upside down and remove two handle screws from the leg frames Ref 3 Ref 6...

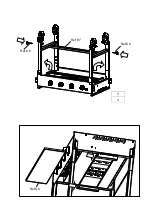
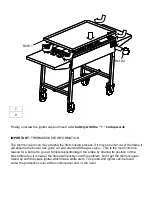
Page 6: ...3 4 Ref 8 Ref 7 Ref 6 Ref 6...

Page 7: ...5 6 Ref 5 M6 15 4 PCS All part remove from the bracket Axis pad 4 PCS M6 Nut 4 PCS Ref 4 Ref 4...

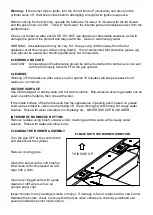
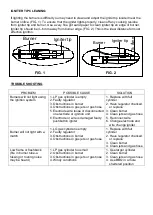
Page 8: ...er has gone out and shut down the gas valve This is the most common reason for a burner to go out Simple repositioning of the probe by altering its position on the brass thread so it is nearer the fla...

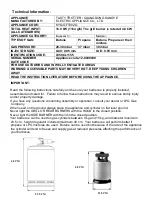
Page 9: ...Your barbecue will perform better if propane or LPG mixtures are used Butane can be used but because of the rate of the appliance the cylinder will tend to freeze and supply gas at reduced pressures a...

Page 10: ...iginal packaging and stored in a dry dust free environment Gas Cylinder The gas cylinder should not be dropped or handled roughly Always keep the cylinder in upright position during operation Make sur...

Page 11: ...joints If bubbles appear you have a leak which must be rectified before use Retest after fixing the fault Turn OFF the gas at the cylinder after testing If leakage is detected and cannot be rectified...

Page 12: ...prox 15 minutes will keep excessive food residue to a minimum OUTSIDE SURFACE Use mild detergent or baking soda and hot water solution Non abrasive scouring powder can be used on stubborn stains then...

Page 13: ...connected on electrode or ignition unit 6 Electrode or wire is damaged faulty pushbutton igniter 1 Replace with full cylinder 2 Have regulator checked or replace 3 Clean burner 4 Clean jets and gas ho...

Page 14: ...another clean rag to a non oily finish This process will aid protection against dirt and other corrosive contaminants by providing a temporary food safe shield The Olive Oil layer also makes later po...

Page 15: ......

Page 16: ...Tasty Trotter Ltd UK Bridge Street Clay Cross Derbyshire S45 9NU Tel 44 0 1246 866800 Email info tastytrotter com Website www tastytrotter com...

Reviews: