Tascam DR-10L Pro Owner'S Manual Download Page 37

TASCAM  DR-10L Pro  V1.00  

37

13 -  Messages

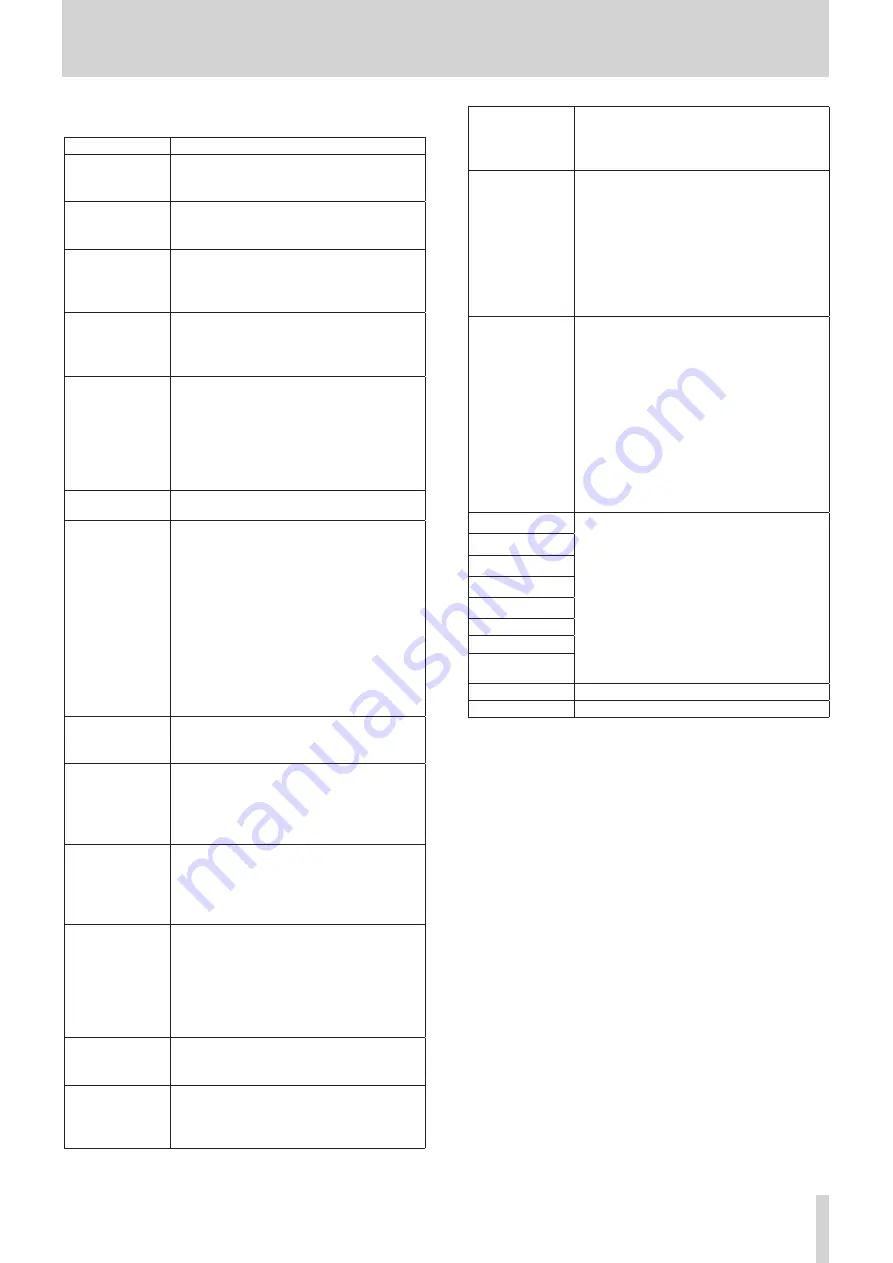
The following is a list of pop-up messages.

Message

Meaning and response

Battery Empty

The battery is almost out of power. Replace the 
battery

Card Error

The microSD card could not be recognized properly. 
Change the microSD card.

Card Full

The microSD card has no remaining capacity. 
Delete or move files to make space available, or 
replace the card.

File Full

The total number of recording files exceeded the 
limit of 1000. Delete or move files to make space 
available, or replace the card.

File Not Found

The file was not found or might be damaged. 
Check the relevant file.
Alternatively, the system file is missing. This unit 
requires a system file for operation.
While this message appears, press the 

7’9


[ENTER] button to create a system file.

File Protected

The file is read only and cannot be erased.

Format Error

The microSD card might not be formatted properly, 
or it might be broken.
This message also appears if the card was format-
ted using a computer connected by USB or if an 
unformatted card is inserted in the unit.
Always use the unit to format cards to be used 
with it.
Change the microSD card or press the 

7’9


[ENTER] button while this message is being shown 
to format the card. Formatting will erase all data 
on the microSD card.

Invalid Card

The card might be abnormal. Change the microSD 
card.

Invalid SysFile

The system file required to operate this unit is 
invalid.
While this message appears, press the 

7’9


[ENTER] button to create a new system file.

Max File Size

The file is larger than the designated size Another 
possibility is that the recording time has exceeded 
24 hours when the total number of folders and files 
was already at the limit (1000).

MBR Error

The microSD card might not be formatted properly, 
or it might be broken.
Change the microSD card or press the 

7’9


[ENTER] button while this message is being shown 
to format the card.
Formatting will erase all data on the microSD card.

No Card

No microSD card is in the unit.
Insert a recordable microSD card.

No PB File

There is no file that can be played back on the 
microSD card. Alternatively, the file might be 
damaged.

Non-Supported

The file format is not supported. Please see 
“Recording/playback formats” on page 39 for file 
formats that this unit can use.

Write error

Writing to the microSD card timed out. This has 
caused audio to be interrupted and noise to 
occur.
A BOF mark was added at the point when audio was 
interrupted.
Recording continues.
Press the 

7’9

 [ENTER] button to close the 

pop-up.

Card slow

microSD card writing performance has become 
worse.
A BOF mark has been added at the point when 
audio was interrupted because writing to the 
microSD card timed out.
Check the audio around the BOF mark.
Execute the erase format function or change the 
microSD card.
Press the 

7’9

 [ENTER] button to close the 

pop-up, and slide the 

¤?o

0

 REC switch 

to stop recording.

Can't Save Data

If any of these errors occurs, turn this unit’s power 
off and restart it.
If the power cannot be turned off, remove the 
batteries and, if using USB bus power, disconnect 
the USB cable.
If these error messages continue to appear 
frequently, please contact the store where you 
purchased this unit or TASCAM customer support 
service.

Device Error
File Error
Not Continued
Player Error
Writing Failed
Sys Rom Err
System Err --
(-- is a number)

Summary of Contents for DR-10L Pro

Page 1: ...D01419820A DR 10L Pro 32 Bit Float Field Recorder and Lavalier Mic OWNER S MANUAL V1 00 ...

Page 2: ...eting files 19 7 Various settings 20 7 1 Recording settings 20 Setting the recording level 20 Setting the low cut filter 20 Setting the limiter 21 Setting the auto level function 21 Setting the phase 22 7 2 Recording file settings 22 Setting the recording file format 22 Setting the WAV recording file type 23 Setting the sampling frequency 23 Setting the quantization bit depth 24 7 3 Setting record...

Page 3: ...is a registered trademark of TEAC Corporation o o microSDXC Logo is a trademark of SD 3C LLC o o MPEG Layer 3 audio coding technology licensed from Fraunhofer IIS and Thomson o o Supply of this product does not convey a license nor imply any right to distribute MPEG Layer 3 compliant content created with this product in revenue generating broadcast systems terrestrial satellite cable and or other ...

Page 4: ...e used Connecting to a computer with a USB Type A port Use the included Type A to Type C cable Connecting to a computer with a USB Type C port A commercially available Type C to Type C cable is necessary 1 Introduction Monitoring equipment Use monitoring equipment to monitor playback input sound with this unit This unit has a 1 8 3 5mm stereo mini headphone jack Please prepare headphones earphones...

Page 5: ...M Distributors list page of the TEAC Global Site https teac global com search for the local company or representative for the region where you purchased the product and contact that organization When making inquiries the address URL of the shop or web shop where it was purchased and the purchase date are required Moreover the warranty card and proof of purchase might also be necessary 1 Introducti...

Page 6: ...ch backward o o Press this when the Menu Screen is open to show the previous menu item o o When a setting item is shown press this to move the cursor left o o When inputting file names use this to select characters 5 k button o o During playback or when stopped in the middle of a file press this to skip to the next file o o Press and hold this during playback to search forward o o Press this when ...

Page 7: ...s toward 0 REC for about one second to start recording o o When recording slide and hold this toward 0 REC for about one second to stop recording NOTE The one second delay is intended to prevent accidental operation w Headphone jack 1 8 3 5mm stereo mini dual mono output Connect stereo headphones to this stereo mini jack The same signal is output to left and right dual mono output 2 4 Top e Input ...

Page 8: ...ganese dry cell batteries cannot be used with this unit o o This unit cannot recharge AAA Ni MH batteries Use a commercially available recharger Using USB bus power Use the included USB cable to connect the unit to a USB port on a computer USB Type C port USB cable Computer NOTE o o If a computer is going to be used only to supply power settings do not need to be made on this unit o o If USB bus p...

Page 9: ...the microSD card slot cover on the left side 2 Insert the microSD card in the direction of the arrow as shown in the illustration below until it clicks into place NOTE o o A screen encouraging formatting will appear if a microSD card that is new or has been formatted by a different device is inserted see Formatting initializing microSD cards sold separately on page 11 o o If no microSD card has be...

Page 10: ...y icon shows 8 levels of remaining power e e e e e e e The battery is almost dead and the power will soon turn off if the icon with no bars blinks When USB bus power is being supplied the remaining battery indicator and appear alternately If no batteries are installed in the unit and will appear alternately Turning the unit off When the unit is on slide the o 0 REC switch toward and hold it for ab...

Page 11: ...matting will appear if a microSD card that is new or has been formatted by a different device is inserted or In order to use a microSD card in this unit it must first be formatted by this unit CAUTION Formatting will erase all data on a microSD card Back up to a com puter for example before formatting a card NOTE See Formatting the SD card on page 27 for formatting procedures if the screen encoura...

Page 12: ...ld separately on page 9 for information about inserting microSD cards 3 Preparation 3 7 Connecting monitoring equipment Connect monitoring equipment to the headphone jack in order to monitor playback input sound with this unit Headphones V CAUTION While wearing headphones do not connect or disconnect them or turn the unit on or off Doing so might cause sudden loud noises which could harm hearing ...

Page 13: ...etooth devices 1 Remove the Bluetooth adapter connector cover from the unit Cover lock 2 After removing the connector cover insert the AK BT1 into the unit Connector cover AK BT1 Insert the connector toward the unit s display 3 Reattach the cover in its original position See Remote control functions on page 32 and Timecode functions on page 35 for Bluetooth connection and use procedures ...

Page 14: ...teries This will blink when at the lowest level e d Shown alternately Using USB bus power Connection status of remote control function Indicator Operation status Lit Remotely connected with dedicated control app Blinking Waiting to connect with dedicated control app File name elapsed time file count timecode Indicator Operation status File name 230123_0001 wav Stopped When changing tracks When sta...

Page 15: ...e setting items c c 3 Use the j and k buttons to change the setting value item c 4 Press the 7 9 ENTER button to confirm the setting and return to the Menu Screen c 5 Repeat steps 2 to 4 as necessary to set each item 6 When finished press the MENU button to return to the Home Screen c NOTE o o After showing the last menu item the first menu item will be shown next 3c 3c etc 3c 3c Example when 28 F...

Page 16: ... low cut filter limiter and other functions can be checked The settings of each function can be set individually from the Menu Screen For details see Recording settings on page 20 To adjust the volume when monitoring press the PHONES buttons to adjust the level output from the headphone jack For details see Adjusting the headphone output volume on page 18 Recording data overview Recorded data is s...

Page 17: ...ime of the playing file o o Only files wav or mp3 in the SOUND folder on the microSD card can be played back Files put in a folder created using a computer for example cannot be played back Skipping During playback or when stopped in the middle of a file press the j button to return to the beginning of the file Press this when located at the beginning of a file to skip to the previous file During ...

Page 18: ...essing a button will adjust the volume by one level Pressing and holding a button will adjust the volume continuously Minimum value 0 Maximum value 30 This is set to 8 when shipped new from the factory NOTE The volume is shown on the display The screen will return to normal 1 second after button operation Large Small 5 Recording and playing files ...

Page 19: ... to delete recorded files with this unit This deletes the file currently shown on the display CAUTION Deleted files cannot be restored Be careful not to make a mistake when deleting files 1 When the Home Screen is open use the j and k buttons to show the file to be deleted on the display 2 Press the MENU button to open the Menu Screen 3 Use the j and k buttons to select 28 FILE DELETE and press th...

Page 20: ...o OFF when the 01 REC LEVEL setting is changed When this happens AUTO LVL Cancel will appear in a pop up message for about one second To use the auto level function after setting the 01 REC LEVEL item set the 04 AUTO LEVEL item to ON again Setting the low cut filter The cutoff frequency of the low cut filter used on the mic input can be set This cuts audio below the selected frequency The low cut ...

Page 21: ...ource Setting the auto level function When the input sound level is too low or too high this function can automatically increase or decrease the recording level to an appropriate level The auto level function can be turned on or off When this function is on the input level will be adjusted automatically in response to the input audio Setting items default value underlined OFF ON 1 When the Home Sc...

Page 22: ... 9 ENTER button 3 Use the j and k buttons to select the setting item and press the 7 9 ENTER button 7 2 Recording file settings Setting the recording file format This sets the recording format used for recorded audio files Setting items default value underlined WAV MP3H MP3L WAV WAV format will be used for recording audio files MP3H MP3 format 192kbps will be used for recording audio files MP3L MP...

Page 23: ...to open the Menu Screen 2 Use the j and k buttons to select 07 FILE TYPE and press the 7 9 ENTER button 3 Use the j and k buttons to select the setting item and press the 7 9 ENTER button Setting the sampling frequency The sampling frequency used for recording can be set Setting items default value underlined 44 1kHz 48kHz 1 When the Home Screen is open press the MENU button to open the Menu Scree...

Page 24: ... for the characters added to file names can be set Setting items default value underlined TEXT DATE UNIT NAME TEXT Chosen characters 6 are used for the file name Example DR0000_0001 wav DATE The 6 digit date is used for the file name Example 110101_0001 wav UNIT NAME The name of the individual device is used for the file name Example DR 10LPro_0001 wav 1 When the Home Screen is open press the MENU...

Page 25: ...03_0001 wav 10th unit DR0010 DR0010_0001 wav Setting the file number The file number that will be used the next time a file is created can be set Setting items default value underlined 0001 1 When the Home Screen is open press the MENU button to open the Menu Screen 2 Use the j and k buttons to select 16 FILE NUMBER and press the 7 9 ENTER button 3 Press the 7 9 ENTER button to move the cursor fro...

Page 26: ...he 7 9 ENTER button NOTE When using USB bus power the display will not become unlit Instead the following screen will appear If the USB cable is disconnected the unit power will turn off and the display will become unlit Setting the backlight This setting controls the brightness of the display backlight Setting items default value underlined ALWAYS 5sec 30sec ALWAYS Backlight always stays on 5sec ...

Page 27: ...o o Erase formatting checks for memory errors as it formats so it takes more time compared to QUICK formatting o o A screen encouraging formatting will appear if a microSD card that is new or has been formatted by a different device is inserted Refer to If Format Error is shown and If File Not Found is shown when formatting Setting the battery type Use this to set the type of battery used This set...

Page 28: ...ms from left to right YY q MM q DD q hh q mm 4 When the cursor is at mm on the far right press the 7 9 ENTER button to confirm the date and time and return to the Menu Screen NOTE o o The cursor cannot be moved back to a previous item from right to left o o Pressing the HOME button before completing the setting will cancel the changes and return to the Menu Screen Initializing settings The unit ca...

Page 29: ...1 or Not Available The file number that will be used the next time a file is created can be set Not Available will be shown if the METADATA function has been turned on using the dedicated control app 17 BACKLIGHT ALWAYS 5sec 30sec This setting controls the brightness of the display backlight 18 FORMAT SD QUICK ERASE Use this to format the microSD card in the unit 19 BATTERY ALKALINE Ni MH LITHIUM ...

Page 30: ...lect 10 TIME MARK and press the 7 9 ENTER button 3 Use the j and k buttons to select the setting item and press the 7 9 ENTER button 9 3 Peak marks Marks can be added automatically when input signals exceed the peak level during recording This can be used after recording to find parts where the peak level was exceeded Setting the peak mark function Use the Menu Screen 11 PEAK MARK item to set the ...

Page 31: ...essing microSD cards from a computer Use this to switch the USB connection mode of the unit to USB mass storage mode Switching to USB mass storage mode 1 When the Home Screen is open press the MENU button to open the Menu Screen 2 Use the j and k buttons to select 24 CARD READER and press the 7 9 ENTER button The CARD READER Screen will open When connected by USB the following screens will appear ...

Page 32: ... the Menu Screen 2 Use the j and k buttons to select 25 BLUETOOTH and press the 7 9 ENTER button 3 Use the j and k buttons to select REMOTE and press the 7 9 ENTER button While waiting to connect with the dedicated control app the icon will blink on the right side of the Home Screen 11 2 Installing the dedicated control app 1 Connect the smartphone or tablet device to the Internet NOTE Please be a...

Page 33: ...st it will begin connection standby and connection will automatically be attempted A check will appear when connection completes NOTE o o If the UNIT NAME has been set on the DEVICE SETTINGS Screen the UNIT NAME data will be registered on the unit after connection completes o o If a different UNIT NAME is already saved on the unit the following pop up will appear Example when the UNIT NAME in the ...

Page 34: ...e Screen See the manual of the dedicated control app for operation procedures NOTE o o Monitoring sound is not possible on paired devices Use the headphone jack on the unit o o When the unit is showing a menu or loading setting data the display for the corresponding unit in the dedicated control app will also show that setting data is being loaded 11 Remote control functions ...

Page 35: ...lled in the unit it will switch functions when its operation is stopped and the Home Screen is open o o Pressing the MENU button while searching will cancel searching and reopen the Menu Screen This will turn off the 25 BLUETOOTH setting o o If the unit power is turned off without pairing the 25 BLUETOOTH setting will be turned off 12 2 Pairing with supported Atomos products When the unit s timeco...

Page 36: ...ize the pairing data NOTE Not Available will be shown if no pairing data has been saved and initialization is unnecessary Press the MENU button to return to the Menu Screen 12 5 Using remote control with timecode running free The remote control app can be used with the unit running free using the timecode that it last received 1 Turn on the timecode function and synchronize the timecode with a sup...

Page 37: ...Another possibility is that the recording time has exceeded 24 hours when the total number of folders and files was already at the limit 1000 MBR Error The microSD card might not be formatted properly or it might be broken Change the microSD card or press the 7 9 ENTER button while this message is being shown to format the card Formatting will erase all data on the microSD card No Card No microSD ...

Page 38: ...n it ON OFF press the MENU button and use the 15 POWER SAVE item The microSD card is not recognized Confirm that the microSD card is inserted completely Recording is not possible Confirm that the microSD card has enough open space Recording becomes impossible when the total number of files reaches 1000 The remaining charge of the batteries is not shown accurately Set the type of battery being used...

Page 39: ...ately USB bus power from a computer Power consumption batteries 0 3W maximum Current consumption USB bus power 0 1A maximum Battery operation time continuous operation Using an alkaline battery EVOLTA Conditions Operation time Note Recording No Bluetooth connection About 16 5 hours Format WAV 48kHz 32 bit float Mic connected Headphones not connected Limiter off File type mono With Bluetooth connec...

Page 40: ...wn above are not continuous recording times but rather they are the total possible recording times for the microSD card o o If recorded using the POLY stereo setting maximum recording times will be about half those above Date and time data retention Secondary lithium battery 1 built in Dimensions 53 x 50 7 x 21 4 mm width height depth excluding protrusions Weight 43g not including batteries 65g in...

Page 41: ...ps www tascam eu en Phone 44 1923 797205 Luminous House 300 South Row Milton Keynes Buckinghamshire MK9 2FR United Kingdom TEAC EUROPE GmbH https www tascam eu de Phone 49 611 71580 Bahnstrasse 12 65205 Wiesbaden Erbenheim Germany TEAC SALES TRADING SHENZHEN CO LTD https tascam cn cn Phone 86 755 88311561 2 Room 817 Xinian Center A Tairan Nine Road West Shennan Road Futian District Shenzhen Guangd...

Reviews: