background image

TASCAM CD-GT1MKII —  

3

Important Safety Instructions

1

  Read these instructions.

2

  Keep these instructions.

3

  Heed all warnings.

4

  Follow all instructions.

5

  Do not use this apparatus near water.

6

  Clean only with dry cloth.

7

  Do not block any ventilation openings. Install 

in accordance with the manufacturer’s instructions.

8

  Do not install near any heat sources such as 

radiators, heat registers, stoves, or other apparatus 

(including amplifiers) that produce heat.

9

  Do not defeat the safety purpose of the po-

larized  or  grounding-type  plug.  A  polarized  plug 

has two blades with one wider than the other. A 

grounding  type  plug  has  two  blades  and  a  third 

grounding prong. The wide blade or the third prong 

are  provided  for  your  safety.  If  the  provided  plug 

does not fit into your outlet, consult an electrician 

for replacement of the obsolete outlet.

10

  Protect the power cord from being walked on 

or pinched particularly at plugs, convenience recep-

tacles, and the point where they exit from the ap-

paratus.

11 

Only use attachments/accessories specified by 

the manufacturer.

12

  Use only with the cart, stand, tripod, bracket, 

or table specified by the manufacturer, or sold with 

the  apparatus. When  a  cart  is  used,  use  caution 

when  moving  the  cart/apparatus  combination  to 

avoid injury from tip-over.

13

  Unplug this apparatus during lightning storms 

or when unused for long periods of time.

14

  Refer all servicing to qualified service person-

nel. Servicing is required when the apparatus has 

been  damaged  in  any  way,  such  as  power-supply 

cord or plug is damaged, liquid has been spilled or 

objects have fallen into the apparatus, the appara-

tus has been exposed to rain or moisture, does not 

operate normally, or has been dropped.

  Do  not  expose  this  apparatus  to  drips  or 

splashes.

  Do  not  place  any  objects  filled  with  liquids, 

such as vases, on the apparatus.

  Do  not  install  this  apparatus  in  a  confined 

space such as a book case or similar unit.

  The  apparatus  draws  nominal  non-operating 

power from the AC outlet with its POWER switch in 

the off position.

Summary of Contents for CD-GT1mkII

Page 1: ...rainer OWNER S MANUAL This appliance has a serial number located on the rear panel Please record the model number and serial number and retain them for your records Model number _____________ Serial number _____________ D00851000A ...

Page 2: ...ent is operated in a commercial environ ment This equipment generates uses and can radiate radio frequency energy and if not in stalled and used in accordance with the instruc tion manual may cause harmful interference to radio communications However there is no guarantee that interference will not occur in a particular installation If this equipment does cause harmful interference to radio or tel...

Page 3: ... plugs convenience recep tacles and the point where they exit from the ap paratus 11 Only use attachments accessories specified by the manufacturer 12 Use only with the cart stand tripod bracket or table specified by the manufacturer or sold with the apparatus When a cart is used use caution when moving the cart apparatus combination to avoid injury from tip over 13 Unplug this apparatus during ligh...

Page 4: ...is completely confined in the protective housings The label required in this regulation is shown here CAUTION DO NOT REMOVE THE PROTECTIVE HOUSING USING A SCREWDRIVER USE OF CONTROLS OR ADJUSTMENTS OR PERFORMANCE OF PROCEDURES OTHER THAN THOSE SPECIFIED HEREIN MAY RESULT IN HAZARDOUS RADIATION EXPOSURE IF THIS PRODUCT DEVELOPS TROUBLE CON TACT YOUR NEAREST QUALIFIED SERVICE PERSONNEL AND DO NOT USE...

Page 5: ...tempo changes 17 Using CD effects 18 Using built in effects 19 Effect presets 21 Using the metronome 22 Using the tuner 23 Changing your preferences for the CD GT1MKII 24 Facts and figures specifications 25 About this Manual When we refer to a key or connector or control on the CD GT1MKII the type face looks like this PLAY When we refer to items shown on the display the typeface looks like this MENU...

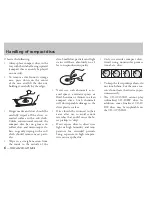
Page 6: ...t particles and light stains will have absolutely no ef fect on reproduction quality Never use such chemicals as re cord sprays antistatic sprays or fluid benzine or thinner to clean compact discs Such chemicals will do irreparable damage to the disc s plastic surface Discs should be returned to their cases after use to avoid serious scratches that could cause the la ser pickup to skip Don t expose...

Page 7: ...re not rechargeable If you are not going to use the CD GT1MKII for longer than one month remove the batteries Do not throw batteries into water or fire Do not disassemble batter ies If a battery leaks in the compart ment wipe the liquid away com pletely with a disposable cloth Make certain no residue remains before inserting new batteries Remaining battery charge level display When the CD GT1MKII i...

Page 8: ...the plug of the AC adapter into a domestic AC power outlet Make sure that the voltage of the outlet corre sponds to that marked on the adapter PS PS5 DC plug Wall outlet WARNING Use only a PS PS5 AC adapter with your CD GT1MKII Using another type of AC adapter may damage your CD GT1MKII CAUTION Remove the batteries before operating the CD GT1MKII with an AC adapter There is a possibility of slight...

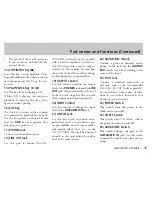
Page 9: ...se the key like this To activate the function written above the key Tap the key once To activate the function written below the key Press down the key and hold it For example in the case of the TUNER SETUP key the Tuner menu is acti vated when you tap the key lightly and if you press and hold it down the key activates the Setup menu ...

Page 10: ...is key to start the repeat loop mode 8 I O Key Use this key to set the IN point and OUT point of the section of music that you want repeated See Using the CD player 9 TUNER SETUP Key Use this key to enter the Tuner menu and the Setup menu See Using the menu system 10 TMP KEY CD EFF Key Use this key to enter the Tempo Key menu and the CD Effect menu See Using the menu system 11 FX BANK Key Use this ...

Page 11: ...djust the output level of the PHONES jack and the LINE OUT jack This control adjusts the level of the two jacks together the two jack levels cannot be adjusted separately 20 INPUT Control Use this control to change the input level of the GUITAR MIC IN jack 21 LINE IN Jack Use this stereo jack to connect exter nal devices such as a synthesizer gui tar preamplifier cassette tape recorder rack mount e...

Page 12: ...e external device you have connected LINE OUT OF EXTERNAL DEVICE WARNING NEVER connect a guitar amplifier to the GUITAR MIC jack of the CD GT1MKII as you will damage your equipment if you do this Adjusting the output level after adding built in effects Press and hold down the FX No EDIT key to open the Effect menu and press the NEXT or PREV key to choose LVL and use the UP and DOWN keys to set the o...

Page 13: ...and cannot be adjust ed independently When you have a recording device connect ed to the LINE OUT jack remember that the OUTPUT control affects the recording level Connecting a footswitch Connect a footswitch to the FOOT jack You can set the polarity push to make push to break of the footswitch us ing the POL item in the Setup menu CAUTION To avoid problems with your CD GT1MKII use only a footswit...

Page 14: ...nking Menu Category Menu Item Values default values are underlined Notes EFFECT EFF ON OFF turns effect on or off LIB d01 15 o01 15 c01 15 v01 12 preset number Parameter depends on effect type LVL 0 to 64 effect output level TUNER TUNE MODE GTR 6E 5A 4D 3G 2B 1E sets string number in Guitar Mode MODE CHR GTR selects tuner mode OSC OFF _C _ A _B C B _ C _ B 3 octaves sets pitch of the oscillator CA...

Page 15: ...l function RNGE MID ALL selects the range reduced by the guitar cancel function MONO OFF stereo L R L R selects mono monitor mode SPLT OFF mix C G G C selects split monitor mode METRONOME MTRO OFF 40 120 220 sets tempo of metronome in BPM Beats Per Minute BEAT OFF 2 6 selects number of beats of the metronome Choosing menu items Choose menu items in the selected menu category using the PREV and NEX...

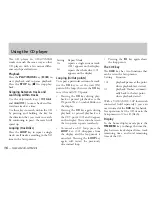
Page 16: ... the I O key to set the end OUT point Pressing the I O key during play back or paused playback sets the IN point The I O symbol blinks on the display Pressing the I O key again during playback or paused playback sets the OUT point LOOP and I O appear on the display The section between the two points repeats seamlessly To cancel an I O loop press the LOOP key LOOP disappears from the display and th...

Page 17: ...t to 0 and you change VSA from OFF to ON the tempo value will be automatically reset to a VSA ON value For example if the value is 33 when VSA is OFF it will automatically be ad justed to 50 when you turn VSA ON Key control Key control changes the key of the mu sic up or down by six semitones Tap the TMP KEY CD EFF key to enter the Tempo Key menu and select KEY by pressing the PREV or NEXT key KEY...

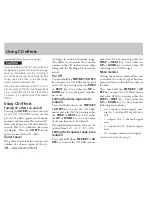
Page 18: ...Off Press and hold the TMP KEY CD EFF key to enter the CD Effect menu and select CNCL by pressing either the PREV or NEXT key Press either the UP or DOWN key to turn the guitar canceller on or off Setting the stereo region to be reduced Press and hold down the TMP KEY CD EFF key to enter the CD Effect menu and select PART by pressing either the PREV or NEXT key Press either the UP or DOWN key to set ...

Page 19: ...lable 45 guitar and 12 vo cal Each of the 45 guitar effect presets has four components while the vocal effect presets have only one When a bank and slot are selected if a preset effect is recalled and edited that bank slot is automatically filled with the edited effect Components DIST Distortion gain TONE Tone control DRIV Overdrive gain COMP Compressor gain FLA Flanger setting REV Reverb setting DLY D...

Page 20: ...n mix param eter with MIX 1 following VIB and MIX 2 following DLY Press either the UP or DOWN key to mix the VIB and DLY components in the effect 8 Continue to select the compo nents to edit by pressing either the PREV or NEXT key then select the value for the selected compo nents by pressing either the UP or DOWN key 9 The last parameter of the sequence for each library effect preset is LVL the out...

Page 21: ...V v03 Shout d04 DIS TONE PHA DLY o04 DRIV TONE PHA DLY c04 COMP TONE PHA DLY v04 Mood Vocal d05 DIS TONE EXC REV o05 DRIV TONE EXC REV c05 COMP TONE EXC REV v05 Response d06 DIS TONE EXC DLY o06 DRIV TONE EXC DLY c06 COMP TONE EXC DLY v06 Proclaim d07 DIS TONE CHO REV o07 DRIV TONE CHO REV c07 COMP TONE CHO REV v07 Quivering Voice d08 DIS TONE CHO DLY o08 DRIV TONE CHO DLY c08 COMP TONE CHO DLY v0...

Page 22: ...P or DOWN key to fast forward or backward through the tempos You can set the value between 40 and 220 BPM beats per minute and you will hear the sound of metronome beats as soon as you set the value Choosing the beats 1 Press either the PREV or NEXT key to select BEAT 2 Select the rhythm 2 through 6 or OFF by pressing either the UP or DOWN key When you choose a rhythm you will notice that the first...

Page 23: ...r menu to set the note on the display and then tune as above You can choose the note from 6E 5A 4D 3G 2B and 1E the names of the guitar strings in standard tuning The selected note is shown on the display as TUNE XX Using the oscillator The CD GT1MKII can output notes sine waves in the standard Western musical scale between C and B in a three octave range Standard tuning frequency in this case is ...

Page 24: ... menu and select one of the four functions by pressing either the UP or DOWN key Choose from the following list MIX mix balance See Changing your preferences TMP CD playback tempo See Pitch and tempo changes KEY key control See Pitch and tempo changes FIN fine tuning See Pitch and tempo changes CUE key function This function allows you to set the function of the CUE key Select CUE in the Setup menu...

Page 25: ...nce 1 kΩ Maximum output level PHONES 18mW into 32 Nominal input levels LINE IN MIC IN GUITAR IN 10dBV 40dBV 15dBV Voltage requirements DC 9V PS PS5 AC adapter AA batteries x 4 NiMH or alkaline Power consumption 4W PS PS5 AC adapter Dimensions w x d x h including feet 232 x 138 x 40 mm 9 1 x 5 4 x 1 6 in Weight excluding batteries 620g 1 lb 6 oz CD playback characteristics Frequency response 20Hz t...

Page 26: ...P 09810 Mexico DF MEXICO 52 555 581 5500 www tascam com TEAC UK LIMITED 5 Marlin House Croxley Business Park Watford Hertfordshire WD18 8TE UNITED KINGDOM 44 1923 438880 www tascam co uk TEAC EUROPE GmbH Bahnstrasse 12 65205 Wiesbaden Erbenheim GERMANY 49 611 71580 www tascam de TEAC FRANCE SA 17 Rue Alexis de Tocqueville CE 005 92182 Antony Cedex FRANCE 33 1 42 37 01 02 www tascam fr TEAC ITALIAN...

Reviews: