12
TASCAM SERIES 102i / SERIES 208i
Making various settings
NOTE
In order to enable the computer to handle digital audio signals
smoothly, other loads on the computer should be minimized as
much as possible.
We recommend that you quit unneeded applications before
use.
Opening the Settings Panel
Launch the Settings Panel software.
Windows
From the
Start
menu select “
SERIES 102i_208i
” under “
TASCAM
”.
Mac
Using the “
Finder
”, select “
SERIES 102i_208i
” from the “
Applica-
tions
” folder and launch it to open the “
Settings Panel
” on the com-
puter display.
Settings Panel overview
The Settings Panel has three pages.
Click a tab at the top of the Settings Panel to open that page.
0
MIXER
: Make built-in mixer and effect settings.
0
INFORMATION
: This shows the current status of the driver and
information about connections. You can also
make various settings.
0
ROUTING
: Make output settings (and Monitor Control settings
for the SERIES 208i).
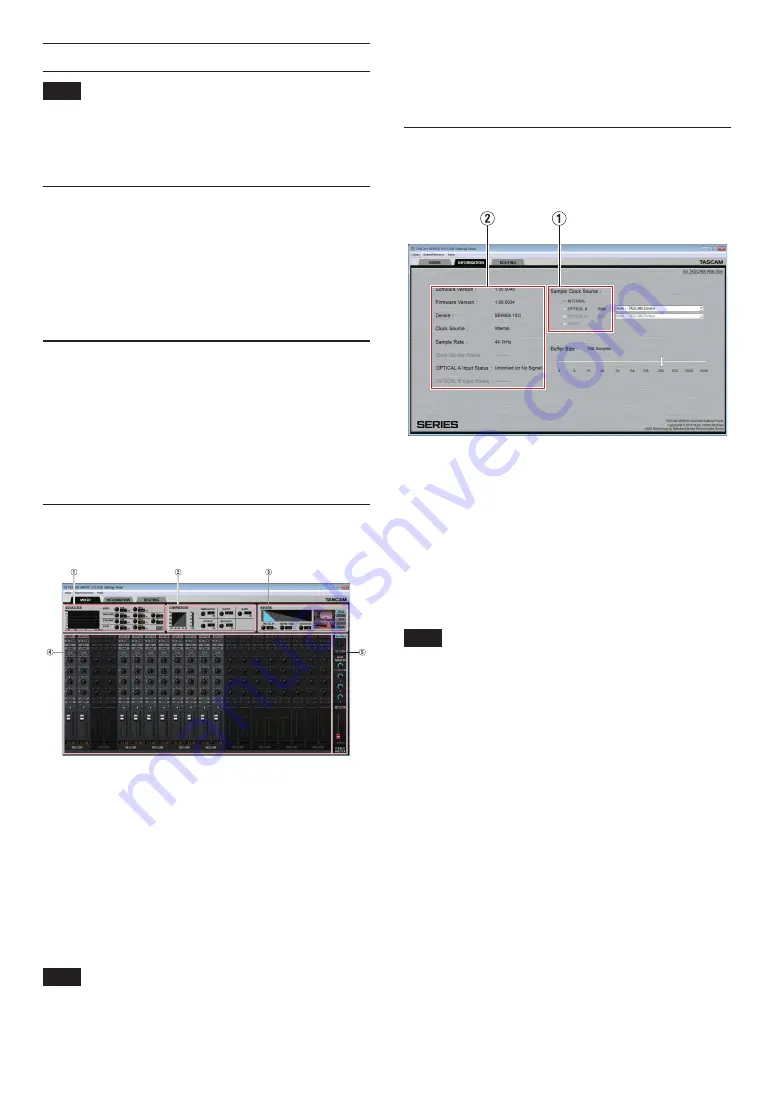
Making settings on the MIXER screen
Click the
MIXER
tab on the Settings Panel to open the
MIXER
page
as shown below.
SERIES 102i Settings Panel MIXER page in Windows
1
EQUALIZER
Equalizer settings are shown for the channel selected in the
Channel Mixer area.
2
COMPRESSOR area
Compressor settings are shown for the channel selected in the
Channel Mixer area.
3
REVERB area
This shows the reverb settings.
4
Channel Mixer area
Check and make settings for each channel.
NOTE
All channels are available when a SERIES 208i is connected.
When a SERIES 102i is connected, the
INPUT 3
,
INPUT 4
and
OPT
B1 - B8
channels cannot be used and will appear dimmed.
5
Output adjustment area
Make
REVERB
,
AUX MASTER
and
STEREO MASTER
settings here.
For details about other settings, see “MIXER page” in “5 - Using the
Settings Panel” of the Reference Manual.
Making settings on the INFORMATION
screen
Click the
INFORMATION
tab on the Settings Panel to open the
IN-
FORMATION
page as shown below.
Windows Settings Panel
INFORMATION
page
For details about settings, see“ INFORMATION page” in“ 5 - Using
the Settings Panel” of the Reference Manual.
Setting the sample clock source
1.
Click the
INFORMATION
tab on the Settings Panel to open the
INFORMATION
page as shown below.
2.
Click
Sample Clock Source
(
1
) on the
INFORMATION
page to
set the sample clock source.
Options:
INTERNAL
,
OPTICAL A
,
OPTICAL B
,
WORD
NOTE
When set to
OPTICAL A
,
OPTICAL B
or
WORD
, if no signal is input
through the corresponding connector or synchronization be-
comes impossible, “
Unlocked
” will appear for the
Clock Source
Status
item in the status area (
2
) and the unit’s
STANDBY
indi-
cator will blink. (“
Manually Configured
” will appear when using
OPTICAL A/B with the Rate item set to Manual.)


