background image

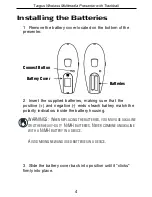
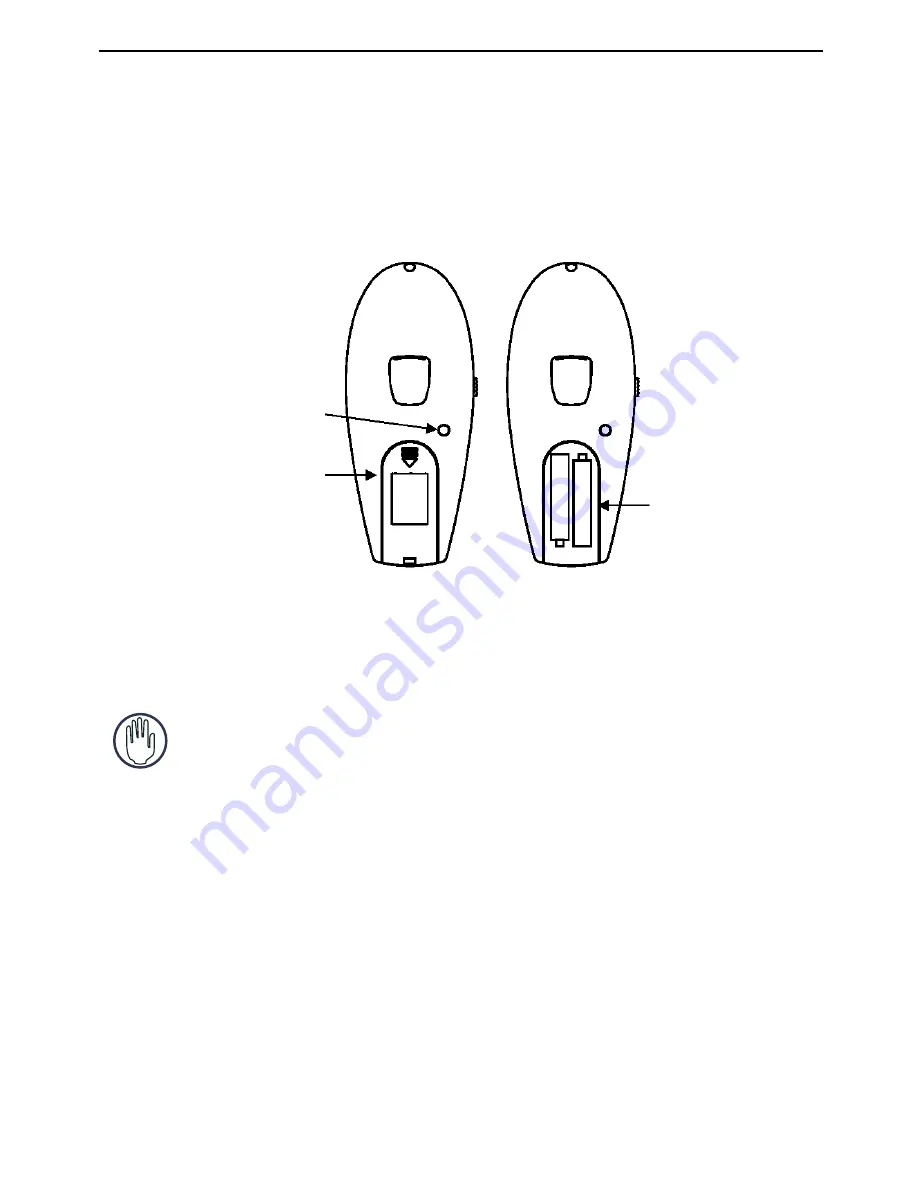
Installing the Batteries

3 Slide the battery cover back into position until it “clicks” 
firmly into place.

Connect Button

Battery Cover

Batteries

1  Remove the battery cover located on the bottom of the 
presenter.

2 Insert  the supplied  batteries,  making  sure  that  the 
positive  (+)  and  negative  (-)  ends  ofeach battery match the 
polarity indicators inside the battery housing.

WARNINGS:  W

HEN REPLACING THE BATTERIES

YOU MAY USE ALKALINE 

OR OTHER HEAVY

-

DUTY

  N

I

MH 

BATTERIES

. N

EVER COMBINE ANALKALINE 

WITH A 

 N

I

MH 

BATTERY IN A DEVICE

A

VOID MIXING NEW AND USED BATTERIES IN A DEVICE

.

Targus Wireless Multimedia Presenter with Trackball

4

Summary of Contents for AMP01US

Page 1: ...USER GUIDE Wireless Multimedia Presenter with Trackball...

Page 2: ...TLY AS PROLONGED EXPOSURE CAN BE HAZARDOUS TO THE EYES MOMENTARY EXPOSURE FROM A LASER POINTER SUCH AS AN INADVERTENT SWEEP OF THE LIGHT ACROSS A PERSON S EYES MAY CAUSE TEMPORARY FLASH BLINDNESS SIMI...

Page 3: ...multimedia presenter With thepresenter you can control cursor movement anywhere within 20m of its receiver and project ared laser pointer beam NOTE THE ACTUAL EFFECTIVE DISTANCE MAY INCREASE OR DECRE...

Page 4: ...r 2 Insert the supplied batteries making sure that the positive and negative ends ofeach battery match the polarity indicators inside the battery housing WARNINGS WHEN REPLACING THE BATTERIES YOU MAY...

Page 5: ...port on your computer Windows 98SE Me Operating Systems The Add New Hardware Wizard appears If it does not the operating system has installed the default driver automati cally No othersteps are necess...

Page 6: ...receiver and the driver software is installed you mustestablish a communications link between the presenter and its receiver BEFORE you canuse the presenter Make sure that your computer is turned on...

Page 7: ...orking modes Mouse Mode Internet hot key E mail hot key The presenter s default setting is Mouse mode To change modes press the Mode select button The mode indicator LED illuminates to indicate the mo...

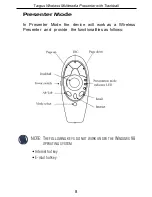
Page 8: ...h Trackball NOTE THE FOLLOWING KEYS DO NOT WORK UNDER THE WINDOWS 98 OPERATING SYSTEM Internet hot key E mail hot key Presenter Mode In Presenter Mode the device will work as a Wireless Presenter and...

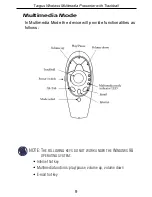
Page 9: ...l Multimedia Mode NOTE THE FOLLOWING KEYS DO NOT WORK UNDER THE WINDOWS 98 OPERATING SYSTEM Internet hot key Multimedia functions play pause volume up volume down E mail hot key In Multimedia Mode the...

Page 10: ...mance and RF reception Place the receiver at least 15 cm away from all electrical devices such as your monitor speakers or external storage devices The presenter will enter a suspend mode at the same...

Page 11: ...Never point the presenter at people especially their faces or look directly into the presenter s laser beam to avoid possible eye damage Avoid pointing the presenter s laser beam at a mirror or other...

Page 12: ...annels 8 Security IDs 4096 Power supply Two AAA batteries Alkaline RF output power 0 dBm Frequency 2 4GHz Effective distance 20m Power consumption Working mode 45mA Standby mode 700 uA Sleep mode 300...

Page 13: ...their base units that are near the presenter s receiver Increase the distance between the presenter s receiver and the rest of your computerequipment Use the USB extension cable if necessary Make sure...

Page 14: ...workmanship for one year If your Targus accessory is found to be defective within that time we will promptly repair or replace it This warranty does not cover accidental damage wear and tear or conseq...

Page 15: ...na Increase the separation between the equipment and receiver Connect the equipment into an outlet on a circuit different from that to which the receiver is connected Consult the dealer or an experien...

Page 16: ...Visit our Website at www targus com Features and specifications subject to change without notice 2006 Targus Group International Inc and Targus Inc AMP01US 410 0020 001C...

Reviews: