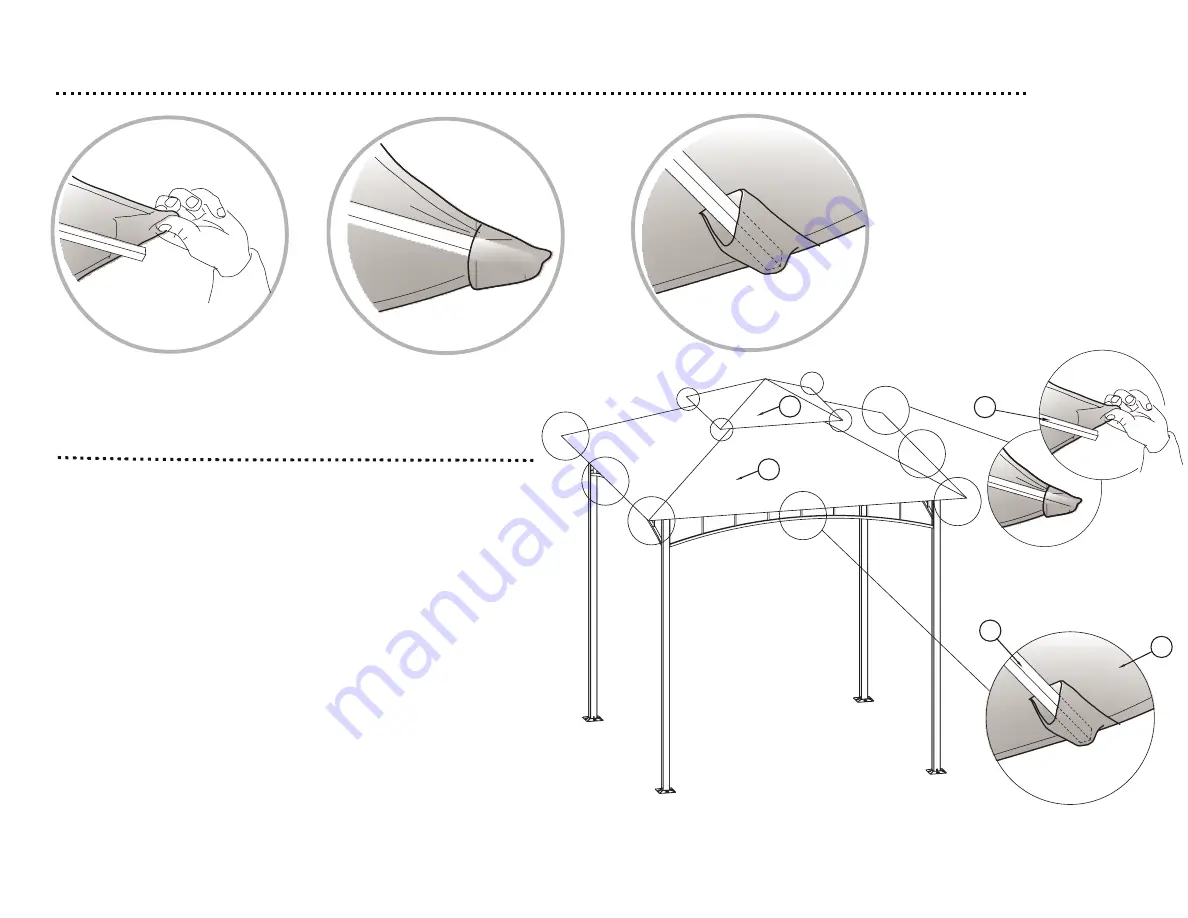
14
step 08:
Do not completely tighten screws until all screws are in place.
1. Slip the corner inclined tube (C) and middle inclined tube (D) into
the top canopy (L) and canopy (M).
2.
1.
3.
L
M
C
D
Page 1: ...8 x 8 FT Steel Gazebo with Curtains style GFS20200B dpci 009050059 assembly instructions TM Fairmont ...
Page 2: ...xtreme heat the Gazebo needs to be stored in a dry sheltered place to prolong the life and to avoid damage to the Gazebo IMPORTANT WARNING Unpack the box on a clean soft level surface and make s ure all parts have been included To replace missing or damaged parts please call 855 MYTGTHOME 855 698 4846 during 7am 7pm CST M F and 8am 5pm CST Saturday Congratulations on your latest Target purchase No...
Page 3: ...n Toll Free at 855 MYTGTHOME 855 698 4846 during 7am 7pm CST M F and 8am 5pm CST Saturday Code Yotrio 2020 before you begin 1 Check for damage or missing parts Call 855 MYTGTHOME 855 698 4846 to order missing supplies 2 Use the carton as a working surface to prevent product damage during assembly 3 Gather all tools prior to assembly 4 This Gazebo is heavy may require two to four adults for safe as...
Page 4: ... contents introduction hardware parts list assembly 2 3 5 6 7 16 QUESTIONS 4 Please call 855 MYTGTHOME 855 698 4846 parts and service For faster service have the style number and DPCI number ready when calling ...
Page 5: ...re 5 Part O 28 Part P 16 Part R 12 Part T 2 M6 15mm bolt with washer nut allen wrench Part S 16 ground spike Part U 1 wrench Part Q 4 M6 55mm bolt with washer Part V 4 plastic washer M6 30mm bolt with washer ...
Page 6: ...ddle inclined tube 4 E F G H I J shade rod 4 top connector 1 U shaped part 1 4 U shaped part 2 4 post base 4 tube connector 8 K L M N connection buckle 32 top canopy 1 4 1 canopy curtain A A A A B B B B C C C C D D D E E E E F G G G G H H H H I I I I J J J J J J J K N M L V V V V ...
Page 7: ...rface such as carpet as a working surface to prevent product damage during assembly 1 Attach the U shaped part 1 G to the post leg A secure with M6 15mm bolt with washer O using the allen wrench T 2 Insert the post base I into the post leg A secure with M6 15mm bolt with washer O using the allen wrench T 1 2 A A A I I O O O G 3 G 3 Repeat above steps until 4 U shaped part 1 G and post base I are s...
Page 8: ...tely tighten screws until all screws are in place Part T 1 allen wrench 1 Attach the beam B to the post leg A secure with M6 15mm bolt with washer O using allen wrench T 2 Repeat above step until the 4 beam B are secured to the post leg A A A A A A B B B B B O ...
Page 9: ...03 Do not completely tighten screws until all screws are in place J J J J E E 1 Attach the tube connector J to the shade rod E 2 Repeat above step until the 8 tube connectors J are attached to the shade rod E ...
Page 10: ...part 2 H to the beam B secure with M6 55mm bolt with washer Q plastic washer V and nut R using allen wrench T and wrench U 3 Repeat above steps until 4 shade rods E and U shaped part 2 H are secured with the beam B B B B B B B B H H H H E E E E J J R P P V Q 2 1 Part P 8 M6 30mm bolt with washer Part T 1 allen wrench Part R 4 nut Part Q 4 M6 55mm bolt with washer Part U 1 wrench Part V 4 plastic w...
Page 11: ...11 step 05 Do not completely tighten screws until all screws are in place C C C C C C C C D D D D D D D D F F 1 Attach the corner inclined tube C and middle inclined tube D to the top connector F ...
Page 12: ...tach the middle inclined tube D to U shaped part 2 H secure with M6 30mm bolt with washer P and nut R using allen wrench T and wrench U 3 Repeat above steps until the 4 corner inclined tubes C are secured to the U shaped part 1 G and the 4 middle inclined tubes D are secured to the U shaped part 2 H 1 2 C C C C C D D D D P P G R R H Part P 8 Part R 8 M6 30mm bolt with washer nut Part U 1 wrench Pa...
Page 13: ...13 step 07 Do not completely tighten screws until all screws are in place 1 Attach the canopy M and top canopy L on the top M L ...
Page 14: ...14 step 08 Do not completely tighten screws until all screws are in place 1 Slip the corner inclined tube C and middle inclined tube D into the top canopy L and canopy M 2 1 3 L M C D M ...
Page 15: ...n screws until all screws are in place 1 Hanging the curtain N to the beam B by using the connection buckle K 2 Insert the ground spikes S through the post base I and into ground 2 1 A A A A N N N N I I I I S E K Part S 16 ground spike ...
Page 16: ...16 step 10 1 Tighten all bolts Ensure all connections are secure before use You are now ready to enjoy your new gazebo ...
Page 17: ......
Page 18: ...TM 2020 Target The Bullseye Design is a trademark of Target Brands Inc All rights reserved ...