background image


3.   MAINTENANCE


IOM manual Tapflo Metal Series


24


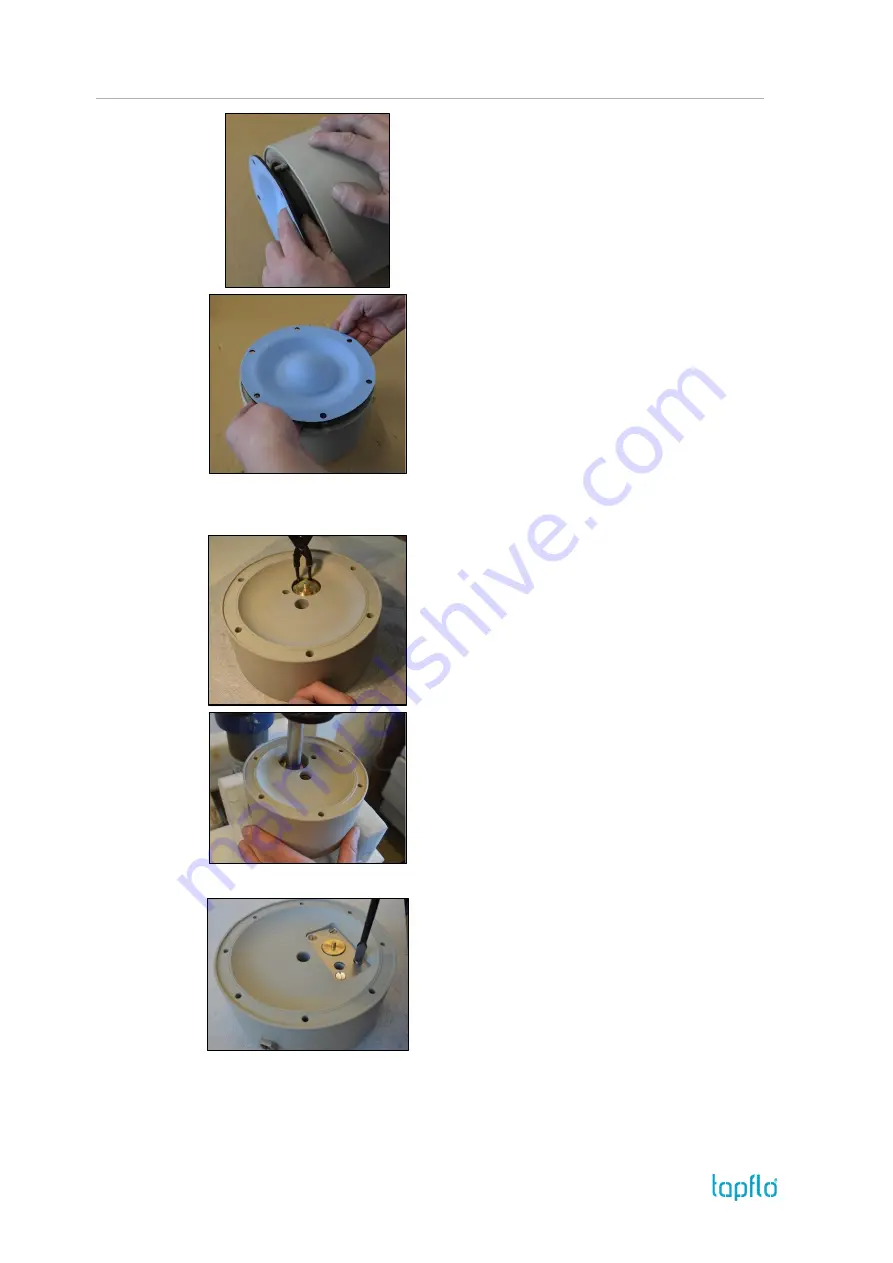
Fig. 3.7.5 

Unscrew the diaphragm [15] from one side of the pump. 


Fig. 3.7.6 

Take out the second diaphragm [15] along with the shaft 
[16]. 


a)


Circlip mounted air valve 

 T/TX70, T120, T820 


Fig. 3.7.7 

Using pliers remove both  circlips [27] from the centre 
block [12].  

ATTENTION!

 While doing this, cover yourself with your 

other hand, as the circlip easily flips away 


Fig. 3.7.8 

Press  out  the  air  valve  [61]  by  means  of  a  pressing 
device. Be careful not to damage the brass edges of the 
air valve. 


b)


Plate mounted air valve 

 TX120, T/TX220, T/TX420 


Fig. 3.7.9 

Unscrew  plate  screws  [2711]  from  both  sides  of  the 
centre body [12] and take  out the left and right plate 
[271]. 

Summary of Contents for Metal Series

Page 1: ...Metal Series Diaphragm Pumps Original Instruction edition 2020 Read this instruction manual carefully before you install and operate the pump Pump models TX25 T TX70 T TX120 T TX220 T TX420 T TX820...

Page 2: ...ction of discharge pipe 10 1 7 Health and safety 10 1 7 1 Protection 10 1 7 2 Explosion hazardous environments ATEX 11 1 7 3 Air pressure 11 1 7 4 Noise level 12 1 7 5 Temperature hazards 12 1 8 Air c...

Page 3: ...bly procedure 23 3 7 2 Disassembly procedure 23 3 8 Stainless steel assembly of the pump 25 3 8 1 Test run 26 4 OPTIONS 27 4 1 Drum pump TD 27 4 2 Twin connections TT 27 4 3 Filter press pump TF 28 4...

Page 4: ...s 42 5 2 6 T820 Spare parts drawing 44 5 2 7 T820 Spare parts list 45 5 3 Stocking recommendation 46 5 4 How to order parts 47 5 5 Pump code 47 6 DATA 48 6 1 Capacity curves 48 6 2 Capacity changes 48...

Page 5: ...of declaration AIR OPERATED DIAPHRAGM PUMPS The object of the declaration described above is in conformity with the relevant Union harmonization legislation Directive 2006 42 EC of European Parliament...

Page 6: ...ried out by J S Hamilton Poland Sp z o o Notified Body No 2057 and as a result a certificate No JSHP 19 ATEX 0018X was issued The object of the declaration described above is in conformity with the re...

Page 7: ...on manual This is what they say This symbol stands next to all safety instructions in this instruction manual where danger to life and limb may occur Observe these instructions and proceed with utmost...

Page 8: ...ltaneously transmits the air pressure to the liquid in the second chamber on the left of the housing pushing it towards the discharge port During each cycle the air pressure on the back of the dischar...

Page 9: ...is to be stored prior to installation place it in a clean location The pump should be stored in an ambient temperature of 15 C 59 F to 25 C 77 F and relative humidity below 65 It should not be exposed...

Page 10: ...t the bottom of the pump to have best suction capability 2 Make sure that the connection between the hose and the pump is completely tight otherwise the suction capability will be reduced 3 Always use...

Page 11: ...ce that may be exposed to gas T4 135 C T6 85 C EPL protection level Gb Db high protection Earth connection of the pump and other equipment Connect a suitable earth wire to the stainless steel earth co...

Page 12: ...so general max temperatures based on water in chapter 5 DATA When the pump is exposed to ambient temperature variations or if there is big difference between the temperature of the product and the sur...

Page 13: ...e compressed air is not fitted with an air dryer it is recommended to use a water separator to remove the extent of water from the prepared air To facilitate the operation of the pump we recommend an...

Page 14: ...priming The Tapflo pump is designed to pull a high vacuum It is able to evacuate an empty suction pipe without any damage to the pump The suction lift is up to 5 meters 16 4 ft from an empty suction p...

Page 15: ...ot necessary if the pump is filled with liquid before start When the pump has been filled with liquid the air pressure flow may be raised in order to increase the suction capacity of the pump The perf...

Page 16: ...is method keep in mind that air must be supplied to the pump This is essential to keep the diaphragms in balance what protects them from premature failure 2 By cutting off the air supply NOTE When usi...

Page 17: ...be an indication of wearing parts see chapter 3 4 Location of faults below Leaking liquid from the pump and changes of performance may also be detected Routine inspections should be conducted frequen...

Page 18: ...ts Improve air quality see chapters 1 7 1 and 2 2 2 Bad flow pressure Pressure fall in air supply Pressure losses on suction side Air supply air valve leaking Increase air pressure via a filter regula...

Page 19: ...cedure Be sure to drain all liquid from the pump Cleanse or neutralize the pump thoroughly Disconnect the air supply and then the suction and discharge connections 3 5 2 Disassembly procedure Fig 3 5...

Page 20: ...ck up O rings 47 by means of a pointing tool ATTENTION Take extra care when carrying out of this operation If any scratches are made on the inner surface of the centre body air leakage will occur Duri...

Page 21: ...pressing device for this operation ATTENTION When inserting the TX25 size air valve replace the shaft with a screw and a nut to make sure the air valve assembly remains properly fastened Fig 3 6 3 Wh...

Page 22: ...en fastening the screws remember to do it according to the tightening procedure and with the appropriate torque NOTE After a few weeks of operation retighten the screws with the appropriate torque 3 6...

Page 23: ...ions 3 7 2 Disassembly procedure Fig 3 7 1 Unscrew the housing nuts 37 Fig 3 7 2 Lay down the pump on one side and lift one of the housings 11 Fig 3 7 3 Lift the loose manifolds 13 and centre block 12...

Page 24: ...iers remove both circlips 27 from the centre block 12 ATTENTION While doing this cover yourself with your other hand as the circlip easily flips away Fig 3 7 8 Press out the air valve 61 by means of a...

Page 25: ...p The assembly procedure is done in the reverse order to the disassembly Nevertheless there are a few things that you have to remember in order to assemble the pump correctly Fig 3 8 1 Before insertin...

Page 26: ...embly of the stoppers you can use an allen hey and pliers to aid yourself Fig 3 8 7 When fastening the nuts remember to do it according to the tightening procedure and with the appropriate torque NOTE...

Page 27: ...Material 6 xxx 63 1 Drum inlet Alu AISI 316L 6 xxx 64 1 Pump tube Alu AISI 316L 6 xxx 65 1 Handle AISI 316L 6 xxx 171 4 Domed nut for pump feet A4 70 6 xxx 172 4 Washer for pump feet A4 70 6 xxx 17 4...

Page 28: ...dditional nuts A4 70 6 xxx 38 4 Additional washers A4 70 6 xxx 99 1 Complete booster 6 xxx 990 1 Booster mounting plate AISI 304 6 xxx 996 4 Booster mounting screws A4 70 6 xxx 997 4 Booster mounting...

Page 29: ...nt screw clockwise until the pressure gauge indicates 0 5 bar below the required set point i e 3 0 bar switching 2 5 bar set 5 Turn off the air supply 6 Remove the pressure gauge and re install the M5...

Page 30: ...ntegrated pulsation dampener are ATEX rated Available only in aluminium version for pump sizes TX25 TX70 TX120 TX220 and TX420 Art no Q ty Description Material 6 xx1 112 1 Dampener housing pump outlet...

Page 31: ...NBR std Klingerseal EPDM Klingerseal FKM x x 22 4 Stopper AISI 316L 23 4 Valve ball EPDM PTFE AISI 316L PU NBR ceramic FKM x 25 1 Muffler PP x 27 2 Circlip Cr3 coated steel 30 6 O ring NBR standard E...

Page 32: ...5 SPARE PARTS IOM manual Tapflo Metal Series 32 5 1 3 TX70 TX420 Spare parts drawing...

Page 33: ...in outlet Klingerseal NBR std Klingerseal EPDM Klingerseal FKM X X 22 4 Stopper AISI 316L 23 4 Valve ball EPDM PTFE AISI 316L PU NBR ceramic FKM X 25 1 Muffler PP X 27 2 Circlip Cr3 coated steel 30 6...

Page 34: ...sensor Aluminium CI 74 1 Inductive sensor CuZn 76 1 Sensing plate AISI 316L Diaphragm stroke sensor 5C 116 2 Pump housing for ball lifter Aluminium 95 4 Ball lifter AISI 316L Optional connections 3 70...

Page 35: ...phragm spacer PA6 Aluminium 169 1 Diaphragm shaft AISI 304L 339 2 Spacer plug PE1000 379 12 16 Screw for TB pump Zinc plated steel 4 for TXB70 TXB120 6 for TX220 TXB420 TXB120 TX220 TXB420 only 12 for...

Page 36: ...5 SPARE PARTS IOM manual Tapflo Metal Series 36 5 1 6 TX820 Spare parts drawing...

Page 37: ...shaft set AISI 316L X 18 4 O ring set in outlet Klingerseal NBR std Klingerseal EPDM Klingerseal FKM X X 22 4 Stopper assembly AISI 316L NBR EPDM O ring 23 4 Valve ball EPDM PTFE PU NBR X 25 1 Muffler...

Page 38: ...5 SPARE PARTS IOM manual Tapflo Metal Series 38 5 2 Stainless steel pumps 5 2 1 T70 T120 Spare parts drawing...

Page 39: ...FKM std X X 22 4 Valve ball stop AISI 316L 23 4 Valve ball EPDM PTFE NBR PU AISI 316L ceramic X 25 1 Muffler PP X 26 1 Air intake adapter Brass 27 2 Circlip Cr3 coated steel 30 6 O ring NBR standard E...

Page 40: ...5 SPARE PARTS IOM manual Tapflo Metal Series 40 5 2 3 T220 T420 Spare parts drawing...

Page 41: ...KM std X X 22U 2 Valve ball stop upper AISI 316L 22L 2 Valve ball stop lower AISI 316L 23 4 Valve ball EPDM PTFE NBR PU AISI 316L ceramic X 25 1 Muffler PP X 26 1 Air intake adapter Brass 271 1 Set of...

Page 42: ...ll lifter AISI 316 95 4 Ball lifter AISI 316L Optional connections 3 70 2 Flange pipe thread AISI 316L 71 2 ANSI flange ring AISI 316L 73 2 DIN flange ring AISI 316L 712 2 JIS flange ring AISI 316L 72...

Page 43: ...6 Diaphragm O ring EPDM FKM NBR 159 2 Diaphragm spacer PE 169 1 Diaphragm shaft AISI 304L 339 2 Spacer plug PP TB70 TB120 TB220 TB420 TB70 TB120 TB220 TB420 TB120 TB220 TB420 only Pump with pressure...

Page 44: ...5 SPARE PARTS IOM manual Tapflo Metal Series 44 5 2 6 T820 Spare parts drawing...

Page 45: ...2 Hexagon socket head cap screw A2 70 1791 2 Lifting eye bolt A2 70 1792 2 Washer A4 18 4 Flat gasket EPDM PTFE X X 181 4 O ring FEP FKM X X 222 4 Valve seat AISI 316L 227 16 Leading screw AISI 316L...

Page 46: ...A C Pos Description Q ty KIT LIQ 15 Diaphragm 2 18 O ring set in outlet 4 23 Valve ball 4 Pos Description Q ty KIT AIR 18 O ring set in outlet 4 61 Air valve complete 1 25 Muffler 1 TX70 A C TX120 A C...

Page 47: ...pump D Drum pump F Filter press pump L Draining system T Twin inlet outlet pump X ATEX approved group II cat 2 IV Material of wetted metal parts A Aluminium S AISI 316L X PTFE coated aluminium C Cast...

Page 48: ...sities and suction lifts Example A flow of 30 litre minute is desired The discharge pressure is calculated to 25 mWC We choose a T70 pump It requires an air pressure of 4 bar and will consume approxim...

Page 49: ...tion standard in stainless steel pumps BSP female thread G BSP female thread G BSP female thread G BSP female thread G DIN 2642 flange TECHNICAL DATA PUMP SIZE T70 S T120 S T220 S T420 S T820 S Max ca...

Page 50: ...44 40 75 F 13 20 20 0 51 0 79 0 79 G 11 18 20 26 38 50 0 43 0 71 0 79 1 02 1 50 1 97 G2 17 20 31 36 25 0 67 0 79 1 22 1 42 0 98 H 12 19 20 29 30 53 0 47 0 75 0 79 1 14 1 18 2 09 H2 13 5 23 5 34 32 13...

Page 51: ...6 DATA IOM manual Tapflo Metal Series 51 Dimensions T820 S...

Page 52: ...s reacting on the manifolds T25 Direction Load N inlet outlet Moment of force inlet outlet Nm X 27 4 9 Y 27 4 9 Z 27 4 9 T70 Direction Load N inlet outlet Moment of force inlet outlet Nm X 31 6 3 Y 31...

Page 53: ...type Serial No see name plate or stamped on pump housing Description of the fault The installation Liquid Temperature C Viscosity cPs Spec grav kg m3 pH value Content of particles of max size mm Flow...

Page 54: ...er documents specifically made available to Tapflo before entering into this agreement c high quality materials are used in the construction of the pumps and that machining and assembly are carried ou...

Page 55: ...t in accordance with standard CE normative and are tested where applicable by Tapflo Approval and tests by other control authority are for the customer s account The products shall not be considered d...

Page 56: ......

Reviews: