background image


3.   MAINTENANCE


IOM manual CTM mag drive pumps


17


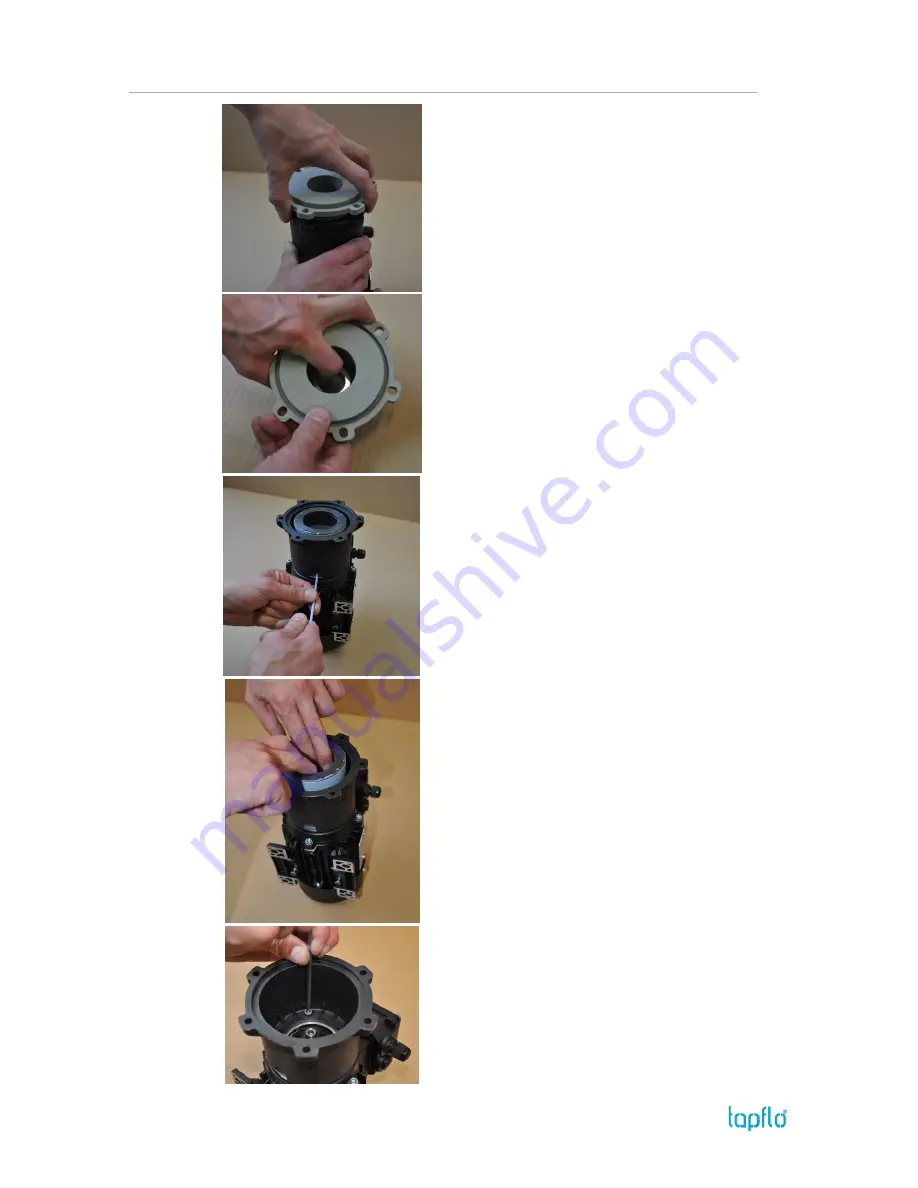
Fig 3.3.8 

Take out the isolation shell [12] form the lantern [11].


Fig 3.3.9 

Pull out the rear static bushing [1522] along with the O-
ring [1822].


Fig 3.3.10 

Loosen  the  lock  screws  (2  x  [161]  on  CTM20/25;  1  x 
[1611] and 2 x [1612] on CTM32). 


Fig 3.3.11 

Take  out  the  external  magnet  assembly  [16]  form  the 
lantern [11].


Fig 3.3.12 

Unscrew the motor mounting screws [111] and remove 
the lantern [11] form the motor.


Summary of Contents for CTM20-7

Page 1: ...ntu Pump models CTM20 7 CTM25 8 CTM25 10 CTM32 12 5 CTM40 12 5 CTM50 12 5 CTM Magnetic Drive Centrifugal Pumps Original Instruction edition 2017 rev 1 Read this instruction manual carefully before you...

Page 2: ...ion of suction pipe 7 1 7 Health and safety 7 1 7 1 Protection 7 1 7 2 Electrical safety 7 1 7 3 Chemical hazard 7 1 7 4 Dry running 7 1 7 5 Noise level 8 1 7 6 Temperature hazards 8 1 7 7 Rotating pa...

Page 3: ...SPARE PARTS 19 4 1 Spare parts drawing 19 4 2 Spare parts list 19 4 3 Recommended spare parts 20 4 4 How to order parts 20 5 DATA 21 5 1 Pump code 21 5 2 Dimensions 22 5 3 Materials data and limits 23...

Page 4: ...ration described above is in conformity with the relevant Union harmonisation legislation Directive 2006 42 EC of European Parliament and of the Council of 17 May 2006 on machinery amending Directive...

Page 5: ...ructions In addition to the instructions in this instruction manual the general safety and accident prevention regulations must be observed This signal stands at points in this instruction manual of p...

Page 6: ...n force thus forcing the impeller to rotate If the impeller gets blocked or the pumped liquid will be too dense and too much torque will be generated on the motor shaft the magnet will de couple and n...

Page 7: ...pump is operated must be sufficiently ventilated Excessive temperature humidity or dirt may affect the pump operation Behind the cooling fan of the motor there must be sufficient room for the hot air...

Page 8: ...ording to local and national safety rules The pumps are constructed for particular applications Do not use the pump on applications different from that for which it was sold without consulting us to a...

Page 9: ...hazardous for personnel in the vicinity of the pump piping The hot or cold parts of the machine must be protected to avoid accidental contacts 1 7 7 Rotating parts Do not tamper with the protection of...

Page 10: ...fter valves and instruments 9 YES attachment for gauge or safety pressure switch 10 NO elbow joints and other parts on the pump discharge and suction lines 11 YES check valve with negative suction lif...

Page 11: ...ptional instruments The optional instruments can indicate if pump is working in an abnormal way The abnormal conditions can be caused by accidentally closed valves lack of pumped liquid overloads etc...

Page 12: ...closed The motor must turn in the same direction as the arrow shown on the pump The direction of rotation is always clockwise looking at the pump from the motor side check by starting briefly then lo...

Page 13: ...p again following the instructions of chapter 2 1 1 Starting the pump 2 2 Stopping the pump It is advisable to close the discharge shut off regulation valve gradually and stop the motor immediately af...

Page 14: ...ideal working conditions Please note that it is a conservative figure since the actual duty point of your pump can substantially modify this value Additional factors such as intermittent operation ty...

Page 15: ...e head by increasing pipe diameter and or reduce number of valves and bends X X Flow rate too high Reduce the flow Partially close the discharge valve Reduce the impeller diameter contact us Reduce th...

Page 16: ...ith the pumped liquid make sure that the pump has been fully emptied and washed When draining the liquid make sure that there is no danger for people or the environment The static and rotating bushing...

Page 17: ...he impeller 90 and isolation shell 11 Fig 3 3 4 Using a sharp tool take off the front rotating bushing 1511 NOTE Level the bushing equally on each side Fig 3 3 5 Using a sharp tool take off the rear r...

Page 18: ...3 9 Pull out the rear static bushing 1522 along with the O ring 1822 Fig 3 3 10 Loosen the lock screws 2 x 161 on CTM20 25 1 x 1611 and 2 x 1612 on CTM32 Fig 3 3 11 Take out the external magnet assemb...

Page 19: ...bushes 1521 1522 O rings 1811 1821 1812 1822 For spare part kits see chapter 4 3 Recommended spare parts 3 4 Assembly of the pump The assembly procedure is done in the reverse order to the disassembl...

Page 20: ...SiC 1512 Rear rotating bushing 1 1 1 1 1 1 PTFE graphite SiC 1521 Front static bushing 1 1 1 1 1 1 Al2O3 ceramic SiC 1522 Rear static bushing 1 1 1 1 1 1 Al2O3 ceramic SiC 16 External magnet assembly...

Page 21: ...25 10 z material P for PP K for PVDF WETEND CTMxx yz Pos Description Q ty 12 Isolation shell rear casing 1 13 Pump casing 1 141 Casing mounting screw 6 142 Casing mounting washer 6 143 Casing mounting...

Page 22: ...terial P PP Polypropylene K PVDF Polyvinylidene fluoride IV Pump options 1 Casing O ring blank EPDM for PP FKM for PVDF pump F FEP Silicone V FKM 2 Static bushing blank Al2O3 ceramic S SiC silicone ca...

Page 23: ...402 5 446 453 9 78 10 98 13 17 14 74 15 85 17 56 17 83 M 36 40 45 54 5 56 63 70 1 42 1 57 1 77 2 15 2 20 2 48 2 76 N 71 80 80 100 125 140 2 80 3 15 3 15 3 94 4 92 5 51 P 9 10 10 13 14 15 0 22 0 28 0 2...

Page 24: ...32 CTM40 and CTM50 PP pumps PN6 at 20 C PN2 at 70 C PVDF pumps PN6 at 20 C PN2 at 90 C Temperature PP pumps 0 C 70 C PVDF pumps 0 C 80 C CTM20 0 C 90 C CTM25 32 40 50 Kinematic viscosity 200 cSt max D...

Page 25: ...5 DATA IOM manual CTM mag drive pumps 24 5 5 Performance curves The performance curves are based on water at 20 C Speed 2900 rpm See Tapflo Infopack for detailed curves here...

Page 26: ...ment of force inlet outlet Nm X 15 3 Y 20 4 Z 15 3 CTM 25 Direction Load N inlet outlet Moment of force inlet outlet Nm X 15 3 Y 20 4 Z 15 3 CTM 32 Direction Load N inlet outlet Moment of force inlet...

Page 27: ...oduct will meet the precise needs of the Customer except for those purposes set out in any invitation to render documents or other documents specifically made available to Tapflo before entering into...

Page 28: ...mination of the pump Replaced faulty parts or components will become the property of Tapflo 7 The products are built in accordance with standard CE normative and are tested where applicable by Tapflo...

Page 29: ...ry Date Date of pump installation Pump type Serial No see name plate Description of the fault The installation Liquid Temperature C Viscosity cPs Spec grav kg m3 pH value Content of particles of max s...

Page 30: ...09 sales tapflo by Bulgaria Tapflo EOOD Tel 359 2 974 18 54 office tapflo org Canada Tapflo Canada Tel 1 514 813 5754 canada tapflo com Croatia Tapflo GmbH Tel 385 91 4884 666 sales tapflo hr Czech Re...

Reviews: