background image

Scooter Operations

Scooter Operations


24. 

Servicing 

Check Tire Pressure 

Maintain the front tire pressure at 28.5 PSI and the rear tire 
at 32 PSI. 

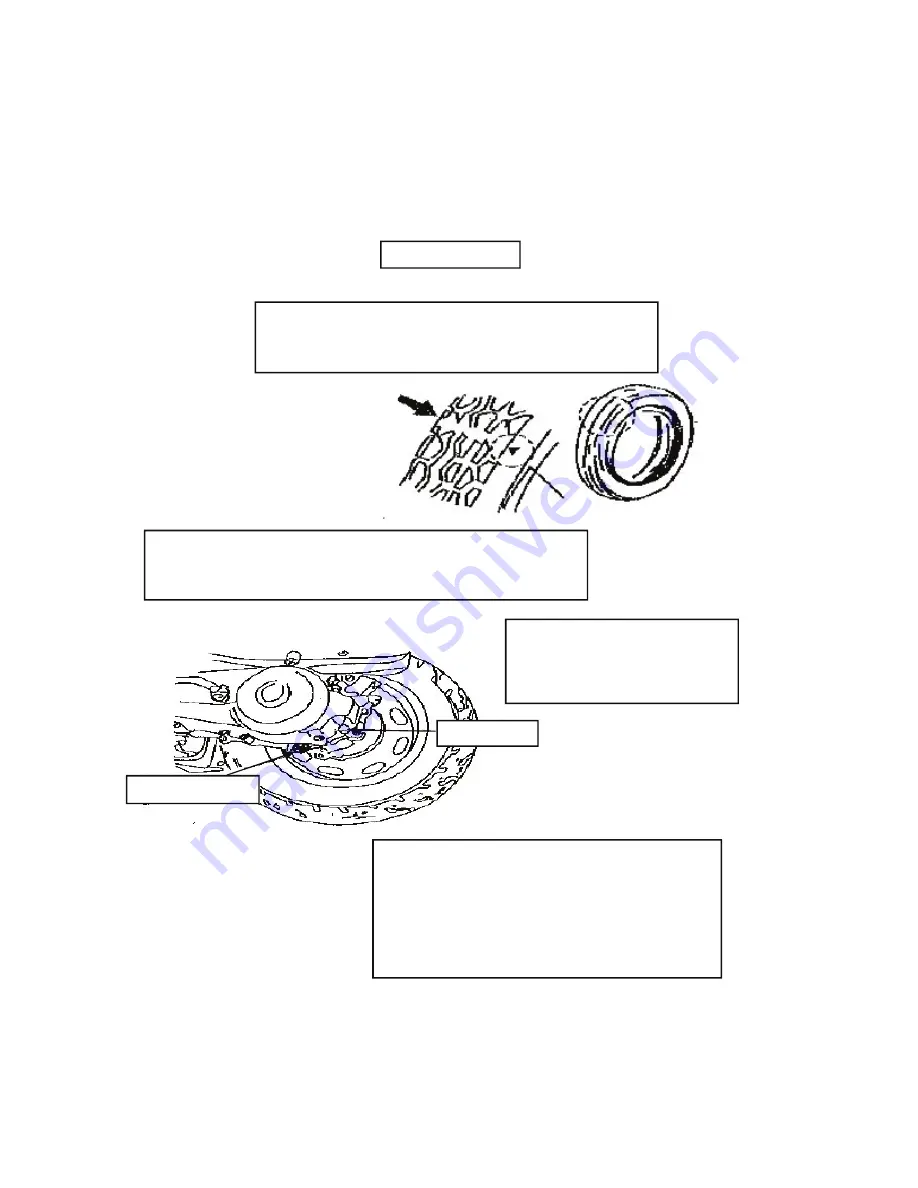
Check Tire Wear and Damage 

Check for tread wear limits as shown above. 
Repair or replace any tire damaged by a foreign object. 

Drain Plug 

Filler Plug 

Change Gear Oil 

Replace the 10 weight or GY 
gear oil after the first 300 km and 
then every 6 months or 3000 km. 

Instructions:   
1.  Place the scooter on a smooth, level surface. 
2.  Warm the engine. 
3.  Remove the drain plug and drain the oil. 
4.  Clean the drain plug and replace it. 
5.  Pour oil into the filler opening. 
6.  Replace the filler plug. 

Summary of Contents for Touring Deluxe 150cc

Page 1: ...Tank Touring Tank Touring Deluxe Scooter Deluxe Scooter 150cc 4 Stroke 150cc 4 Stroke Operating and Maintenance Manual ...

Page 2: ...Starting Button Headlight Switch 8 Air Cleaner 25 Hi Lo Beam Switch Horn Button 9 Maintenance Schedule 26 Turn Signal Switch 9 Spark Plug 27 Key Helmet Luggage Box 10 Fuse Replacement 28 Steering Lock 11 Clean Battery 29 Ignition Switch 12 Adjusting Carburetor and Choke 30 Electric Starting 13 Cleaning Air Cleaner 31 Kick Starting 13 Specifications 33 Natural Way Of Driving 14 Electrical Diagram 3...

Page 3: ...porter or dealer who imports or sells this scooter I am just a guy who works as an English Consultant in Taiwan and who has been dealing with this kind of situation for 7 years now and saw a need for a manual in understandable American English I don t as yet own one of these scooters However I intend to remedy that situation soon within the next month or so when I take my annual leave in the US I ...

Page 4: ...able clothing Wear helmet and gloves when driving Hold the handlebars with both hands Never drive using only one hand Wear protective shoes Avoid wearing loose or long clothing To avoid a burn injury be careful to avoid any contact with the hot exhaust system after running the engine 1 ...

Page 5: ...ving Tips For proper weight distribution sit on the center of the double seat Sitting further back will reduce the weight on the front end making the steering more sensitive When turning or swerving keep your weight to the inside of the turn Be alert when driving on rough roads 2 ...

Page 6: ...he motor scooter the steering may become very light Please drive with caution Be careful not to allow clothing to cover the air filter as this will choke the engine Don t allow clothing to cover the air intake on the frame side panel as this will over heat the engine Don t replace the bolts of the luggage rack with pointed bolts or screws as this will damage the body 3 ...

Page 7: ...nd Controls Features and Controls Locations Locations Rear Brake Lever Head Light Helmet Hook Under Seat Storage Seat Lock Air Cleaner Engine ID Number Location Center Stand Side Stand Frame ID Number Location 4 ...

Page 8: ...Features and Controls Features and Controls Locations Locations Oil Dipstick Filler Cap Main Switch Front Brake Lever Fuel Filler Trademark Location 5 ...

Page 9: ... Indicator When lit indicates turn signal is activated Fuel Gauge Indicates the remaining fuel in the fuel tank with the main switch turned ON the indicator is correct with the main switch turned OFF the indicator is not correct When the needle reaches the red zone it indicates 1 5L of fuel is remaining in the tank 90 octane fuel needs to be supplied within a short time 1 liter 0 264172051 US gall...

Page 10: ...lectrical source is on engine may be started The key cannot be removed The steering column is locked The key can be removed NOTE To prevent theft when parking the motorscooter lock the steering column and remove the key Main Switch Main Switch OFF ON LOCK Main Switch OFF ON LOCK 7 ...

Page 11: ...gage the front or rear brake by pulling on the brake lever Starter Button Headlight Switch Headlights side lights and speedometer light OFF Sidelights and speedometer lights ON headlights OFF Headlights and speedometer lights ON sidelights OFF OFF Light Switch 8 Throttle Throttle ...

Page 12: ...riving Low beam low speed and city driving Flashes lights to indicate passing HI LO PASSING Left Handgrip Horn Button Main switch ON press to sound horn 9 Turn signal switch is not self canceling please turn off after finishing your turn Turn Signal Switch L Left Turn R Right Turn ...

Page 13: ...and lock the seat Do not leave a helmet in the lock while driving as body damage will occur to the scooter Underseat Storage Do not exceed item weight of 22 lbs Do not carry food or any other items that will be harmed by the engine heat Be careful not to get water inside during scooter washing Seat Lock ...

Page 14: ...k To avoid theft lock the steering when parking by turning the steering to the left and turning the key to LOCK Turn the steering lightly after locking to ensure it is locked To avoid damage do not move the scooter after locking the steering ...

Page 15: ...on either the front or rear brake handle and engage the starting button In cold weather turn the key off and engage the kick starter 5 times then turn key on and engage the electric start Let warm up 2 3 minutes before using Use the above procedure after not using the scooter for a long period of time The life of the scooter can be prolonged by using the above procedure when the scooter is new ...

Page 16: ...n 3 seconds if the scooter fails to start Wait 10 seconds then try again but do not exceed 4 times Allow the starter to cool down before trying again After starting release the starter button and continue to hold the brake Before riding return the kick starter lever to it s stored position ...

Page 17: ...ward to remove it from the main stand which will fold up under the frame automatically Mount the scooter from the left side seat comfortably and keep the left foot on the ground Keep the brake engaged NOTE Do not run the engine at high rpm until it has warmed up ...

Page 18: ...Scooter Operations Scooter Operations 15 Release the brake NOTE Do not add throttle before releasing the brake Turn the throttle slowly Add the throttle slowly to avoid a dangerous fast start ...

Page 19: ...y Before proceeding turn on the turn signal and ensure there is no traffic approaching from the rear Speed is controlled by the throttle Twisting towards you will increase the speed and power Twisting away from you will lower the speed and power If released the throt tle will return to it s original position ...

Page 20: ...by changing speeds after the break in period Please keep the speed less than 60 km h during the first 1500 km details as follows Driving Mileage km 0 300 300 500 500 1000 1000 1500 Speed km h 25 30 35 40 45 50 55 60 Use The Front And Rear Brakes When Stopping Or Parking Return the throttle to off position then stop slowly using both brakes Place your left foot on the ground upon stopping Using onl...

Page 21: ...ns 18 Wet Weather Driving Please drive slowly and decrease your driving distance When on a downgrade return the throttle to OFF and use intermittent braking Don t stop or swerve quickly without warning This is a major cause of accidents ...

Page 22: ...e surrounding traffic and stop slowly Turn the throttle OFF while braking NOTE If the scooter inclines excessively the idle speed will become unstable NOTE If when driving you shut off the main switch the electrical system is inoperative therefore you will not have brake lights Wait until the scooter is in the parking space and stopped before turning off the main switch ...

Page 23: ...r service establishment Parking When parking Stand to the left of the scooter and operate the main stand with your foot Hold the handle bar with the left hand and the handhold on the side of the seat with your right hand Step down on the main stand with your right foot and pull the scooter to the rear Make sure the scooter is parked on a level area to avoid it s falling over Lock the steering colu...

Page 24: ...oil Add oil to full level if it indicates below the low level Recommended Oil SAE 10W 30 SIGMA Please do not use synthetic oil Use oil as recommended to avoid any problems Check and Fill Fuel Fuel the scooter when the fuel indicator reaches the red zone which indicates remaining fuel of 1 5L Use 90 Octane fuel Maximum Fuel Level Fuel filler cap locking indicator ...

Page 25: ...and Fill Brake Fluid Center the handlebars and check the fluid level in the right brake fluid tank Maintain the level between the upper and lower limits Use DOT3 fluid Check and Service Brakes Movement of the brake levers should be 1 2 cm Adjust if necessary ...

Page 26: ...s and cleanliness Check Turn Signals Turn the Main Switch ON Engage the turn signal switch check front and rear turn signals for proper operation broken lenses and cleanliness Please maintain the vehicle to assure safe and comfortable riding Please check the scooter thoroughly after long periods of non use Please perform the maintenance inspection after the first month of use or 300 km ...

Page 27: ...bove Repair or replace any tire damaged by a foreign object Drain Plug Filler Plug Change Gear Oil Replace the 10 weight or GY gear oil after the first 300 km and then every 6 months or 3000 km Instructions 1 Place the scooter on a smooth level surface 2 Warm the engine 3 Remove the drain plug and drain the oil 4 Clean the drain plug and replace it 5 Pour oil into the filler opening 6 Replace the ...

Page 28: ...e rear hangar is tight Check Air Cleaner Clean the paper air cleaner every 2000 km and add air cleaner oil Replace every 5000 km Check and replace more often if driven during wet weather or on dusty roads Engine Oil Filler Port Engine Oil Drain Port Change Engine Oil Change the engine oil after the first 300 km of operation and then every 1000 km Check the oil level every 500 km and fill as needed...

Page 29: ... R R R R R R I Oil Filter Screen C C C C C C C Gear Oil R R R R R R R Spark Plug Clean or Replace every 1000 km Valve Clearance 12 cold A A A A Cam Chain A A A A Carburetor I I I I I I Air Cleaner Clean every 2000 km and Replace every 5000 km Battery Electrolyte I I I I I I I I I I I I I Fuel Filter Screen Clean or Replace every 1000 km Brake System I I I I I I I I I I I I I Drive Belt I I I Screw...

Page 30: ...e gap Clean using a spark plug cleaner or brush Center Electrode Side Electrode Gap 0 6 0 7 mm Washer Recommended Spark Plugs G7HSA NGK U22FS U ND Be careful of burn injury if engine is hot Start the spark plug into the cylinder with your hand and tighten with wrench Be careful to avoid cross threading ...

Page 31: ...ing the fuse cover take care not to expand it too far When closing confirm that it snaps closed Do not exceed the amperage of the fuse as this may cause further troubles If changing any electrical item is necessary please use the specified parts Using non recommended parts will blow the fuse easily and the battery will lose it s charge When cleaning the vehicle avoid getting water in the electrica...

Page 32: ...le for a long period remove the battery and store in a cool well ventilated area to prevent discharge Battery Cleaning 1 Remove the 3 screws in the battery cover 2 Disconnect and remove the battery 3 Clean with a brush Wipe Vaseline on posts 4 Replace and reconnect the battery 5 Replace the battery cover and 3 screws NOTE When removing the battery disconnect the positive post first When reinstalli...

Page 33: ...he choke 1 Check whether the choke and throttle are working well with the choke indicating full opening and closing 2 Determine the free play in the throttle cable 2 6 mm 3 If this needs adjusted loosen nut 1 and adjustor 2 1 Nut 2 Adjustor Adjusting the idle speed 1 Start the engine and warm up 2 Seat the fuel adjustment screw then slowly open it about 3 1 4 turns Lock it and adjust the limiting ...

Page 34: ...leaning The Air Cleaner Dust is the leading cause of loss of power and performance Removal 1 Remove the left side cover 5 locking screws 2 Remove the cover and air cleaner 3 Remove 2 screws holding the air cleaner 4 Reinstall using the reverse procedure ...

Page 35: ...ressures Rear 221 kpa 32 05 psi Lubrication System Forced Lubricant Electrical System Clutch Dry Auto Acentric Battery 12V7Ah Shifting System Belt Automatic Headlight 12V 35W 35W Deceleration Ratio I 2 800 II 3 076 Taillight Brake Light 12V 8W 20W Turn Signals 12V 10W i 4 License Light 12V 5W Speedometer Indicator 12V 1 7W i 4 Fuse 7A Spark Plug Horn 12V 3A 105dB A Tire Pressure Tire Spec ...

Page 36: ...ced Air 4 Stroke Fuel Octane 90 Stroke Bore 57 4 x 57 8 Engine Oil Four Stroke SAE10W 30 SIGMA Engine Volume cc 149 50 Deceleration Ratio I 2 800 II 3 076 Compression Ratio 9 2 1 Maximum Speed km h 85 Maximum Power kW rpm 7 0 7500 Maximum Torque Nm rpm 8 5 4000 Specifications 1 Liter 1 0566882 US Quarts 2642 US Gallons 1 MM 0394 Inches 1 Inch 25 4 MM 1 Kg 2 2046 Pounds 1 Pound 4535924 Kg 1 Km 6214...

Page 37: ...34 Electrical Diagram Scooter Operations Scooter Operations ...

Reviews: