3.
After entering the above, next, enter the login ID and password.
* The WDR-3 factory default login ID is "wsc-user" and the password is "wsc-passwd". Make any
necessary changes to the login ID and password at [Detailed Network Settings].
4.
After checking for entry errors, click the [Send] button. After transmission has been completed
a message will appear.
Click the [OK] button to complete the settings.
* After settings are completed the WDR-3 will automatically restart. During the restarting
process, a search cannot be performed, even if you click the [Search] button. It should take about
30 seconds.
2
.Making Changes to the IP Address and Subnet Mask
1.
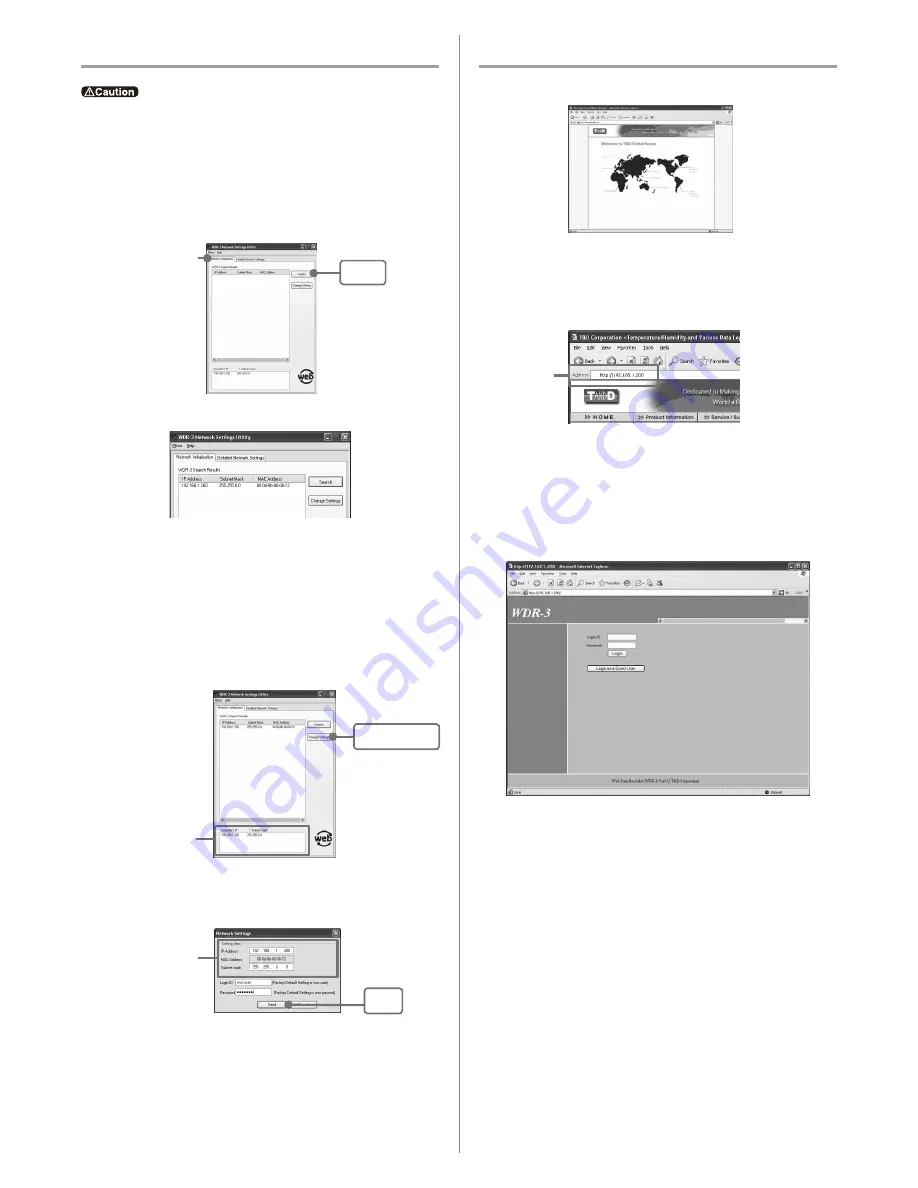
From the displayed list, select the WDR-3 to which you wish to make settings by either double
clicking on that address or select and click on the [Change Settings] button.
The [Network Settings] window will then appear.
2.
Enter an IP address and subnet mask that is appropriate for your network.
For example, if your computer IP address is "192.168.1.1", and the subnet mask is
"255.255.255.0", then set the RTR-5W IP address as "192.168.1.10".
* If you are unsure, ask your company network administrator.
[Change Settings]
button
Computer "IP address" and
"subnet mask"
Enter the "IP address"
and "Subnet mask".
[Send]
button
* The factory default settings for WDR-3 are as follows: IP Address: "192.168.1.200", Subnet
Mask: "255.255.0.0".
If no units are detected
-
Check the connection between the computer and the WDR-3.
-
Check the hub power switch and the network cable type.
-
In some network environments, it may be necessary to make changes to the IP address and
subnet mask at the computer side in order to carry out a search. To find out more details about
checking and changing a computer's network settings, see [Network Initialization Settings] in
the User's Guide on the provided CD-ROM.
- Please note, that upon purchase, all WDR-3 units are set with the same IP address. To make IP
address changes, connect one unit at a time and carry out the changes. Do not connect more than
one WDR-3 unit with the same address to the network at the same time.
- This explanation is about how to connect to a local network and is not about how to connect to the
Internet. If you wish to use by connecting to the Internet, see [Connecting to the Internet] in the
User's Guide on the provided CD-ROM.
1
.In [Network Settings Utility], click on the [Initialization Settings] Tab and
then click on the [Search] button.
- After clicking, the search results will be shown in about 5 seconds.
4. Initialization Settings
About the WDR-3 Web Viewer
There are two ways to log into the WDR-3 Web Viewer. One is to login in using the
Administrator Login ID and Password, the other is to login using the User Login ID
and Password.
1
.Open Internet Explorer.
If the Viewer does not appear
Check the IP address and subnet mask, and repeat the steps in [4. Initialization Settings].
2
.In the address, enter the IP address that was entered in the [Network Settings
Utility] in the form of a URL that begins with http://...and then press the
<Enter> key. The WDR-3 Web Viewer will appear.
After this, anytime you wish to view an already initialized WDR-3, enter the address as above, and
press the <Enter> key to open the WDR-3 Web Viewer.
Enter address
5.Opening the WDR-3 Web Viewer
When Logging in as the Administrator
Make all environmental settings for the operation of WDR-3.
The Login ID and Password are the same as those for the [Network Settings Utility]. If, in
[Detailed Network Settings] under [Network Settings Utility] changes were made to the
Login ID and Password, make sure to enter the new ID and Password.
If no changes were made, the Login ID is: "wsc-user" and the Password is: "wsc-passwd".
-
Login Settings
Make Login and Password settings, as well as access permission settings for using without a
Login ID.
-
LAN Settings
Without opening the Network Settings Utility, settings can be made for Wireless LAN, IP address,
Subnet Mask, and DNS server address.
-
Mail Settings
Mail settings can be made to enable the sending of warning report mail upon the occurrence of a
warning or for sending mail containing measurement readings at a set period of time.
-
Clock Settings
If the clock settings for the WDR-3 are set incorrectly, the time will be incorrect for recorded data,
warning occurrences and all other functions.
Please make sure to set correctly before using.
[Search]
button
[Network Initialization]
Tab


