Network Settings Utility
The Network Settings Utility contains the following functions:
If you open [Network Settings Utility] on multiple computers in the same network, it may not work properly.
Please open it from only one computer at a time in the same network (same broadcast domain).
-
[Network Initialization] Tab
After purchasing a WDR-3 unit, the first step is to make all Network Settings for connecting to a
network.
-
[Detailed Network Settings] Tab
The reception of WDR-3 settings and more detailed network settings can be made here.
To open the Network Settings Utility, go to the Windows [Start] Menu and under
Programs, click on [Network Settings Utility].
3. Using the Network Settings Utility
* For more detailed information about using Network Settings Utility, see the User's Guide on the
provided CD-ROM or the software Help Menu.
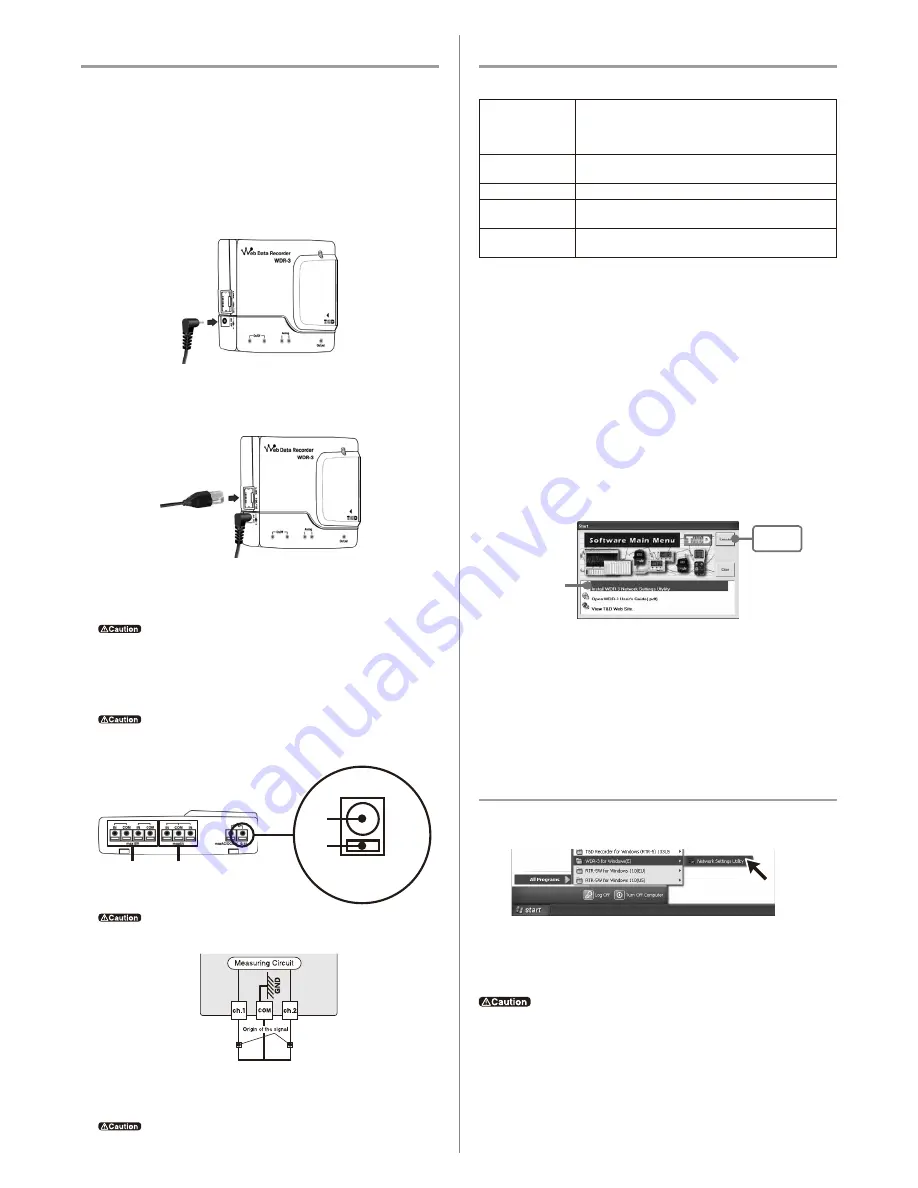
2. Installing the Software
3
.Select [Install Network Settings Utility] and click the [Execute] button to
start the installation.
4
.Continue the installation by following the directions as they appear.
5
.After installation has been completed, Network Settings Utility will be
registered in the Windows [Start] Menu.
1
.Open Windows
®
.
2
.Place the accompanying CD-ROM into your CD-ROM drive.
In a few seconds, the [Install Program] window will appear.
* If that window does not automatically open, please open it by double clicking the CD-ROM icon
in [My Computer] on your desktop.
Also, if the file appears in the CD-ROM folder, click on the "start.exe" icon.
-
Is Windows
®
operating properly?
If Windows is not operating properly, Network Settings Utility may not be installed correctly or it may
not operate properly.
-
Please quit all other applications.
If other programs are open, please close and quit all of them, making sure to quit all Quick Start
programs such as a virus checker.
-
To install the Network Settings Utility, it is necessary to have Administrator
Rights for the computer into which it will be installed.
[Execute]
button
Click here
1. Getting the WDR-3 Ready to Use
1
.
Connecting the AC Adaptor
Please make sure to use the proper AC adaptor for your local voltage. The AD-0605 AC adaptor
has an input range of 100 to 120V, the AD-051C AC adaptor has a range of 100 to 240V.
* To ensure a proper connection make sure that the plug is completely inserted.
NOTE :
- Do not use an AC adaptor other than the one that is supplied with the product. Doing so may
cause fire or other trouble.
- Insert the AC adaptor plug into the socket. Inserting the plug into a socket with different voltage
may cause fire or other trouble.
- Do not insert or pull out the AC adaptor plug with wet hands or if there are water drops on the
plug; it may cause electrocution.
* For how to directly connect to a computer or for how to connect to use a Wireless LAN card,
see [Connecting to a Network] in the User's Guide on the CD-ROM.
3
.Connecting the Signal Wire
1.
Prepare a ø0.5 ~ 0.9 single type wire and remove the covering to about 10mm from the tip.
Do not connect to a voltage higher than the allowed input (measurement) voltage.
-
The allowed input (measurement) voltage for an analog input signal is 0 ~ +5V (resolution of 4.88mV).
-
The allowed input (measurement) voltage for an ON /OFF input signal is 0 ~ 15V (both contact input and
open collector input are possible).
2.
Using a screwdriver or other such tool, while pressing down on the terminal button <B> at the
back of the unit, insert the wire into the hole <A>.
Do not remove the input cable from the logger and leave it while still connected to the origin of
the signal. There is a chance that it will come into contact with another signal and cause a short.
2
.Connecting a LAN Cable
- When first making settings, please connect to a computer that is connected to the a local
network.
* To ensure a proper connection make sure that the plug is completely inserted.
The Analog Signal Input Terminal uses a common ground for both channels, so when connecting
input cables be sure to connect the ground for each channel to the same point.
Removing an Input Signal Wire
If you wish to remove an input signal wire, press down on the <B> button with a screwdriver and
pull out the wire.
Please be careful when pulling out the wire.
To properly use WDR-3, the following operational environment is necessary.
OS
Microsoft
®
Windows
®
7 32/64bit
English
Microsoft
®
Windows Vista
®
32bit
English
Microsoft
®
Windows
®
XP 32bit (SP2
or above
)*
English
Microsoft
®
Windows
®
2000
English
PC / CPU
A Stable Windows Operating Environment
LAN, TCP/IP Communication Possible
Memory Capacity
Enough memory to stably operate Windows
Disc Space
More than 20MB free space (More free space is necessary for
data)
Monitor
VGA (SVGA higher than 640×480 recommended)
more than 256 colors
Enlarged view of Wire
Connection Terminal
<A>
<B>
ON /OFF Signal
Input Terminal
Analog Signal
Input Terminal


