background image


23 


Using the remote control:

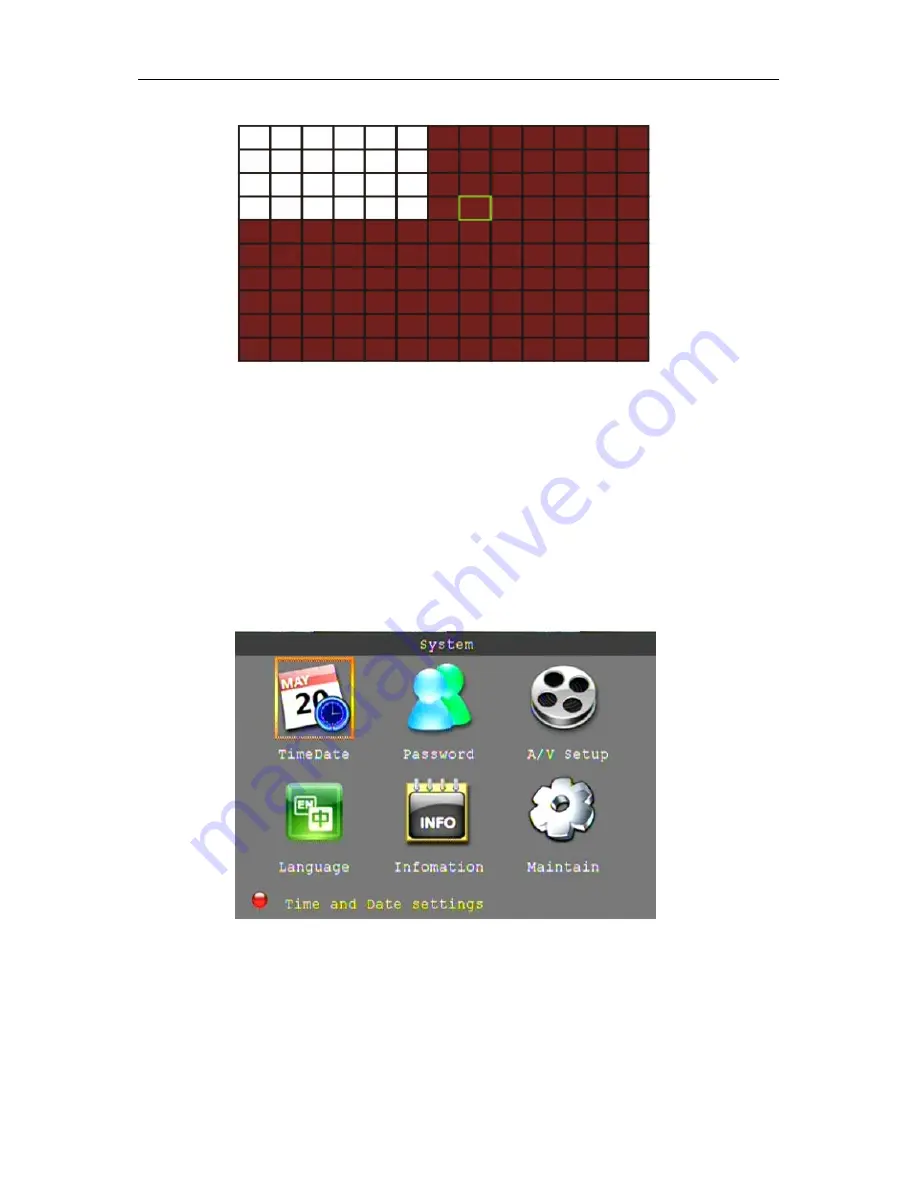
 Use the direction key to move the cursor to the desired grid segment; 

green indicates the cursor is on a specific grid segment, press enter to activate the segment. When 
set-up is complete select exit to return to the previous menu screen. 

Using the mouse:

 Move the mouse to the desired grid segment; green indicates the cursor is on a 

specific grid segment, left click to activate the segment. When set-up is complete select exit to return 
to the previous menu screen. 

Remark:  

IR Operation: press [Menu] key to select or cancel the entire screen. 
Mouse operation: click left and drag the frame to setup the region for motion detection. 


3.4.2.6 SYSTEM 

SETUP 

Click "SYSTEM" to enter the system settings interface. 


System setups include: time/date, password, video/audio setup, language, system information and 
system maintenance. 


Summary of Contents for DK1400

Page 1: ...DK1400 H 264 Networkable 4 Camera Surveillance System USER MANUAL ...

Page 2: ...t bench or kitchen table and inventory items Connect cameras to the DVR video inputs a monitor or TV to the DVR video output and then connect power to the cameras Turn the DVR on the cameras will be visible on the DVR live view screen Turn DVR power off to install the hard drive into the DVR turn on the DVR and familiarize yourself with the DVR menus and functions Permanently install the cameras c...

Page 3: ...26 4 NETWORK OPERATION 27 Installing Client Viewer Software 27 Log into Client Viewer Software 28 Client Viewer Local Setup 28 Add DVR Server to Client Viewer 28 Client Viewer Remote Setup 30 Dynamic Domain Name Service DDNS 30 DVR Network Settings DDNS 31 Router setup 32 Port Forwarding 32 Client Viewer Settings DDNS 34 Internet Explorer Access 36 IE Settings 36 Security 37 ActiveX 37 Login using...

Page 4: ...r and back up etc 1 2 PRODUCT FEATURE H 264 compression Two USB interface USB 2 0 for data backup USB 2 0 for mouse operation Support one 3 5 SATA HDD Special file system for security 16 bit color translucent user friendly GUI with notes for selected menu items Optimized four channel simultaneous playback Two level user management Support live view parameter setting and copy playback via network 1...

Page 5: ...this device please comply with all the electrical product safety criteria Do not drop liquid on DVR or insert any objects Use soft dry cloth to clean DVR do not use chemical cleaners Please disconnect this device from the power if not used for long duration 1 4 PACKAGE CONTENTS QTY DESCRIPTION 1 4 Channel DVR 4 600 TVL Bullet Cameras 4 Camera Power Supplies 4 60 ft Camera Power Cables 4 Camera mou...

Page 6: ...d communicating with the local area network 4 IR Remote control receiver 2 1 2 Connectors on Rear Panel NO Name Function 1 Video input 4 BNC composite video camera inputs 2 Video output 1 BNC composite video output 3 USB USB flash drive connection for file backup 4 USB USB mouse port 5 Network Connect the DVR to a local area network 6 Power Jack Connect 12Vdc power supply 7 VGA Connect a VGA monit...

Page 7: ...rive into the DVR 1 Remove the cover from the DVR and locate the four screw holes and ventilation slots 2 Remove the four screws and foam isolation pads from the accessory box see photo below 3 Remove the paper backing and place the isolation pads over the screw holes ...

Page 8: ...rew holes and isolation pads as shown below 5 Insert the screws through the bottom of the chassis through the isolation pads and into the mounting screw holes of the hard drive NOTE After installation the new hard drive must be formatted ...

Page 9: ...in split screen double click on a channel to view the selected channel in full screen double click the channel again to return to split screen view Right Button Click to open a Sub Menu Scroll Wheel No function Figure 1 1 Mouse button operation 2 Virtual Keyboard Mouse When using the mouse input values using the onscreen virtual keyboard You will need to use the Virtual Keyboard when entering your...

Page 10: ...d Move cursor in menus down Channel down OK In menus press to confirm selections 9 In menus press to adjust values 10 RECORD Press to start manual recording 11 STOP Press to stop manual recording 12 EXTRA Not applicable 13 Playback controls Increase reverse playback speed 2X 4X 8X 16X 32X Press to start playback Press to increase forward playback speed 2X 4X 8X 16X 32X Press to slow playback speed...

Page 11: ...NU TREE Use the mouse to control the DVR and navigate the menus The tree diagram below is a quick reference to help keep track of menu levels and functions The menu functions are explained on the following pages ...

Page 12: ... 2 SYSTEM LOGIN By default passwords are disabled on the system you do not need to enter a password when accessing any system menus However for security purposes it is highly recommended to enable passwords on the system using the Password Menu If you have enabled password and set up user accounts you will see the following screen when you log into the DVR Input device ID and user password and pre...

Page 13: ...H04 Click to select the channel to change settings CHN NAME Click to enter channel description names into the system POSITION Click to switch name location there are 5 options COLOR Click to enter camera setting interface as follows See below for detailed information LIVE Click to select Open the view of the camera Close the view of the camera LIVE TIME Display time while in live view Open Yes Clo...

Page 14: ...ng disabled BITRATE Click to select the bitrate for best data compression RESOLUTION Click to select the resolution of recorded video D1 720 x 480 Half D1 720 x 240 CIF 352 x 288 FRAME RATE Click to select the recoded frame rate AUDIO Not applicable MODE Always DVR will begin recording at startup Schedule DVR will record by a set schedule PACK TIME Four options 15min 30min 45min 60min this breaks ...

Page 15: ...ttings 3 4 2 3 NETWORK SETUP Click the NETWORK to enter network settings interface TYPE Two options DHCP and Static IP address STATIC TYPE Select Static to set your preferred DVR IP address on your network PORT This is the out bound port for video transmission WEB PORT This is the in bound contact port for HTTP IP ADDRESS Set an IP address and press Enter Address should not conflict with automatic...

Page 16: ...ng DDNS or Close if you are not using DDNS service with your DVR SERVICE The DVR supports 3 DDNS services 3322 dyndns and perfecteyes HOST NAME Input the host name you created when you opened your DDNS account USERNAME Input the user name you created when you opened your DDNS account PASSWORD Input the password you created when you opened your DDNS account Click Apply then Exit then reboot your DV...

Page 17: ...n the detail files screen DAY Will show all the recording status of the day to playback the recorded file click the corresponding period PLAY You can enter a number directly into the time field by overtyping the current time After setting the time move the cursor to PLAYBACK and press APPLY to enter video playback of that time You can select any period of time from the video status frame after sea...

Page 18: ...isplay time 4 In playback mode press to slow playback press and to fast forward or rewind press to pause and advance frame by frame Press Exit to exit from playback and return to the previous menu 5 When playback is completed the DVR will return to the file list screen BACKUP You can backup files directly from the DVR onto a USB flash drive The DVR supports USB 2 0 and USB OTG devices Insert the U...

Page 19: ... Alarm types are Alarm Motion and Scheduled TIME is the time the event triggered the DVR to record VIDEO indicates if video was recorded along with an alarm event 3 4 2 5 DEVICE SETUP Click DEVICE on the main menu to enter into the device settings interface Advanced Features include HDD ALARM PTZ MOBILE and MOTION DETECT ...

Page 20: ...DVR to overwrite older files with newer Depending on the settings of your DVR you can anticipate 3 weeks on a 500 GB HDD with a 4 camera system Disable the DVR will only record to the end of the HDD storage capacity When less than 500 MB remains available on the HDD the DVR will display on the live view please shutdown and replace HDD You can reformat the drive or replace with another and archive ...

Page 21: ...set to Off Close or On Open Email setup The DVR can be configured to send an e mail alert if the DVR senses an alarm event Email Enable On Disable Off SSL is a security link transport protocol that allows you to encrypt your communication information including your email Using SSL helps to prevent hackers from monitoring your email or communication information even your password Please confirm wit...

Page 22: ...t must be forwarded in your router Please note that the DVR server port is not the same value as the mobile server port NETWORK Select the mobile network 2 5G 2 7G 3G or WIFI MOTION DETECT Click MOTION to enter the motion detection settings interface CHN Select the channel to set up and enable motion detection SENSITIVITY Set the sensitivity level highest high middle and low If you receive a lot o...

Page 23: ...segment green indicates the cursor is on a specific grid segment left click to activate the segment When set up is complete select exit to return to the previous menu screen Remark IR Operation press Menu key to select or cancel the entire screen Mouse operation click left and drag the frame to setup the region for motion detection 3 4 2 6 SYSTEM SETUP Click SYSTEM to enter the system settings int...

Page 24: ...RMAT Click to choose your preferred time format 12 Hours or 24 Hours DST Click to select Daylight Saving Time as applicable to your region Click Apply to save the new settings PASSWORD Click PASSWORD to enter the password settings interface DEVICE ID Enter a number between 000000 and 000255 to create a unique device ID for the DVR PASSWORD Click to choose if you will require a password to log into...

Page 25: ...Click to select the video resolution for the VGA output 1024 768 1280 1024 1920 1080 1440 900 VOLUME Click Volume to enter settings for the volume level Reboot the DVR after making changes to the Audio and Video settings LANGUAGE Click LANGUAGE to enter the language settings interface Select the language you want the DVR to display Chinese English Russian Portuguese Spanish Turkish Italian Persian...

Page 26: ... setting interface AUTO MAINTAIN Click to set the DVR for auto maintenance Close turns off auto maintenance Open turns on auto maintenance and allows you to schedule regular system reboots UPDATE Click to start a software update on a flash drive create a folder called dvrupgrade and copy the software update to that folder Insert the flash drive into the USB port on the DVR and press Enter The syst...

Page 27: ... With the DVR connected to your network the Client Software allows you to operate the DVR from your PC 4 1 1 Install NVClient software The Client Software can be found on the CD included in the accessory box 4 1 1 1 Load the CD into your CD DVD drive and open the CMS file folder Double click NVCL to install the Client Software A shortcut will be placed on your desktop double click to launch NVClie...

Page 28: ...the same user name and password used to log into NVClient 4 1 2 1 Local Setup Click Local Setup to enter into the server setup menu 4 1 2 2 Common Setup Tab Under server manage click on Add to enter the Add Server settings interface Server Type Click to choose the DVR server type select 37DVR Address Enter the IP address of the DVR from the network setup menu Local Name Assign a name to easily rec...

Page 29: ...ver Check On Check Camera Select Open Image at Free Position On Open Server Select Auto Open Camera Enable Back Connect Check Listen Port Enter the port number used on your router to stream video from the DVR Click Apply and then OK to return to the DVR live view 4 1 3 Log out of NVClient ...

Page 30: ...ill change periodically therefore you will need to sign up for dynamic domain name hosting from a source like DYN com 4 2 1 Sign up for a dynamic domain name at DYN com Click Get Started With DNS Click DynDNS Free at the bottom of the screen Click Get It Now Hostname enter a hostname of your choosing I E talosdvr along with an extension I E dyndns tv IP Address Enter the IP address at the location...

Page 31: ... in bound contact port for HTTP The normal value is 80 if your ISP blocks 80 you will need to select a different port number like 8081 IP ADDRESS Set an IP address and press Enter Address should not conflict with automatically assigned addresses DHCP from the router I E 192 168 1 222 NETMASK Enter the Netmask settings this is normally a default setting GATEWAY Enter the Gateway settings this is th...

Page 32: ...ick Apply then Exit then reboot your DVR for changes to take effect 4 2 3 Setup the Router for Port Forwarding We are using a popular Linksys router for our example Refer to your router user manual or visit portforwarding com for instructions to forward ports in your router 4 2 3 1 Log into your router Use a web browser like Internet Explorer to access the router setup interface Address Enter the ...

Page 33: ...application I E Tal DVR Start Enter the staring port for a range of ports to forward 7777 for DVR video streaming 80 for http access from the internet and 8888 for the mobile port END Enter the ending port for a range of ports to forward It is OK to have the same port number in both start and end Protocol select Both IP Address Enter the IP address you assigned your DVR in network setup Enable Cli...

Page 34: ...cut on the PC desktop 4 2 5 Local setup Click Local Setup to enter into the server settings interface Server Manage Under the server manage tab click on Add to enter the Add Server menu Server Type Click to choose the DVR server type select 37DVR Address Enter the DDNS host name of the DVR from the network setup menu Local Name Assign a name to easily recognize a DVR if you have more than one I E ...

Page 35: ... server functions Enable Sync Time On Server Open Check On Start App Auto Open Server Check On Check Camera Select Open Image at Free Position On Open Server Select Auto Open Camera Enable Back Connect Check Listen Port Enter the port number used on your router to stream video from the DVR 7777 4 2 5 1 Click on OK then exit NVClient and launch the client again to view cameras ...

Page 36: ...es to the PC 4 3 1 Launch Internet Explorer Address Bar Enter the DVR IP address or Host Name into the address bar I E http 192 168 1 222 or http talosdvr dyndns tv IP Address The IP address must match the IP address from the DVR Network setup menu Use the IP address to operate the DVR from a PC on the same local area network as the DVR DDNS The Host Name must match the DDNS host name from the DVR...

Page 37: ...it IE Click OK then Apply then OK Close Internet Explorer to save the new set up 4 3 2 3 Reset Default Security After you successfully log into the DVR for the first time you will want to restore Internet Explorer s default security settings Tools On the IE toolbar click on the Tools tab Internet Options In the drop down menu click on Internet Options Security In the Internet Options menu click on...

Page 38: ...he cameras using the built in web server 4 3 4 WEB SERVER INTERFACE There are four setting options in Live view LIVE REPLAY REMOTE SETTING LOCAL SETTING and LOGOUT 4 3 4 1 LIVE Click LIVE to view a live feed from the cameras through the DVR web server In LIVE view you can view live video feeds record video and capture video images to the local PC PTZ CONTROL Not Applicable to this DVR ...

Page 39: ... file to the local PC Note While the video file is playing the system won t allow you to download video files After viewing the selected file click DOWNLOAD to save the file to the local PC When download is complete a dialog box will be displayed showing the path for the file on the local PC Playback control Above the purple bar displays download progress the green shows playback progress Click to...

Page 40: ...etting and System information seven menus ENCODE SETTING Video Parameters setting allows you to change the way the DVR encodes video to maximize storage space and video streaming AV Channel Bind Not Applicable to this DVR Color Adjust setting allows you to change the video and color levels making camera images look more natural and easier to see Note you can copy settings to any or all channels us...

Page 41: ...io recording on or off Audio recording requires microphones Time OSD allows you to r the time display ON or OFF per channel while recording Timer Rec Schedule allows you to set the schedule for recording when record mode is set to Timer Record For example an office might record the interior from 6 AM to 7 PM and turn to alarm record for off hours ALARM SETTING Click Alarm Setting to enter the Alar...

Page 42: ...ork connection you will use with your DVR DHCP or Static IP Address allows you to set a specific address on your network Preferred DNS allows you to use the DVR with an external IP address and Domain Name Service Media Port is the port on your router the DVR uses to transmit a video stream Gateway is the address of your router on your network MAC is the specific identity of the DVR allowing device...

Page 43: ...lick Mobile to enter the mobile settings interface Port is the port on your router used for streaming to a Smartphone Network Type allows you to choose the type of network used by your Smartphone or tablet ...

Page 44: ... Time Zone allows you to set the time zone the DVR will operate in with reference to GMT Daylight Savings Time DST allows you to tune daylight savings time ON or OFF DST Mode allows you to choose between default and custom DST Start allows you to set the start of custom DST End allows you to set the end of custom DST Date Time Sync Date allows you to select the date select from the calendar pop up...

Page 45: ... to toggle ON or OFF Mode allows you to set the frequency of auto maintenance reboots the DVR Time allows you to set the time of day for auto maintenance Setup allows you to save the settings Refresh sets enable to OFF and clears all fields SYSTEM INFO Click to enter the System Information interface Version Info Device SN is the serial number of the DVR Device Type is the manufacturer style of DVR...

Page 46: ...to set the account number for a user 1 5 Enable allows you to turn an account ON or OFF accounts 2 5 User Name allows you to assign a user name to an account Password allows you to assign a password to accompany a user name Control allows you to assign permission for PTZ control Parameter Set and Upgrade Format system Note Only admin users can add users modify user names and passwords The default ...

Page 47: ...ng video recorded from the DVR server to the local PC Frame Save Path allows you to set a path to a folder for saving an image captured from the DVR server to the local PC File Save Path allows you to set a path to a folder for saving video downloaded from the DVR server to the local PC LOGOUT Click Logout to return to the login screen ...

Reviews: