background image

1. Remove the Shipping
Hardware

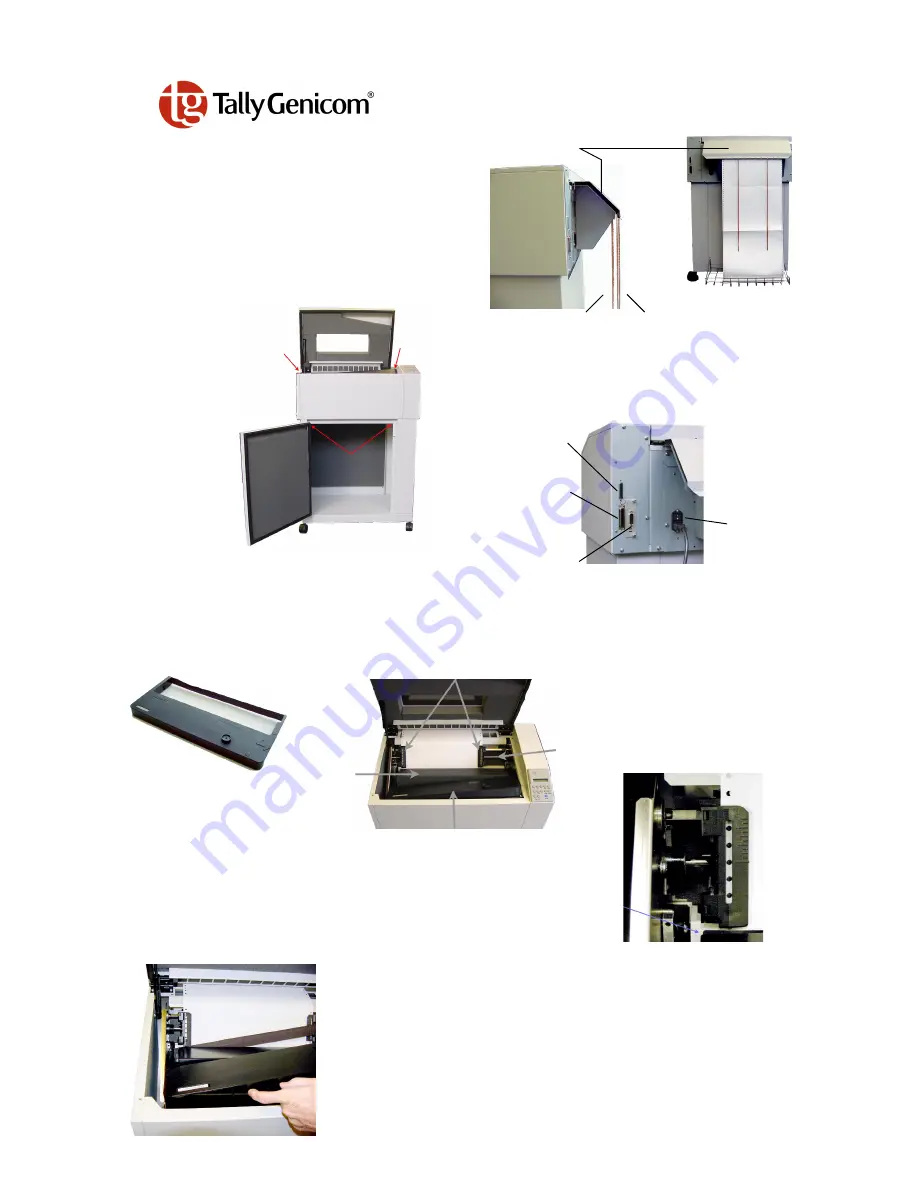
There are 4 screws, identified by red tags, that
secure the printer base to the inside mechanism,
and tie restraints that secure the Paper Stacking
Chains. The upper 2 shipping screws have wing-
heads which tighten a bracket against the platen to
prevent it from bumping
against the hammer bank.
The lower 2 shipping
screws fasten from
underneath, near the
front of the printer
cabinet. Remove all of
these restraints, including
the brackets beneath the
wing-head screws.

LG Series

Quick Start Guide

Paper comes out between these two

sets of chains.

Rear Paper Guide

2. Set Up Paper Stacking Chains

Paper exits the print area through a set of passive Paper Stacking Chains
that help fold and stack printed forms uniformly. Secure two of the
chains to the wire guide and two to the rear paper guide so that the
paper can be fed between them.  Make sure chains are not tangled.

Serial Interface Port

Parallel Interface Port

On/Off Switch
& Power Plug

3. Connect the I/O and Power Up

Secure the cable to the printer interface using the correct connectors.

Shielded I/O cables must be used on all installations
to comply with regulatory requirements.

4. Install the Ribbon Cartridge

Step A.

 Open the printer lid. Remove slack in the new ribbon by turning the knob on the ribbon cartridge as indicated by the arrow printed

next to the knob.

Tractors

Ribbon Cartridge

Shaft for
Tractors

Step B.

 Carefully position the ribbon between the two panels of the ribbon shield.

Step C.

 Press down lightly on the cartridge while turning the ribbon knob as before until it seats on

first the left, (as shown), and then the right cartridge drive posts.  Make sure that the ribbon does
not twist or fold over.

Optional LAN
interface or
Optional Twinax/Coax interface

Hammer
Bank
Housing

Ribbon Cartridge

Summary of Contents for 6300 Series

Page 1: ...wo to the rear paper guide so that the paper can be fed between them Make sure chains are not tangled Serial Interface Port Parallel Interface Port On Off Switch Power Plug 3 Connect the I O and Power Up Secure the cable to the printer interface using the correct connectors Shielded I O cables must be used on all installations to comply with regulatory requirements 4 Install the Ribbon Cartridge S...

Page 2: ...rst or left most printable character Each successive tick mark indicates the location of additional 10 CPI characters Column Alignment Scale Fine tune the Column Alignment Rotate the Horizontal Vernier Wheel which is located on the right end of the shaft on which the tractors ride Depending upon the direction the paper needs to move you will rotate the wheel either upwards or downwards Use this wh...

Page 3: ... Sie die Farbbandkassette ein Schritt A Öffnen Sie den Gehäusedeckel Spannen Sie das Farbband indem Sie den Knopf auf der Farbbandkassette in die durch den Pfeil neben dem Knopf angegebene Richtung drehen Traktoren Farbbandkassette Welle für Traktoren Schritt B Schieben Sie das Farbband vorsichtig zwischen die beiden Leisten des Farbbandschildes Schritt C Setzen Sie die Kassette mit leichtem Druck...

Page 4: ...et welche Skalamarkierung sich am besten für die verwendeten Formulare eignet Spaltenskala Exakte Einstellung der Spaltenausrichtung Drehen Sie das horizontale Feineinstellungsrad das rechts außen an der Welle angebracht ist auf der sich die Traktoren befinden Je nachdem in welche Richtung das Papier verschoben werden soll drehen Sie das Rad entweder nach oben oder nach unten Verwenden Sie dieses ...

Page 5: ... papier arrière pour que le papier puisse être correctement alimenté entre elles Assurez vous que les chaînes ne sont pas emmêlées 4 Installation de la cartouche à ruban Étape A Ouvrez le capot de l imprimante Supprimez le jeu du nouveau ruban en tournant le bouton de la cartouche comme indiqué par la flèche en regard du bouton Guides d entraînement Cartoucheàruban Arbredes guides d entraînement É...

Page 6: ...aire doit s aligner sur le repère de la règle que le créateur de formulaires a créée La règle sert de référence générale L opérateur détermine le repère qui convient le mieux pour ses formulaires Règled alignementdecolonnes Meilleur réglage de l alignement de colonnes faites pivoter la roulette vernier horizontale qui se trouve à l extrémité droite de l arbre sur lequel se déplace les guides d ent...

Page 7: ...carta fra di loro Accertarsi che le catene non siano aggrovigliate Portadiinterfacciaseriale Portadiinterfaccia parallela Interruttoredi accensionee spinadi corrente 3 Collegamento I O e accensione Fissare il cavo all interfaccia della stampante utilizzando i connettori corretti Per conformità con i requisiti normativi è necessario usare cavi I O schermati per tutte le installazioni 4 Installazion...

Page 8: ...rtello del dispositivo di trazione Lacartacadenel cestelloinrete metallica Fessuraperlacarta Passo D La scala di allineamento delle colonne si trova in cima all alloggiamento del gruppo martelli La prima colonna dei moduli pre stampati o la perforazione sinistra della carta comune devono essere allineate con l indicatore sulla scala designata dalla persona che ha creato il modulo La scala serve co...

Page 9: ...osterior para que el papel pase entre ellas Verifique que no estén enredadas las cadenas Puertodelainterfazenserie Puertodelainterfazparalela Interruptorde encendido apagadoy enchufe eléctrico 3 Conecte el cable de E S y encienda la impresora Enchufe el cable en la impresora usando los conectores correspondientes Se deben usar cables de E S blindados en todas las instalaciones a fin de cumplir con...

Page 10: ... La escala es tan sólo una guía general El operador determinará cuál marca de la escala funciona mejor con los formularios Escaladealineacióndecolumnas Perfeccione la alineación de las columnas Gire la rueda horizontal de Vernier situada en el extremo derecho del eje sobre el cual se mueven los tractores Dependiendo de la dirección hacia la que se tenga que mover el papel gire la rueda hacia arrib...

Reviews: