


H
eaTing
o
PeraTing
i
nsTrUCTions
The Hotplates and Hotplate-Stirrers have a micro-processor controlled heater that is
designed to bring samples to temperature quickly and accurately.
1.
Getting ready:
a. Turn the heat knob to the off position. Plug power cord into a properly grounded
3-prong outlet.
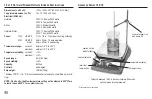
b. Place a vessel with solution and the appropriate accessories in the center of the
top plate. This is important because the vessel should be over the hottest part
of the top plate.
2.
Setting temperature for Advanced Series:
a. Turn the heat knob clockwise until the display reaches the desired heat setting.
The display will flash the set-point temperature until the temperature is reached,
at which time the display will stop flashing and beep 5 (five) times. When the heat
is turned on the indicator light above the heat knob is illuminated. Removing or
adding more to a sample content could cause the temperature to fluctuate. If this
occurs, the display will again start to flash until the set-point value is stabilized.
b. Temperature adjustments can be made without interrupting heating by turning
the heat knob clockwise to increase heat or counter-clockwise to decrease
heat.
c. To stop heating, turn the heat knob to the off position. Your vessel can then be
removed.
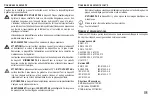
Caution hot top indicator:
The caution hot top indicator light warns that the top plate
is too hot to touch. The caution hot top indicator light will
illuminate when the heat is turned on and remain on until the
top plate cools down.
Recall last temperature button:
Advanced Series Hotplate/Hotplate-Stirrers have a built-in memory that allows users
to recall the last set temperature, even after the unit has been turned off. (The
temperature in memory is the last temperature that ran for more than 5 minutes.)
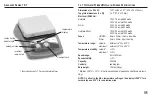
Max Temperature:
If the unit has an aluminum top, the max temperature setting is 400°C. If the unit has
a ceramic top, the max temperature setting is 500°C.
OPERATING TIPS
The unit may overshoot the temperature up to 10°C before stabilizing at the set-point.
The two methods suggested to minimize overshoot are:
1. Metal containers minimize overshoot.
CAUTION:
When heating metal
containers on a ceramic top it is recommended to use the lowest
temperature setting possible to limit thermal stress to the ceramic top.
2. If a glass vessel is used, anticipate overshoot. Start with a setting 5-10°C below the
desired temperature. When the temperature stabilizes at this lower setting, turn the
heat knob to the final temperature. Overshoot is then reduced to about 1°C.
The temperature display on the Advanced units show the actual temperature of the
heater not the top plate or sample. The vessel contents being heated may be at a lower
temperature depending on the size and insulating qualities of the vessel. It may be
beneficial to monitor the temperature of the vessel contents and adjust the set-point
temperature accordingly.
8


