②
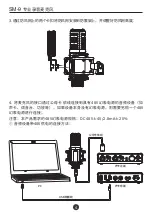
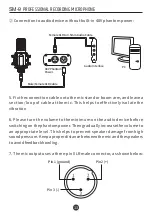
Connection to audio device without built-in 48V phantom power:
5
. Fix the connection cable onto the mic stand or boom arm, and leave a
section/loop of cable at the mic. This helps to effectively isolate the
vibration
6
. Please turn the volume to the minimum on the audio device before
switching on the phantom power. Then gradually increase the volume to
an appropriate level. This helps to prevent speaker damage from high
sound pressure. Keep a proper distance between the mic and the speakers
to avoid feedback howling.
7
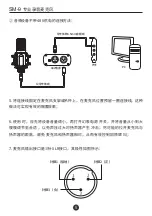
. The mic output uses a three-pin XLR male connector, as shown below:
13
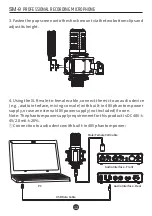
Male/Female XLR Cable
48V Phantom
Power
Audio Interface
Female XLR to 3.5mm Audio Cable
PC
Pin 3 (-)
Pin 1 (ground)
Pin 2 (+)
SM-9
PROFESSIONAL RECORDING MICROPHONE
Summary of Contents for SM-9
Page 1: ...Professional Recording Microphone SM 9...
Page 2: ...SM 9 4006828333 34mm 1 SM 9 1 1 2 1 1 1...
Page 4: ...1 2 SM 9 3 SM 9...
Page 5: ...3 4 48V 48V 48V DC 48V 4V 2 8mA 20 48V 4 PC USB SM 9...
Page 6: ...48V 5 6 7 XLR 5 3 1 2 48V 3 5mm PC SM 9...
Page 7: ...1 2 3 4 5 6 7 6 2000 2000m SM 9...
Page 9: ...8 SM 9...
Page 18: ...17 SM 9 PROFESSIONAL RECORDING MICROPHONE...
Page 19: ......
Page 20: ......


