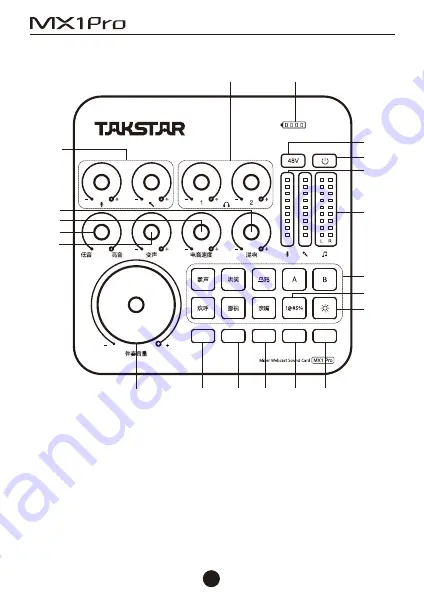
Takstar MX1 Pro User Manual Download Page 6

05

调音台式直播声卡

■  功能示意

① 电量指示灯:电池符号有四格,一格为25%电量。剩下一格时,红灯亮 起,表示
电量不足,需要及时充电。充电时,逐格流水点亮指示灯,充满电时,指示灯满格显
示;
② 电源按键:循环长按电源按键2秒,开启或关闭声卡。开机时,电源指示灯长亮蓝
灯,关机时,电源指示灯熄灭;
③ 48V开关:循环点按开启或关闭48V供电。开启时,48V指示灯长亮蓝灯,关闭时,
48V指示灯熄灭;

蓝牙

电音

内放

降噪

闪避

② 

⑩  ⑪


④ 麦克风音量指示灯:分别显示两路麦克风音量大小,直播时,指示灯跟随麦克风
音量大小动态变化;
⑤ 伴奏音量指示灯:显示伴奏音量大小,直播时,指示灯跟随伴奏音量大小动态变
化;
⑥ 主播特效:8个主播特效,其中有6个固定音效,分别是:掌声、哄笑、乌鸦、欢呼、
鄙视、亲嘴;有2个自定义特效,分别是:A、B,特效可根据个人喜好进行自由更换,
更换方法详见说明书的“自定义主播特效”部分。当点按主播特效时,开始播放特
效。播放特效过程中,如果再点按该特效按键,将立即停止播放;
⑦ 声音屏蔽按键:当不想让网络对方听到自己说话内容时,长按该按键,可传
出“哔”声,同时麦克风会静音,直到释放该按键时“哔”声停止,麦克风恢复正常拾
音状态;
⑧ 灯控按键:点按灯控按键,可切换多种灯光效果模式,有七色循环模式、七色常
亮模式、七色呼吸模式等;
⑨ 蓝牙按键:循环点按蓝牙按键,开启或关闭蓝牙功能,蓝牙配对方法详见说明书
的“蓝牙配对”部分;
⑩ 电音按键:循环长按电音按键,开启或关闭电音效果。开启电音时,指示灯长亮
红灯,关闭时,指示灯熄灭。电音开启状态下,循环点按切换12种电音基调,并有相
应的语音提示,分别是:C大调,降D大调,D大调,降E大调,E大调,F大调,降G大调,
G大调,降A大调,A大调,降B大调,B大调;
⑪ 内放按键:循环点按内放按键,开启或关闭内放功能。内放开启时,指示灯长亮
绿灯,电脑播放的音乐能够发送给电脑直播间。内放关闭时,指示灯熄灭,电脑播
放的音乐不能发送给电脑直播间;
提示:在电脑直播平台的自由聊天模式下使用时,请关闭内放功能,否则直播间的
人说话会听到双重音。其它模式下请开启内放功能,否则电脑播放的伴奏不会发
送到电脑直播间。

⑫ 降噪按键:循环点按降噪按键,开启或关闭降噪功能。开启降噪时,指示灯长亮
橙灯,可以自动屏蔽麦克风对环境噪声的拾取。关闭时,指示灯熄灭;
⑬ 闪避按键:循环点按闪避按键,开启或关闭闪避效果。开启闪避时,指示灯长亮
白灯,说话背景音乐会自动压低音量。关闭时,指示灯熄灭;
⑭ 伴奏音量旋钮:顺时针旋转增加伴奏音量,反之减少伴奏音量;
说明:伴奏音量旋钮只控制通过蓝牙及Φ3.5MM伴奏接口的方式连接的设备所播
放的音量大小,对于通过USB接口及Φ3.5MM手机接口的方式连接的设备所播放
音量不起作用。当直播或播放设备(如电脑或手机)通过USB接口及Φ3.5MM手机
接口的方式连接声卡时,需要在电脑或手机端调整播放音量大小。
⑮ 麦克风音量旋钮1/2:分别控制两路麦克风音量。顺时针旋转增加麦克风音量,
反之减少麦克风音量;
⑯ 耳机音量旋钮1/2:分别控制两路耳机音量。顺时针旋转增加耳机音量,反之减
少耳机音量;
⑰ 高/低音旋钮:调节麦克风高、低音。调到中间档为平衡状态,从中间开始顺时针
旋转增加高音,从中间开始逆时针旋转增加低音;
⑱ 混响量旋钮:顺时针旋转增加麦克风混响量,反之减少麦克风混响量;
⑲ 电音速度旋钮:在电音效果开启的状态下,顺时针旋转增强电音强度,反之减少
电音强度;电音效果关闭状态下,该旋钮不起作用。
⑳ 变声量旋钮:调到中间为正常状态,从中间顺时针旋转使变声效果变得尖锐,从
中间逆时针旋转使变声效果变得低沉;

Summary of Contents for MX1 Pro

Page 1: ...MixerWebcastSoundCard UserManual...

Page 2: ...01 2 2 3 3 3 4 4 4 4 5 9 10 13 20 22 23 23 24 1 2 4 Content 25 49...

Page 3: ...02 MX1 Pro 400 6828 333 K DSP OTG USB 8 2...

Page 4: ...03 MX1 PRO 1 C2 5 OTG 1 1 1 6 35mm 2 1 K APP APP iOS Android windows...

Page 5: ...04 USB2 0 48KHz 16bit 20Hz 20KHz 3dB THD 0 5 1KHz 167 7mW 32 90dB A Weighted DSP Reverb 12 Autotune EQ 490g 2 3 5mm 3 5mm 1 XLR 6 35mm 2 3 5mm 2 6 35mm Type C DC 5V 1 5A 4400mAh 5 8 48V 6 48V...

Page 6: ...05 25 2 48V 48V 48V 48V...

Page 7: ...06 8 6 2 A B 12 C D D E E F G G A A B B...

Page 8: ...07 3 5MM USB 3 5MM USB 3 5MM 1 2 1 2...

Page 9: ...08 1 1 XLR 6 35mm 48V XLR 2 3 5mm 1 2 K Type C C2 5 OTG...

Page 10: ...09 C2 5 OTG 3 5mm 3 5mm...

Page 11: ...10 1 2 48V 48V 48V 3 3 5mm 6 35mm 4 3 5mm Type C Type C A Type C C2 5 OTG C2 5 OTG Type C C2 5 OTG C2 5 OTG...

Page 12: ...11 B 3 5mm 3 5mm 3 5mm 3 5mm OTG OTG 5 USB 6 3 5mm A 3 5mm 3 5mm 3 5mm OTG OTG B TAKSTAR MX1 Pro 7...

Page 13: ...12 K K 8 9 10 1 USB 2 3 5V 1A 5...

Page 14: ...13 MX1 PRO TAKSTAR MX1 Pro Audio Windows10 MAC OS Windows10 1 2...

Page 15: ...14 3 4 100...

Page 16: ...15 5 6 TAKSTAR MX1 Pro Audio...

Page 17: ...16 7 TAKSTAR MX1 Pro Audio 100 8 QQ TAKSTAR MX1 Pro Audio TAKSTAR MX1 Pro Audio...

Page 18: ...17 9 A A 1 MX1 Pro 2 A B A B A A...

Page 19: ...18 B 1 F3 2...

Page 20: ...19 MAC OS 1 C2 5 OTG Type C C2 5 OTG USB 2 3 TAKSTAR MX1 Pro Audio 100...

Page 21: ...20 4 TAKSTAR MX1 Pro Audio 100 iOS 1 C2 5 OTG 2 3 TAKSTAR MX1 Pro Audio...

Page 22: ...21 Android OTG OTG OTG OPPO VIVO OTG...

Page 23: ...22 1 2 3 4 5 6 7 8...

Page 24: ...23 WEEE 2012 19 EU WEEE https www takstar com...

Page 25: ...24...

Page 26: ...patibility 27 Speci cations 28 Sound card speci cation 28 Battery speci cation 28 Connector speci cation 28 Function instructions 28 Operation instructions 33 I Operating Steps 34 II Computer Settings...

Page 27: ...to meet the voice characteristics of di erent people OTG function for the MX1 Pro sound card to connect with a mobile phone via USB to realize high de nition lossless recording and webcast Colorful an...

Page 28: ...cable 1 pc Stream audio cable 1 pc Computer data cable 1 pc 6 35mm adapter 2 pcs User manual 1 pc Cell phone Tablet PC Karaoke webcast recording Suitable for a variety of entertainment webcast APPs a...

Page 29: ...nnector Cell phone connector 2 3 5mm Accompaniment connector 3 5mm Microphone connector 1 XLR 6 35mm Microphone connector 2 3 5mm Headphone connector 2 6 35mm Data Connector Type C connector Note The...

Page 30: ...ged in time When the sound card is charging the four bars light up one by one when fully charged all four bars light up Power button Long press it for two seconds to turn on or o the sound card The po...

Page 31: ...long press the button and the microphone is muted when you hear a beep sound The beep sound stops when you release the button and the microphone picks up sounds again Lighting control button Press it...

Page 32: ...to increase the accompaniment volume and turn it counterclockwise to decrease the accompaniment volume Note The MUSIC VOL knob controls only the playback volume of the device connected via Bluetooth a...

Page 33: ...rts in the middle position Turn it clockwise starting in the middle position to sharpen the voice and turn it counterclockwise starting in the middle position to deepen the voice Microphone connector...

Page 34: ...via two cell phones or two tablets Type C interface Connect to a computer using the computer data cable or to a smartphone using the C2 5 OTG data cable for plug and play use For details refer to the...

Page 35: ...o be connected to the mic interface marked with 3 To connect a pair of headphones if the headphone plug is 3 5mm use the supplied 6 35mm adapter 4 To connect a mobile phone for live stream there are t...

Page 36: ...Connect via the supplied audio cable with one end hooked up to the interface marked with on the sound card and the other end to the 3 5mm interface of your phone If your phone does not have a 3 5mm in...

Page 37: ...ic instrument and headphones to their appropriate levels respectively as their sensitivity and impedance vary and thus require di erent volume levels As for the appropriate range consult a professiona...

Page 38: ...ended to fully charge it if it is not used for a long time charge the sound card once every six months to avoid over discharge of the battery and avoid a ecting the battery performance II Computer Set...

Page 39: ...2 Select Sound Control Panel to enter the Sound setting dialog 3 Select Record tab in the Sound dialog and set the Stereo Mix device as the default device 38 Mixer Webcast Sound Card...

Page 40: ...enter the stereo mix properties select Level tab and adjust the recording volume to 100 as shown below 5 Select Listen tab in the Stereo Mix Properties dialog uncheck Listen to this device if not yet...

Page 41: ...dio as the default device as shown below 7 Double click TAKSTAR MX1 Pro Audio to enter the playback properties select Level tab and adjust the playback volume to an appropriate volume It is recommende...

Page 42: ...sic playback to your broadcast simply set TAKSTAR MX1 Pro Audio as the output device You can then disable loopback mix to stop sending the music playback whenever necessary or use the ducking function...

Page 43: ...nect to a computer via a Type C data cable and open the software for customizing host e ects on the MX1 Pro sound card 2 Right click the Entry sound e ect select Loading a device and then there are tw...

Page 44: ...try sound e ect you can do the following 1 Right click the Entry sound e ect and select the Set a hotkey option if the sound e ect has been set with a shortcut key select Modify a hotkey press the cor...

Page 45: ...f the sound card and then the C2 5 OTG cable plug marked with to the Apple computer use supplied Type C cable if the computer uses USB A port and the Apple computer will automatically install the driv...

Page 46: ...input device and drag the Input Volume to 100 4 In the Output tab select TAKSTAR MX1 Pro Audio as the sound output device and adjust the Output Volume to an appropriate volume It is recommended to adj...

Page 47: ...t a phone for live stream 2 Swipe down or up the screen of your phone and the setting page will appear then click the window with the icon in the upper right corner 3 In the dialog that appears check...

Page 48: ...not work with certain smartphone models or apps due to incompatibility issues which is not a quality issue Please con rm with your device manufacturer on whether your device supports OTG function For...

Page 49: ...time Avoid getting close to re rain water excessive collision throwing vibrating the machine and covering the ventilation holes during use so as not to damage its function 4 This product must not be e...

Page 50: ...e to the e ective use of natural resources For more information on where you can place your waste recycling equipment please contact your local City O ce Waste Management Bureau or Household Waste Tre...

Page 51: ......

Page 52: ...CMIIT ID 2021DP10308 Made in China...

Reviews: