


29
Mixer Webcast Sound Card
Battery Type: Li-ion battery
Charging: DC 5V 1.5A
Battery Capacity: 4400mAh
Charging Time:approx. 5h
Operation Time: approx. 8h(when 48V
is turned off)
approx. 6h(when 48V is turned on)
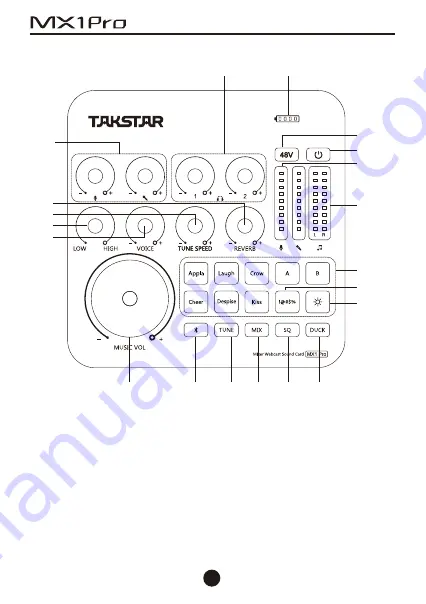
■ Function instructions
① Battery LED: The battery icon has four bars with each bar representing 25%
power. When there is only one bar left, the battery LED lights up red, indicating
that the sound card has insufficient power and needs to be charged in time.
When the sound card is charging, the four bars light up one by one; when fully
charged, all four bars light up.
② Power button: Long press it for two seconds to turn on or off the sound card.
The power LED lights up blue when the sound card is turned on and lights off
when the sound card is turned off.
③ 48V switch: Press it to turn on or off the 48V power supply. The 48V LED lights
up blue when the 48V switch is turned on and lights off when the 48V switch is
turned off.
④ Microphone volume LEDs: Display the microphone volume. During webcast,
microphone volume LEDs light up dynamically based on the microphone volume.
⑤ Accompaniment volume LEDs: Display the accompaniment volume. During
webcast, accompaniment volume LEDs light up dynamically based on the
accompaniment volume.
⑥ Host special effects: There are totally 8 host special effects, six of which are
fixed, including applause, laugh, crow, cheer, despise, and kiss. The other two
effects of A and B are user-defined and subject to change based on personal
preference. The methods of changing effects are written in details at the part of
"Customizing host effects" on the user manual. The special effect starts to play
when the corresponding button is pressed, and stops playing when the button is
pressed again.
⑦ " " Voice shielding button: When you do not want the other side to hear
what you are saying, you can long press the button, and the microphone is muted
when you hear a "beep" sound. The "beep" sound stops when you release the
button, and the microphone picks up sounds again.
⑧ " " Lighting control button: Press it to switch between multiple lighting
modes: 7-Colors Cycle Mode, 7-Colors Constant Light Mode, 7-Colors Breathing
Mode, etc.
⑨ Bluetooth button: Press it to turn on or off the Bluetooth function. For the methods
of Bluetooth pairing, please refer to the "Bluetooth pairing" on the user manual.
⑩ TUNE button: Long press it to turn on or off the autotune function. When the
autotune function is on, the TUNE LED lights up red; when the autotune function
is off, the TUNE LED lights off. At the state of autotune, press the button to switch
between the 12 autotunes with voice prompts. They are C, Db, D, Eb, E, F, F#, G,
Ab, A, Bb, B.
⑪ MIX button: Press it to turn on or off the mixing function. When the mixing
function is on, the MIX LED lights up, and the music played on the computer can
be sent to the webcast room; when the mixing function is off, the MIX LED lights
off, and the music played on the computer cannot be sent to the webcast room.
Note: When using the sound card in the free chatting mode of the webcast
platform, please turn off the mixing function, otherwise there will be two sounds
when people in the webcast room speak. Please turn on the mixing function in
other modes, otherwise the accompaniment music played on the computer will
not be sent to the webcast room.
⑫ SQ button: Press it to turn on or off the noise reduction function. When the
noise reduction function is on, the SQ LED lights up orange, and it helps to
prevent the microphone from picking up ambient noise; when the noise
reduction function is off, the SQ LED lights off.
⑬ DUCK button: Press it to turn on or off the ducking function. When the ducking
function is on, the DUCK LED lights up white, and the background music will be
lowered automatically when people speak; when the ducking function is off, the
DUCK LED lights off.
⑭ MUSIC VOL knob: Turn it clockwise to increase the accompaniment volume
and turn it counterclockwise to decrease the accompaniment volume.
Note: The MUSIC VOL knob controls only the playback volume of the device
connected via Bluetooth and a Φ3.5mm accompaniment connector but not that
of the device connected via a USB connector and a Φ3.5mm cell phone
connector. When a live streaming device or a playback device (a computer or a
cell phone) is connected to the sound card via a USB connector and a Φ3.5mm
cell phone connector, the playback volume needs to be adjusted on the
computer or the cell phone.
⑮ MIC VOL knobs 1/2: Control two ways of microphone volume respectively. Turn
it clockwise to increase the microphone volume and turn it counterclockwise to
decrease the microphone volume.
⑯ Headphone VOL knobs 1/2: Control two ways of headphone volume
respectively. Turn it clockwise to increase the headphone volume and turn it
counterclockwise to decrease the headphone volume.
⑰ HIGH/LOW knob: Adjust the treble and bass of microphones. It starts in the middle
position. Turn it clockwise starting in the middle position to increase the treble and
turn it counterclockwise starting in the middle position to increase the bass.
⑱ REVERB knob: Turn it clockwise to increase the microphone reverb and turn it
counterclockwise to decrease the microphone reverb.
⑲ RETUNE SPEED knob: When the auto-tuning function is on, turn the knob
clockwise to strengthen the auto-tuning effect and turn it counterclockwise to
weaken the auto-tuning effect; when the auto-tuning function is off, the knob
doesn't work.
⑳ VOICE knob: It starts in the middle position. Turn it clockwise starting in the
middle position to sharpen the voice and turn it counterclockwise starting in the
middle position to deepen the voice.
㉑ Microphone connector 1: One combined connector with XLR and Φ6.35mm.
When the connected microphone needs 48V phantom power supply, please use
the balanced XLR connector.
㉒ Microphone connector 2: Connect to a microphone with a Φ3.5mm connector
(a dynamic microphone or a power-free condenser microphone).
㉓ Headphone connector: Connect to headphones or active speakers.
㉔ Accompaniment connector: Connect to external audio equipment via an
accompaniment cable, making it convenient to play accompaniment during the
webcast.
㉕ Cell phone connectors 1/2: Connect to the cell phone or tablet for webcast or
Karaoke via an audio cable. Two cell phone connectors are available for the
simultaneous webcast via two cell phones or two tablets.
㉖Type-C interface: Connect to a computer using the computer data cable or to a
smartphone using the C2-5 OTG data cable for plug-and-play use. For details,
refer to the "Operation instructions" in the user manual.
②
①
③
④
⑤
⑨
⑩ ⑪
⑫
⑬
⑥
⑭
⑮
⑯
⑱
⑲
⑰
⑳
⑦
⑧
Summary of Contents for MX1 Pro
Page 1: ...MixerWebcastSoundCard UserManual...
Page 2: ...01 2 2 3 3 3 4 4 4 4 5 9 10 13 20 22 23 23 24 1 2 4 Content 25 49...
Page 3: ...02 MX1 Pro 400 6828 333 K DSP OTG USB 8 2...
Page 4: ...03 MX1 PRO 1 C2 5 OTG 1 1 1 6 35mm 2 1 K APP APP iOS Android windows...
Page 6: ...05 25 2 48V 48V 48V 48V...
Page 7: ...06 8 6 2 A B 12 C D D E E F G G A A B B...
Page 8: ...07 3 5MM USB 3 5MM USB 3 5MM 1 2 1 2...
Page 9: ...08 1 1 XLR 6 35mm 48V XLR 2 3 5mm 1 2 K Type C C2 5 OTG...
Page 10: ...09 C2 5 OTG 3 5mm 3 5mm...
Page 13: ...12 K K 8 9 10 1 USB 2 3 5V 1A 5...
Page 14: ...13 MX1 PRO TAKSTAR MX1 Pro Audio Windows10 MAC OS Windows10 1 2...
Page 15: ...14 3 4 100...
Page 16: ...15 5 6 TAKSTAR MX1 Pro Audio...
Page 17: ...16 7 TAKSTAR MX1 Pro Audio 100 8 QQ TAKSTAR MX1 Pro Audio TAKSTAR MX1 Pro Audio...
Page 18: ...17 9 A A 1 MX1 Pro 2 A B A B A A...
Page 19: ...18 B 1 F3 2...
Page 20: ...19 MAC OS 1 C2 5 OTG Type C C2 5 OTG USB 2 3 TAKSTAR MX1 Pro Audio 100...
Page 21: ...20 4 TAKSTAR MX1 Pro Audio 100 iOS 1 C2 5 OTG 2 3 TAKSTAR MX1 Pro Audio...
Page 22: ...21 Android OTG OTG OTG OPPO VIVO OTG...
Page 23: ...22 1 2 3 4 5 6 7 8...
Page 24: ...23 WEEE 2012 19 EU WEEE https www takstar com...
Page 25: ...24...
Page 51: ......


