background image

11

protective hood closes automatically when the 
tool arm is swung upwards.

Assembly

Note:

A second person is required for unpacking and 
assembling the saw.

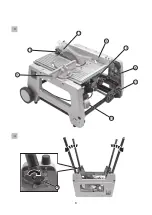
Folding out the supporting legs

• P. 5, item 4

 P

lace the product with saw bench downwards 

on  an  even  and  adequately  load-bearing 
surface.
– Fold out the supporting legs as illustrated.

– Tighten the Tommy screws (25).

Setting up the product

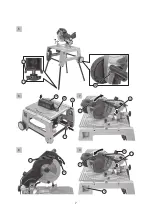
• P. 6, item 5

– Turn the product over and place on an even 
and adequately load-bearing surface.
–  Undo  the  adjusting  screw 

(26)

  until  the 

product  is  standing  securely  and  does  not 
wobble.

– Tighten screw using counternut (27).

Attaching the wheels

• P. 6, item 5

– Tightly fasten the wheels to the product using 

hex nuts (28) as illustrated.


Turn the saw bench over
DANGER!
Risk of injury due to accidental switch-on!

Disconnect the mains plug before carrying out 
any work on the device.

WARNING!

Risk of crushing!

A risk of being crushed when turning the bench 
saw over! Do not reach between bench
saw and side parts!
Hold the bench

 fi

rmly so that it cannot suddenly 

turn back over!
Make sure that the saw bench is adequately 
locked to prevent accidental fold over!

Turning over into crosscut saw position

DANGER!
Risk of injury!

When used as a crosscut and mitre saw

,

 the 

saw blade when sawing protrudes below
the saw bench during the sawing operation. 
The protective box must always be attached.

• P. 6, item 6
– Attach the hand wheel (21).

– Rotate saw blade fully downwards.
– 

P

osition the protective box 

(24)

 on the saw 

bench as illustrated and tighten using screw 

(29).

– Actuate the release lever 

(8)

 and carefully 

turn over the saw bench.
– Allow the saw bench to securely engage.

• P. 6, item 7
– Gently push tool arm (3) downwards.

– Remove the safety bolts 

(12)

 and lock by 

turning clockwise.
– Slowly guide the tool arm upwards.
– Attach the dust bag to the swarf remover 

(13) 

or connect a swarf extractor.

Note:

The use of a swarf extractor is recommended 
when processing larger volumes.

Summary of Contents for TKFOS-10-A

Page 1: ......

Page 2: ...n recuperador de polvo 9 Seleccione las hojas adaptadas al material a cortar 10 Tome todas las precauciones necesarias cuando haga muescas 11 Despu s de que la maquina haya sido puesta bajo tensi n NO...

Page 3: ...ra del alcance de los ni os No fuerce la herramienta Funcionara mejor y de forma mas segura a la velocidad para la que esta dise ada Use la herramienta adecuada No fuerce las herramientas o accesorios...

Page 4: ...ra pieza esta da ado antes de seguir usando la herramienta rev selo con gran atenci n y compruebe si funciona correctamente seg n el uso al que esta destinado Compruebe la alineaci n de las piezas m v...

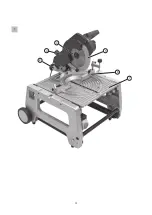
Page 5: ...4 5 3 4 6 2 7 1...

Page 6: ...5 8 9 10 11 12 13 14 2...

Page 7: ...6 15 16 17 18 19 20 21 22 3 25 4...

Page 8: ...7 27 26 28 5 29 8 21 24 6 12 3 7 16 30 8 12 13 3 8 9...

Page 9: ...8 21 17 31 10 6 14 32 33 11 21 34 19 20 12 36 18 15 35 38 37 13 40 41 4 39 5 11 14...

Page 10: ...ot suitable for commercial or industrial use Any other type of use is inappropriate Improper use or modi cations to the device or the use of components that are not tested and approved by the manufact...

Page 11: ...an extension of your hand and protects you against inadvertent touching of the saw blade The slide rod must always be used if the distance between the stop profile and saw blade is less than 120 mm 16...

Page 12: ...ING Risk of crushing A risk of being crushed when turning the bench saw over Do not reach between bench saw and side parts Hold the bench rmly so that it cannot suddenly turn back over Make sure that...

Page 13: ...e until the bolts 31 audibly engage Attach the dust bag to the swarf cover or connect a swarf extractor Note The use of a swarf extractor is recommended when processing larger volumes Operation Check...

Page 14: ...NOTICE Risk of product damage Press the tool arm onto the workpiece only so that the motor revolutions do not drop too low and does not overload the motor and cause damage P 4 item 2 Push the workpie...

Page 15: ...ANGER Risk of injury The ap of the On Off switch must be always closed even if the operation is interrupted for a short while in order to protect the device against unintentional switching on P 7 item...

Page 16: ...a hot saw blade using ammable liquids Risk of being cut even with a stationary saw blade Wear gloves when changing the saw blade Removing the saw blade P 7 item 14 Press the release button 11 and care...

Page 17: ...wards Transport NOTICE Risk of product damage To transport the saw always fold in the supporting legs and secure the saw to prevent slippage Never raise the product by the saw bench Always use the fra...

Page 18: ...4 3 25 4 mm Saw bench dimensions 510 470 mm Saw bench height 820 mm Weight 24 5 kg Crosscut sawing function Mitre angle horizontal 45 45 Incline angle vertical 0 45 130 68 mm vertical cut Max workpiec...

Page 19: ...18 Despiece Modelo TKFOS 10 A...

Reviews: