NOTE :
NOTE :
NOTE :
2 : Low voltage
3 : Failure to replace
TROUBLE ALARM
NOTE :
1 : Unit trouble
ON
OFF
ON
OFF
120
%
100
%
(
Factory set
)
80
%
60
%
Switch
4・5
1
2
3
4
5
6
FACTORY SET
ALARM CONTACT CHENGEOVER
SETTING OF SENSITIVITY
FINE MOTION DETECTION
Switch
3
ON
N.O.
OFF
N.C.
(Factory set)
Switch 6
ON
Fine motion
OFF
Intruder detection
(Factory set)
■
LED CONTROL
LED CONTROL FUNCTIONS
Wire terminal 6 (L/C) through an external control contact
switch with Power (-).
●
OPERATION
Turn the Mode selector 1 OFF.
When the switch is turned ON, the alarm LED lights at alarm.
When the switch is turned OFF, the alarm LED does not light.
POWER
Signal Input
Contact switch
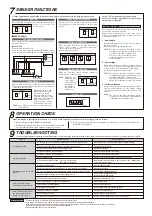
Sensor operation can be adjusted to fit the environmentals / applications with the built-in mode selector.
ALARM LED
ALARM MEMORY
Switch 2
ON
OFF
(Factory set)
Switch 1
ON
OFF
(
Factory set
)
6
6
SENSOR FUNCTIONS
7
The alarm LED will light up, synchronized with the alarm
contact, if you set the mode
selector at ON.
Change alarm contact to N.O. when sensor is used for
an application except security purpose, such as light
control.
Make use of the fine motion detection (motion of
hands or body) at narrow range.
When operation check shows you high sensitivity of
sensor, change setting of sensitivity with mode
selector and re-check operation.
Four settings are available.
This mode is so
sensible to detect
even a slight
motion that the
performance to
discriminate
small animals
might be low.
NOTE : Same LED is used to indicate both alarm and
alarm memory.
Memory LED will inform you which sensor initiated an
alarm during alert conditions when two or more sensors are
connected on the same line.
When this setting is "ON".
Memory is always stored
when sensor is armed.
When an alarm has been
activated, the memory LED
flashes for 3 min. and then
remains lit for 47 min.
It automatically reset and
memory is also canceled.
This function checks / monitors sensor unit itself in
accordance with built-in program.
When trouble is found out as a result of the check /
monitor, alarm LED lights and an alarm signal also
continuously outputs.
Trouble alarm outputs when inner circuit / wiring is
damaged / broken.
See 9, troubleshooting and remedy table.
The monitor functions regardless of mode
settings but an alarm is not indicated in case
of setting alarm LED at OFF position.
When power is reset during the alarm
status, trouble alarm stops only for
warming up time.
When power voltage of sensor drops down (approx.
8.5V DC or less), trouble alarm outputs before sensor
operation comes to be unstable due to low voltage.
See troubleshooting and remedy table.
Trouble alarm outputs to prevent failing to replace
sensor head unit which is set for aiming. Alarm
stops when the sensor head unit is replaced to alert
position.
The monitor functions regardless of mode
settings but an alarm is not indicated in case
of setting alarm LED at OFF position.
When power voltage recovers to normal level
during the alarm status, trouble alarm stops.
The monitor functions regardless of mode
settings, but an alarm is not indicated when
alarm LED is set to OFF position.
MAINTENANCE
Sometimes inactive.
Analyze possible problems according to the following table. If normal operations cannot be restored by this means, contact either the dealer from whom you bought the unit or TAKEX.
Trouble
Possible cause
Corrective action
●
●
●
●
●
●
●
●
●
●
●
●
●
●
●
●
●
●
●
●
●
●
●
●
●
●
●
●
●
●
●
●
●
●
●
●
●
●
●
●
Either power is OFF (including broken cable) or power voltage is too low.
Not yet 1 min. after power turned on. (Is alarm LED flickering ?)
There is an obstacle in front of the detection area.
Check the power cable and adjust power voltage properly.
Allow for warm-up time.
Remove the object.
Improper detection area adjustment.
Improper detection area adjustment .
Readjust the detection area setting.
Readjust the detection area setting.
Cover surface soiled.
Clean cover with a soft cloth. (Do not use thinner, etc.)
Activated when no person has
passed.
Improper power supply.
Correct power supply.
Something moving in protected area or too rapid temperature variations.
Trouble alarm initiated again after warming-up period, though power is reset.
A source of electrical noise (broadcasting station, amateur radio etc.) nearby.
Strong sunlight reflection or direct light hitting the unit.
The detector reacts to passersby outside.
Remove the cause.
Change the installation location.
Change the installation location.
Shield sunrays with a blind.
Readjust the detection area.
Alarm LED lights, though
connected units are inactive.
Poor contact output connection or broken wire.
Check the wiring.
Connected units are damaged.
Check connected units.
Damaged alarm contact.
Check alarm output terminals with tester.
Alarm LED continues to light
and alarm continues to be
initiated. (Trouble alarm)
Head unit fails to be replaced.
Replace to armed position.
Too low power voltage.
Adjust power voltage properly.
There is a possibility of inner broken wire/damage.
To clean the device, use a soft, wet cloth and then wipe off any water drops.
If the device is particularly dirty, dip the soft cloth in the water that contains a weak neutral detergent.
Wipe the device gently with the cloth, then wipe off any detergent that remains. Do not use substances such as thinner or benzene.
(The plastic parts may deform, discolor or change their properties.)
Perform operation checks on a regular basis.
When installation is completed, turn the power "ON" and check operation, after about 1min. warming up time, as follows:
1. Make sure that alarm LED finishes flickering.
2. Walk test in the protected area to check if an alarm is initiated.
Check alarm LED and control panel for sensor operation.
3. After correct operation has been confirmed, use the mode selector switch to disable the
alarm LED, if required.
Reposition so that the range is less than 40ft. (12m) (Wide angle) or
82ft. (25m) (Long range)
The detection range exceeds. 40ft. (12m) (Wide angle)
82ft. (25m) (Long range)
OPERATION CHECK
8
9
TROUBLESHOOTING
Completely inactive.
Built-in CPU automatically checks/monitors
sensor unit function, regardless of mode settings
except a part of features.


