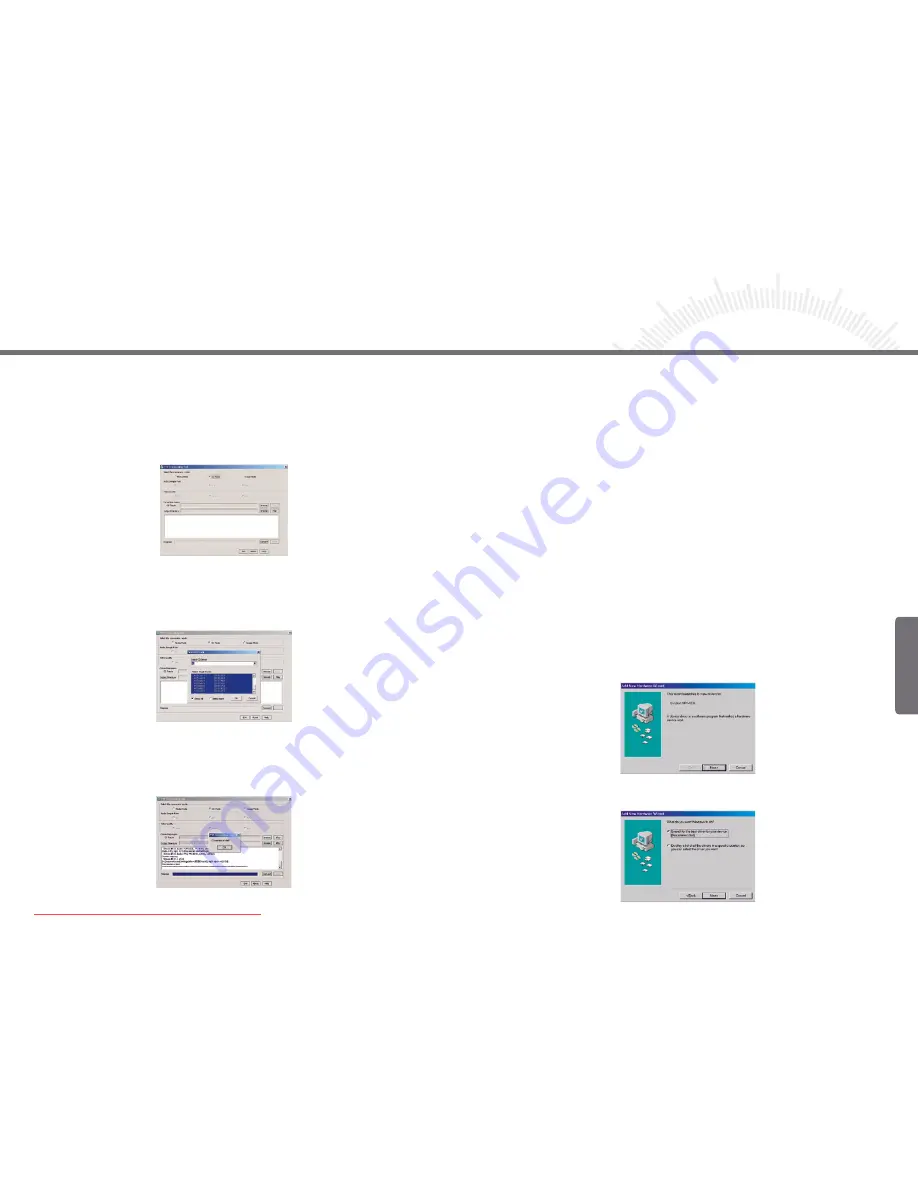
TakeMS CineWalker User Manual Download Page 7

44

45


- Converting Images:


(1) On the bottom Windows taskbar, click “Start” 

 ”Programs” 

→ 

“CineWalker  


      file conversion software” to run the tool.


(2) Select ”Image Mode”.


(3) Click the “Browse” button for the “Input File” field to specify the file that you   


      want to convert. If you want to preview the file, click the “Play” button.


(4) Click the “Browse” button for the “Output File” field to specify where the  


      converted file is output.


(5) Click the “Convert” to start converting.


(6) Wait for the conversion to finish. When you are prompted, click “OK” to finish. 

1.9 Installing Driver (for Windows 98/SE)                              

This device is Plug & Play for Windows 2000, Windows ME and Windows XP. For Windows 
98/SE, you need to install a driver before connecting it to the PC. The driver is provided on the 
driver CD. Please follow these steps to install the driver:
(1) Insert the driver CD into the CD-ROM of the computer.
(2) Power on the device and connect it to the PC.
(3) When you are prompted by the following message, click “Next” to continue.

(4) Select “Search for the best driver for your device (Recommended)” and click “Next” to    
      continue.


- Converting CD tracks


You can convert tracks on a CD to audio files that are supported by the device:


(1) On the bottom Windows taskbar, click “Start” 

 ”Programs” 

→  


“CineWalker file conversion software” to run the tool.


(2) When the following screen appears, select ”CD Mode”.


(3) Click “Browse” button for the “CD Tracks” field to specify the CD that you  


      want to convert. To convert all tracks, select “Select All”. To select tracks from    


      the list, hold down the “Ctrl” or “Shift” key and click the desired tracks. Click  


      “Ok”  after selection.


(4) Click the “Browse” button for the “Output Directory” field to specify where  


      the converted tracks will be saved.


(5) Click “Convert” to start converting.


(6) Wait for the conversion to finish. When you are prompted, click “OK” to finish. 

Chapter 1  Getting Started

Chapter 1  Getting Started

Englisch

Downloaded from ManualMPlayer.com Manuals

Summary of Contents for CineWalker

Page 1: ...32 33 User Guide Englisch Downloaded from ManualMPlayer com Manuals ...

Page 2: ...h memory and can be used as removable disk 6 Voice Recording Records voice input as WAV files 7 LINE IN Encoding Encodes audio source from external audio player such as CD player MD player into MP3 files 8 Games Play Tetris World and Snake games 9 Display pictures on an external monitor such as a TV 10 SD MMC memory card support Access up to 1GB of SD MMC memory card via the card slot Features Engli...

Page 3: ...se it to direct sunlight Back up data frequently in case of accident data loss Keep the player away from strong magnetic fields Keep the device away from water or other liquids In the event that the device is exposed to water or other liquids switch the power off immediately take out the battery and clean the device To avoid corrosion do not use chemical solution to clean the device Clean it with a...

Page 4: ...indows ME etc 1 2 Accessories 1 3 Description of buttons Table of Content USB Cable Audio Video Cable Earphone with neck strap CineWalker file conversion software CD LINE IN Cable DC Adapter Rechargeable Lithium Battery Carrying Case Warranty Card User Manual 1 3 Description of buttons a USB Port Connect to USB cable b Memory Card Slot Insert SD MMC card c Power Jack Connect to DC adapter d Power S...

Page 5: ...converted 1 4 Installing the battery The device comes with a rechargeable lithium ion battery Please install the battery as shown below 1 Press the point embossed with an arrow sign and slide the battery cover as shown below to remove it 2 Place the battery into the battery compartment making sure it is correctly aligned 3 Close the battery cover 1 5 Using the DC adapter 1 5 1 To charge the batter...

Page 6: ...column set the audio quality The higher the sample rate the better the audio quality will be in the Video Quality column set the video quality Higher quality needs more storage space 6 Click Convert to start converting 7 Wait for the conversion to finish When you are prompted click OK to finish finish Category File Type Convertible Video mov Yes Some mpg Yes avi Yes asf Yes wmv Yes Some rm No Image j...

Page 7: ...er 2 Power on the device and connect it to the PC 3 When you are prompted by the following message click Next to continue 4 Select Search for the best driver for your device Recommended and click Next to continue Converting CD tracks You can convert tracks on a CD to audio files that are supported by the device 1 On the bottom Windows taskbar click Start Programs CineWalker file conversion software ...

Page 8: ...ut port and a video output port With these ports you can connect the device to a TV and display pictures on the TV screen Follow these steps to connect the device to a TV 1 Power on the device 2 Remove the audio video cable from the package Connect the end with two connectors to the device connecting the yellow connector the Line in jack to the video port and the black connector the earphone jack ...

Page 9: ...ideo Out and press the PLAY NAVI button to confirm 5 Move the PLAY NAVI button up or down to select TV PAL or TV NTSC depending on the TV video standard and press the PLAY NAVI button to confirm When the settings have been adjusted as shown above the operating window will be transferred to the TV screen You can use the keys to operate the device and view the result on the TV screen Note To leave TV ...

Page 10: ...ideo mode you can play delete or manage ASF video files 1 When you enter Video mode move the PLAY NAVI button to select the video that you want to play 2 Press the PLAY NAVI button to play the selected video During playback you can Adjust Volume Move the PLAY NAVI button up and down Play the previous video Move the PLAY NAVI button left Play the next video Move the PLAY NAVI button right Fast forwa...

Page 11: ...liser setting is only available in Music mode There are six EQ modes for you to choose from Normal Classical Pop Rock Jazz and Bass The EQ mode can be set as follows 1 On the playlist screen press the MENU key to show the menu 2 Move the PLAY NAVI button up and down to select EQ Mode 3 Move the PLAY NAVI button left to show options 4 Press the PLAY NAVI button to confirm 6 Move the PLAY NAVI button...

Page 12: ...t select the recording that you want to play 3 Press the PLAY NAVI button to play the recording To delete a recording see the steps in the 2 4 5 Delete Track section Note Make sure the device has enough power to record If the device shuts down abruptly during recording the recorded content will not be saved 2 4 4 Setting Play Mode This option provides four play modes to play all music files Rep One...

Page 13: ... pause or resume 4 Press the ESC button to end the game 2 6 PHOTO In the PHOTO mode you can view and manage photos and still images On the main menu select PHOTO and press the PLAY NAVI button to use the photo viewer 2 6 1 Browse Photos Images 1 When you enter PHOTO mode thumbnails of all images will be displayed 2 Move the PLAY NAVI button to select photo image 3 Press the PLAY NAVI button to blo...

Page 14: ...ght to switch Off and On 3 Press the ESC button to return Language Sets the display language 1 Move the PLAY NAVI button up and down to select option 2 Press the PLAY NAVI button to confirm Default Restores default system settings 2 Move the PLAY NAVI button left to select YES 3 PLAY NAVI button left to select YES 3 Press the PLAY NAVI button to confirm 2 8 ACCESSORIES 2 8 1 Calendar Move the PLAY N...

Page 15: ...ted correctly The DC adapter is not properly connected Charge the battery Reinsert the battery Reconnect the DC adapter The player cannot be switched on even when the battery is replaced The FAT table in the flash memo ry may be corrupted if it has been exposed to a strong mag netic field or static electricity or if it has been unplugged incorrectly Other unknown Please contact your vendor for help ...

Page 16: ...files to MP3 Otherwise these files cannot be played or viewed If you delete the DCIM or MP3 folder accidentally please recreate it or restart the device For WMA track ID3 information such as artist and album is not displayed For MP3 tracks the ID3 information should be no longer than 15 characters For WMA tracks please ensure that the bit rate is between 32kbps and 160kbps When the battery level is ...

Reviews: