background image

10

The setup menu in your TAGARNO FHD microscope provides you
with 2 entrances to setup your microscope exactly as you like it.


Access the Setup menu by holding the round center


button on the XPLUS FHD control box until the Setup menu  


appears.

The Setup menu contains 5 submenus: 

1. Camera settings   

2. General settings 

3. Applications  

4. Information

5. On/off


To navigate in the set-up menu, use the multi function


buttons on the control box.


When applicable, sliding the button to the right, will activate  


the feature. Sliding the button left will deactivate the  


functionality.

Exit setup menu

You can always exit the setup menu by pressing the center button on 
the control box for 1 second or by choosing Exit in the Setup menu. 

Same procedure is valid regardless of the menu option accessed. 
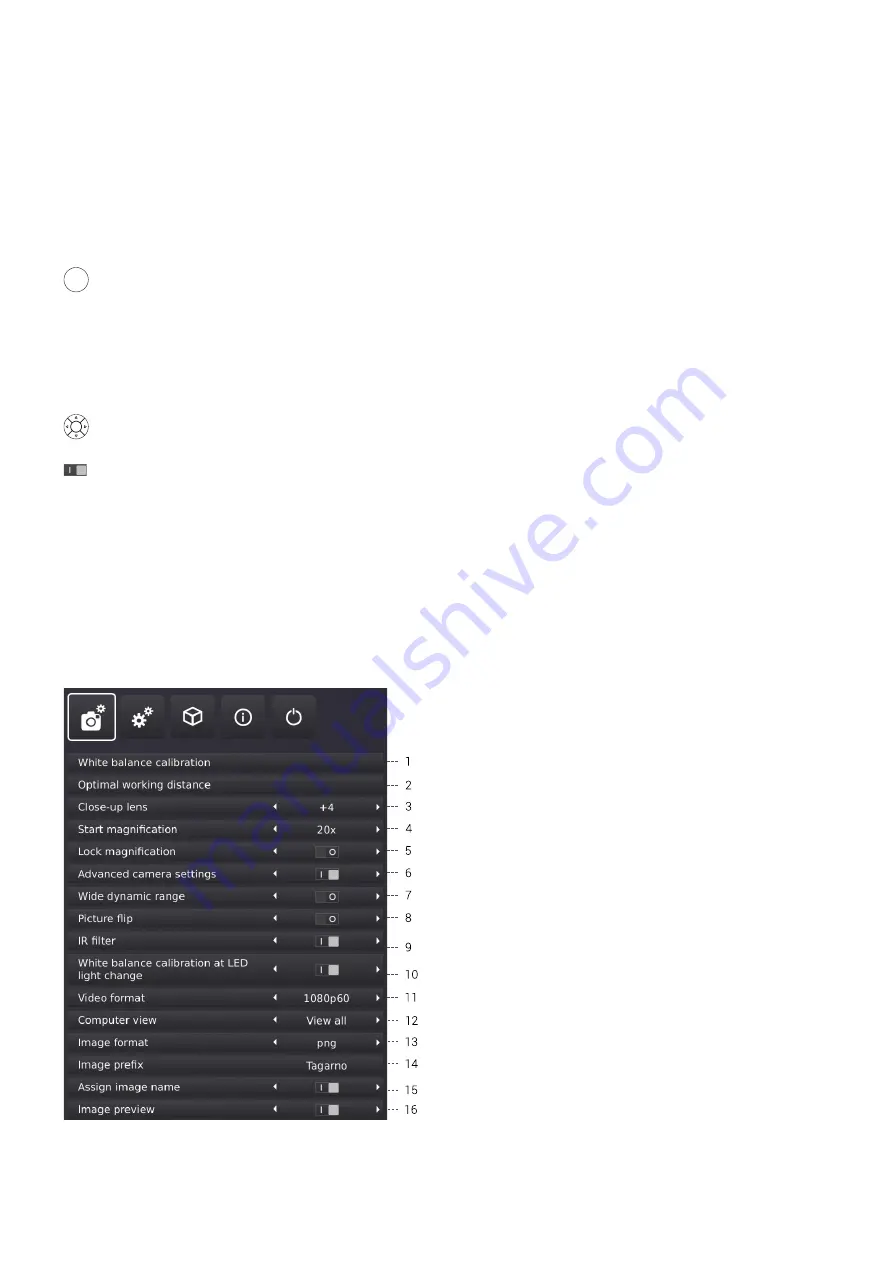


1. CAMERA SETTINGS


1. White balance calibration

Perform an automatic white balance adjustment in order to get
colors displayed correctly on screen. There must be a white object

present in the camera’s field of view when the white balance is being

adjusted. A white balance calibration is made each time the camera
is turned on to adjust to the given light conditions.

NB: If the camera’s field of view does not contain a white object,

when the unit is turned on, the white balance will be incorrect and it
will be necessary to perform the white balance adjustment process
as described previously.

2. Optimal working distance

This setup works in 2 steps and needs to be carried out on a flat 

surface. Follow the on-screen directions to find the optimal working 
distance. The magnification settings prior to performance will be 

restored. 

3. Close-up Lens

Indicate which lens is mounted on your TAGARNO microscope,

to get the right magnification levels displayed in the On Screen

Display when zooming in and out.

4. Start magnification

Choose the start magnification level you want your TAGARNO

microscope to automatically set when turning your system on.

5. Lock magnification

Lock your magnification level, so your microscope is always
working at your start magnification level and you are not able to

manually zoom in/out.

6. Advanced camera settings

When activated, the advanced camera settings can be modified in 

detail for optimum visual inspection result. Deactivated by default. 

7. Wide dynamic range

When this option is selected and auto exposure mode is active, the 
camera uses individual exposure settings for dark and light areas. This 
option can be useful to reduce glare when inspecting reflective objects. 

NB: If the camera live image is grainy, increase Exposure 
compensation in Auto exposure mode.

8. Picture flip

Select if you want to display your image on screen as placed below
the camera or flip it 180 degrees. 

9. IR filter

Turn Infrared filter off when using Infrared ring light. 
To use regular ring lights turn the Infrared filter on.

10. White balance calibration at LED light change

Switch on if you want an automatic white balance calibration to be 
performed when LED light is changed. Deactivated by default. 

Switch off if you do not want an automatic white balance calibration to  
be performed when LED light is changed.

SETUP MENU (1/5)

8.  SETUP MENU

Summary of Contents for FHD PRESTIGE

Page 1: ...SETUP MENU 10 9 STANDARD APPS 15 11 SYSTEM UPDATE 18 12 LICENSE ACTIVATION 20 13 TECHNICAL SPECIFICATIONS 21 14 PC REQUIREMENTS 23 15 MAINTENANCE 24 16 WARRANTY 24 18 ERGONOMIC RECOMMENDATIONS 24 19...

Page 2: ...ways turn off the system before unplugging when possible WARNINGS The product is a digital magnifying system consisting of a camera unit PCBs mechanical parts and a power supply The product is intende...

Page 3: ...ffusor lens kit Fresnel lens kit 100 mm for Lens 1x Plan 4 YOU HAVE RECEIVED Smart guide Camera arm with lens Base Rod washers screw OPTIONS XPLUS FHD control box Power supply USB A B 3 0 cable Hex ke...

Page 4: ...lly and horizontally on top of the base Fasten the two washers with the screw on top of the rod Pull the release button and place the camera arm on the rod The complete microscope with base 5 ASSEMBLI...

Page 5: ...trol box Output 3 3V 6A Max Use only control boxes supplied by TAGARNO 4 Output HDMI Standard Type A Monitor HDMI Out 1080p60 5 Ethernet RJ 45 Ethernet wall socket Ethernet LAN 100BASE TX 1000BASE T 6...

Page 6: ...Power on off Place the camera arm in the appropriate height according to the lens you are using Adjust the friction according to your personal preference 7 OPERATION TIP Find the How to Use tutorial v...

Page 7: ...ou wish to focus on something very close Push this button on the control box to adjust focus if you wish to focus on something that is farther away To turn the autofocus on again simply push both zoom...

Page 8: ...to USB or your microscope internal storage press the image capture button until you hear a beep Long press on the same button will save an image with graphics causing the live image to freeze for a fe...

Page 9: ...e right and left arrows to choose between the different settings in the microscope menu Activate an application or submenu by pressing Enter If you have selected Exit pressing Enter will close down th...

Page 10: ...lat surface Follow the on screen directions to find the optimal working distance The magnification settings prior to performance will be restored 3 Close up Lens Indicate which lens is mounted on your...

Page 11: ...haracters missing in the scanned image name 16 Image preview This feature allows users to quickly inspect and capture images of new samples When an image is captured the default behavior is to preview...

Page 12: ...Japanese Korean Polish Romanian Russian and Spanish 11 Keyboard layout Select your horizontally language by pressing buttons left or right on the XPLUS control box The available languages are listed a...

Page 13: ...top of your live image on screen For more info see manual section STANDARD APPS 4 Watermark Create an info field on captured images with an image prefix time stamp horizontal field of view microscope...

Page 14: ...torage does not currently have this file system use this function to format the USB storage A second pop up will ask you to confirm your selection Please notice that all files on the USB memory stick...

Page 15: ...or cancel an ongoing focus stacking All current settings used during Focus stacking except zoom level are persisted during power down 2 RULER With Ruler you can add vertical and or horizontal rulers i...

Page 16: ...ings at the same time 2 Enable or disable info field Enable or disable an info field automatically stating an image prefix default or as stated under Camera settings time stamp horizontal field of vie...

Page 17: ...ss of method verify that an IP address of the microscope is displayed in the microscope System information If no IP address is stated check that all cables are connected correctly or consult a network...

Page 18: ...k www tagarno com firmware download 2 Download the installation file s to a USB memory stick FAT32 formatted 3 If the file s is in a ZIP folder unzip the files and make sure that only the correct inst...

Page 19: ...m update STEP 5 VERIFY INSTALLATION 1 Verify the system update by checking that the Application version displayed in the Setup menu Info System information matches the version of the system update fil...

Page 20: ...it with a unique license key file To activate a license key on your TAGARNO microscope follow the steps below Note The license can only be paired with the microscope which has the serial number state...

Page 21: ...Monitor Detect Yes Plug connection 2 x USB 2 0 Type A Socket USB 3 0 output Type B Socket Control box D SUB 9 Pin Female ESD Snap Socket 10mm Monitor output HDMI Standard Type A Power supply DC Jack E...

Page 22: ...tor arm Flexarm XPLUS FHD Control box Table mount monitor arm Cleaning kit Foot switch Wall mount monitor arm Dust cover TAGARNO Ring light White Circular tilting table Coaxial light TAGARNO Ring ligh...

Page 23: ...Vidia GeForce GT 740M with 2GB RAM Monitor resolution 1920x1080 FULL HD 1080P 25 30HZ OS Desktop Laptop Windows 7 8 or 10 with DirectX 11 Memory 4GB CPU Intel Core Dual 3 0GHz or i3 2 4GHz 4th generat...

Page 24: ...will be free from defects in material and workmanship for a period of 24 months 2 years from date of invoice from Supplier This warranty covers a The replacement of defective parts b All labour costs...

Page 25: ...PTION TAGARNO A S hereby declares that the product listed above consisting of a camera unit and a 12V power supply is in compliance with the following European directives 2006 25 EU 2014 30 EU 2014 35...

Page 26: ...ncy energy and if not installed and used in accordance with the instruction manual may cause harmful interference to radio communications Operation of this equipment in a residential area is likely to...

Reviews: